 The kitchen is clean the family is gone...it's time to sew! Bring in the holidays by sewing something new for you or someone you love. All patterns are 25% off through Monday November 27th. Use the code: THANKFUL
Enjoy!
1 Comment
 I'm channeling my inner 70's with this new addition to my closet. This is my Bronte Top by designer Jennifer Lauren Handmade and she got it on the mark with this pattern! It's fun, cute, EASY and retro 70's. I only wish I had a pair of my old Dittos to wear it with.
Jennifer Lauren is a fellow designer at Upcraft Club and Indiesew and her designs have a vintage and feminine vibe but are also very wearable. This is my first one and I am completely impressed! I used a Liberty knit I picked up from The Fabric Store in LA and used vintage buttons from my stash. If you're afraid to make a t-shirt, I would encourage you to try this one. The neckband is super easy (even though it looks hard) and the sleeve went right in. You can do this!  I plan on making another one soon but I've used every knit in my stash. Are you proud of me? With a pat on the back I'm headed out to the fabric store. More makes to come soon!
 It's a 3-day weekend which means there's more time to sew! Let's celebrate with 25% off all PDF patterns in the store now through 9/5/17. That means all patterns are only $7.50! Use coupon code "WEEKEND" for the discount.
Sew away the weekend and enjoy! The Georgia Top is one of those patterns you can use over and over (and it's on sale right now!) I've been inspired by sewists out there that have done some amazing Georgia hacks. This one from Mahlicadesigns is one of my favorites. And this one from That'sSewAmy is a don't miss. I've said it before, I love nothing more than seeing someone get creative with one of my patterns. I thought I'd show you how to take the simple Georgia pattern and make it up in three VERY different tops.  This is Georgia in a cold shoulder version. I made this so quick I sewed it in the morning and wore it to work in the afternoon. Check out the blog post on how I did it.  Here's Georgia View A in her purest form straight out of the package. An adorable easy to wear dolman sleeve top in a black and mint green rayon stripe knit.  Georgia isn't just for knits but also for wovens. I took this dreamy Anna Sui cotton/silk vintage print and made it up adding a bias neck binding, pintucks and a keyhole neck. I have all the details in this post.
I have a Georgia Pinterest page with even more ideas. I'd love to see your makes! Send me pics! The Georgia Top pattern is 25% now through July 4th! Enjoy!  The newest addition to the Blue Dot Patterns Collection is the Ally Skirt PDF Pattern! It's now available on the BDP website! To celebrate the new release, it's on sale for 30% off....just $7.00. Ally has length and pocket options and best of all, it sews up really quick 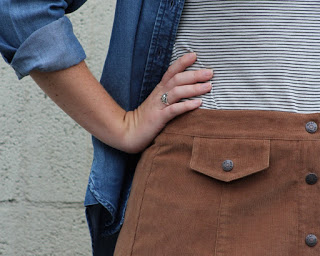 Head on over to the website and check it out!
 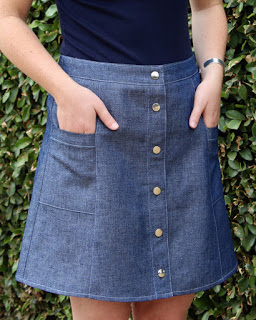 The Ally Skirt is a 6 gore skirt with 2 length options, button front, topstitching and flap or pocket option (because we love our pockets!) Instructions include directions for a custom fit. View A is above the knee a with flap and has a finished length of 17 1/2". View B is knee length with an inset patch pocket and finishes at 22 1/2”. This pattern is designed for the beginning/intermediate sewer.  She doesn't take much fabric and is a really quick sew. Ally is a great way to add to your wardrobe. I hope it becomes one of your TNT patterns.  Upcraft Club is doing an exclusive release today so head on over and take a look!
The pattern will be available on the Blue Dot Website on June 3rd. I hope you like it! 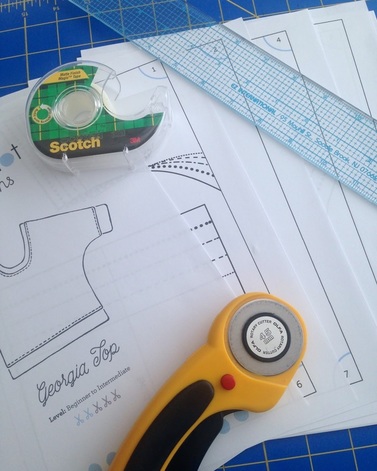 There's nothing like the satisfaction of finding the perfect pattern for that fabric and then realizing you can have it immediately by printing it at home. You find it, buy it, print it and can be sewing in a few minutes! But... taping them together isn't quite as fun. Today I'm sharing the fastest way I've found to tape them together so you can be on your merry (sewing) way. Here's what you'll need: PDF pattern Rotary cutter Ruler Rotary cutting mat Clear tape (matte finish) Step 1: Test Square (don't skip this step) Print the test square provided on the pattern and verify that it's the correct size. In my example, the test square must be 4". If your test square size is incorrect, be sure to go back and make print setting adjustments (setting the printer to "actual" size is the common fix) until it's right on. Once everything is correct, print your pattern. 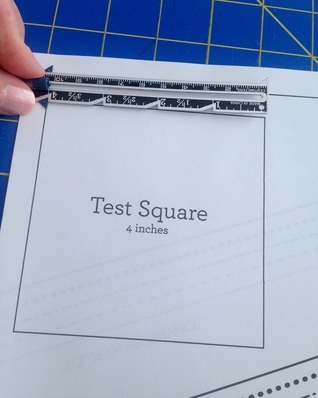 Step 2: Place ruler along the left line of pattern frame and cut off margin using a rotary cutter. Do the same for the bottom margin. 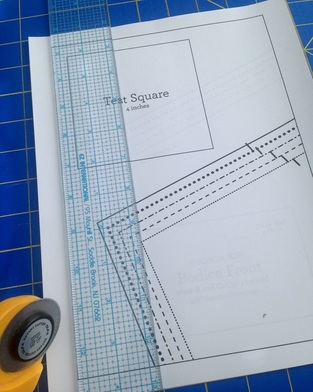 Be sure to leave the top and right sides untouched. Your pattern pieces should look like this: 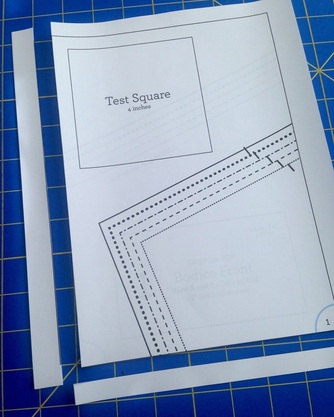 Step 3: Tape pages together Align numbers or markings on the pattern and tape. Because you cut the left margins off already, you simply need to slide the left page under the right. Tape pages together in rows from left to right. 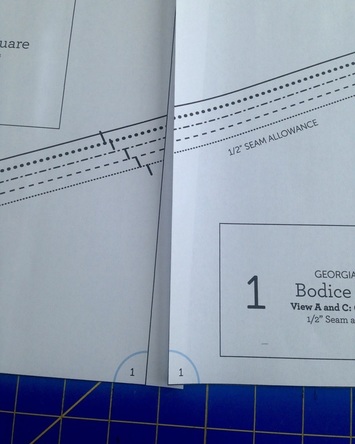 In this example, Blue Dot patterns have both a number and a circle to help make alignment accurate. I tape at all alignment marks and pattern lines to assure my pattern stays together. I use "matte" clear tape because it allows me to use a pencil or pen to make any fitting adjustments.  Step 4: Tape rows together from top to bottom. 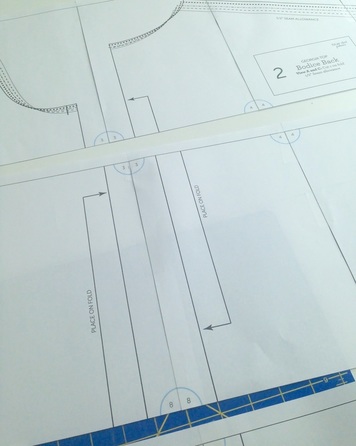 That's it! The rotary cutter saves so much time!
I hope this helps you enjoy your PDF patterns! |

About MeHi! I'm Diane, a wife, mom, sewing teacher and pattern designer from sunny Southern California. I share my sewing adventures here on the Blue Dot Blog formerly Gatorbunnysews. For more info click here. 

Categories
All
Archives
October 2022
|


 RSS Feed
Proudly powered by Weebly