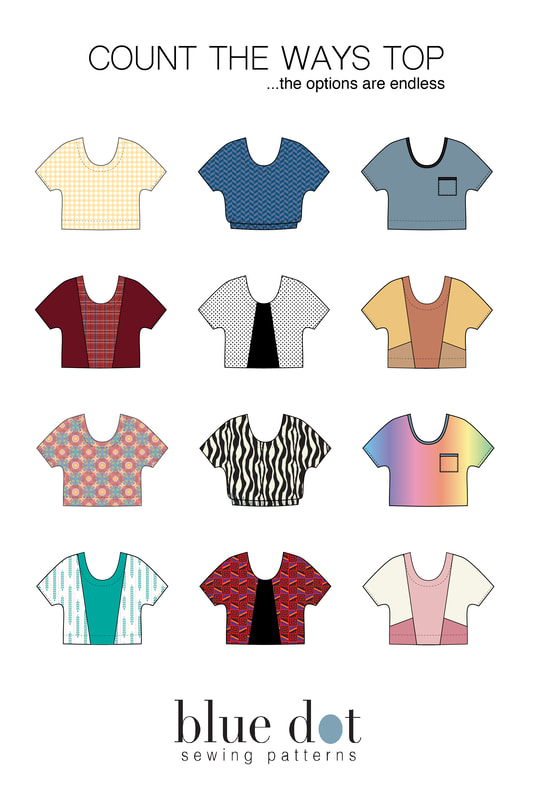
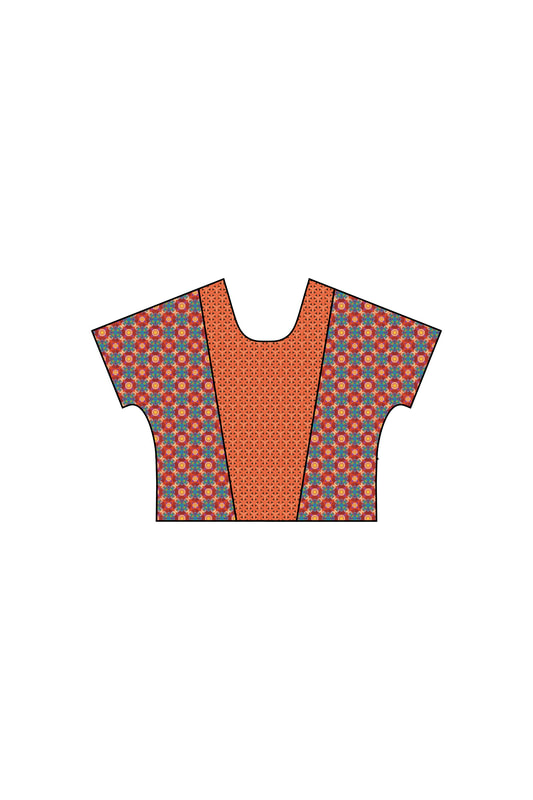
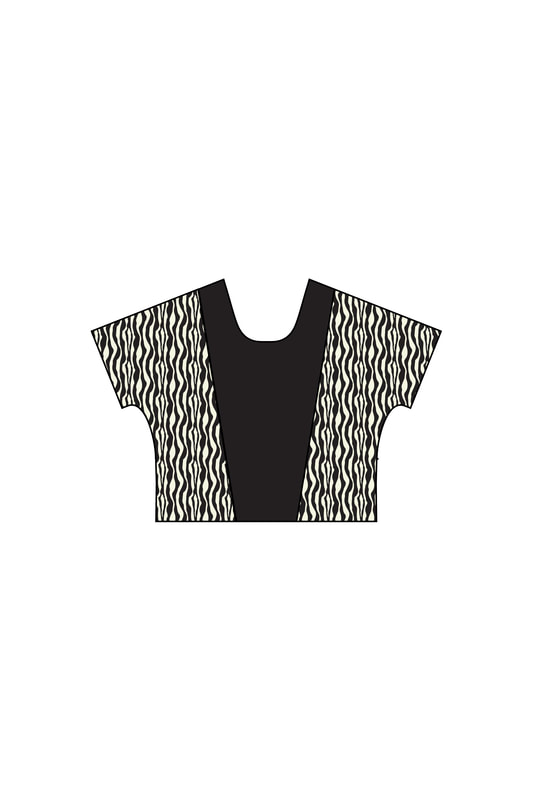
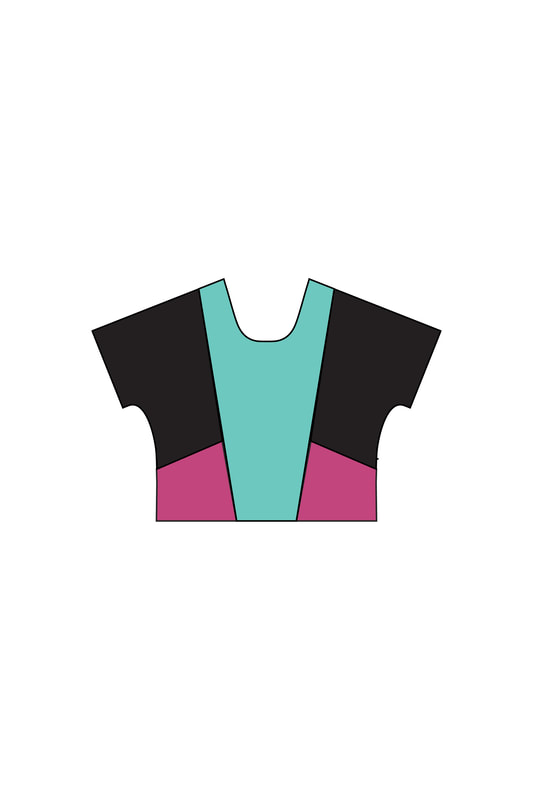
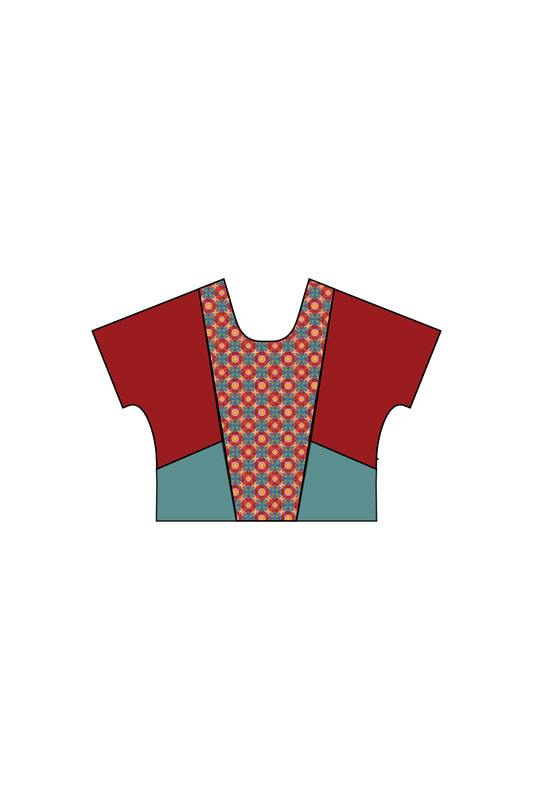
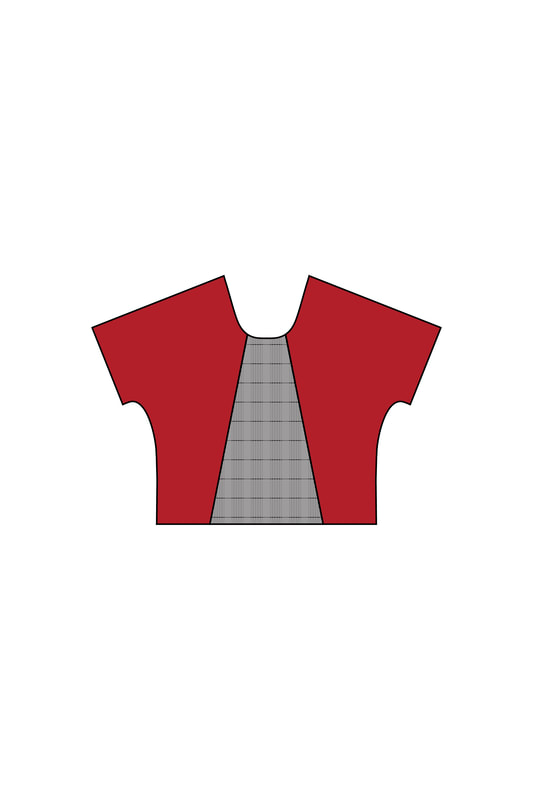
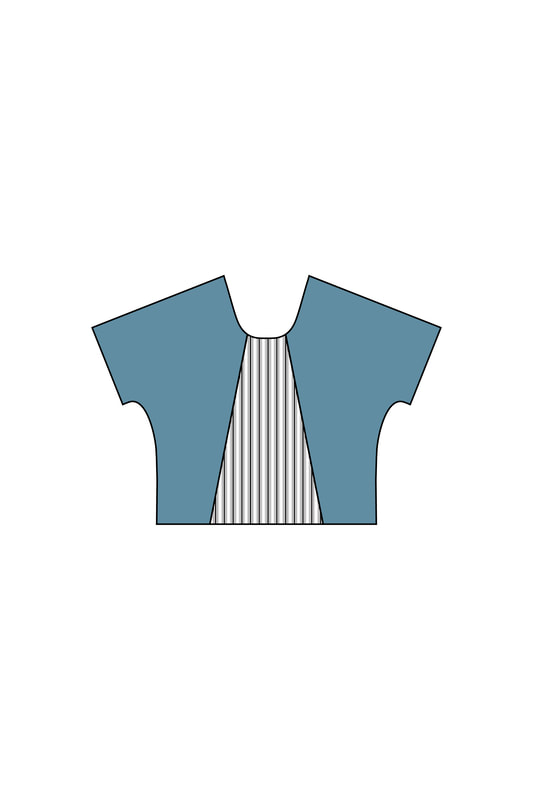
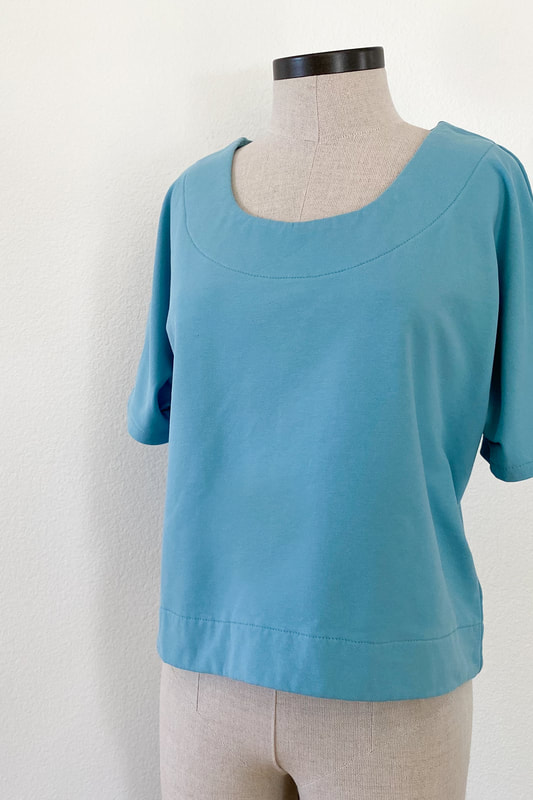
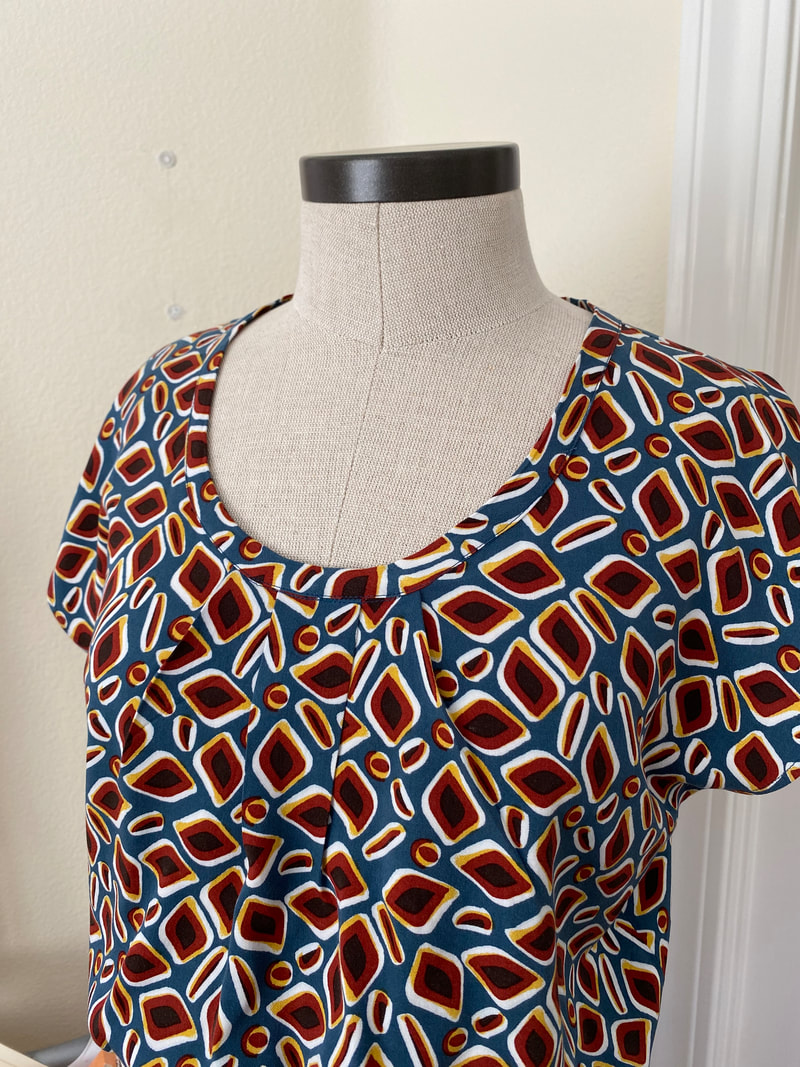
 Yes! There's a brand new pattern tee'd up and ready for you! Like the No-Zip Skirt pattern, I was intentional in my design process. With the skirt, I set out to solve a problem many sewists have a hard time getting over... putting in a zipper! Well, I was just as intentional in designing the Count The Ways Top. Here's what this pattern does:
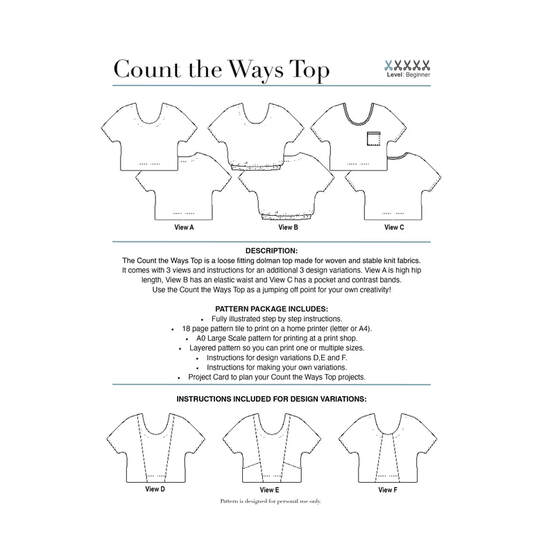 Here's what it comes with:
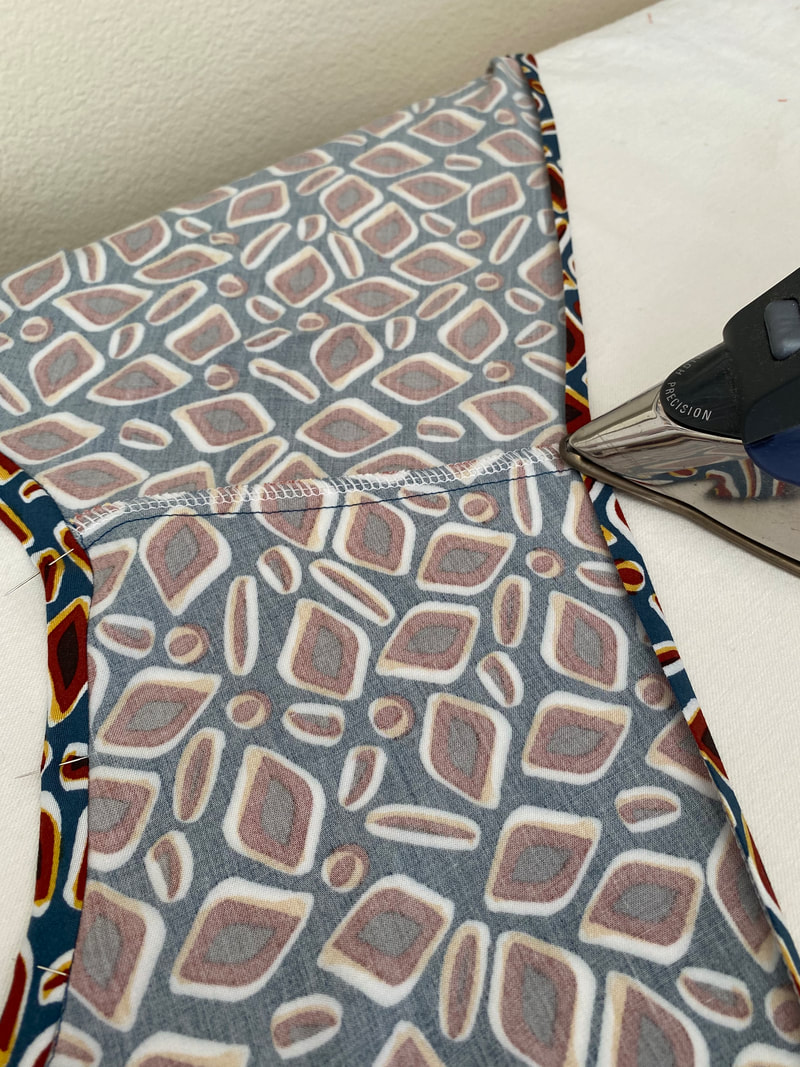
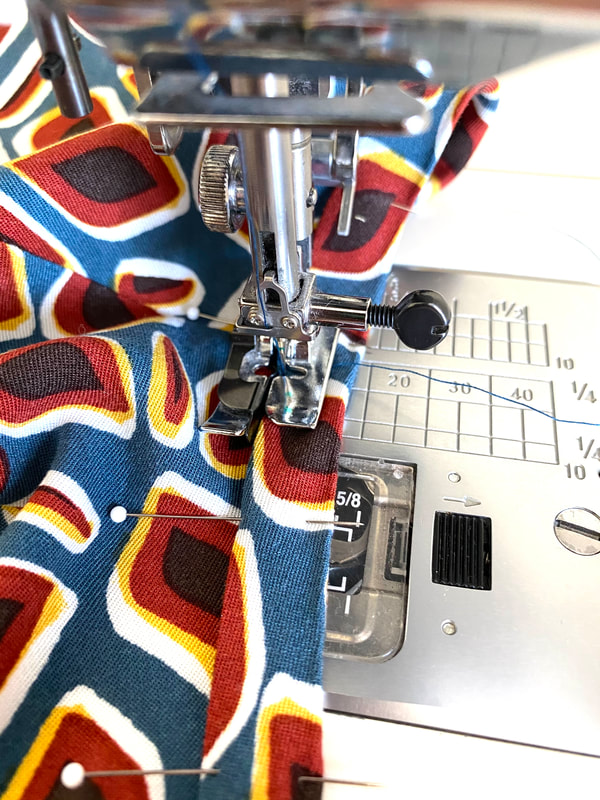
Lots of options and opportunity here. You can color block, add embroidery, pleats, topstitching, piecing or use it for scrap busting. Make it in something silky or sequined and have a quick top for the holidays or piece together your favorite scraps and add fringe to the hem for a bohemian look.
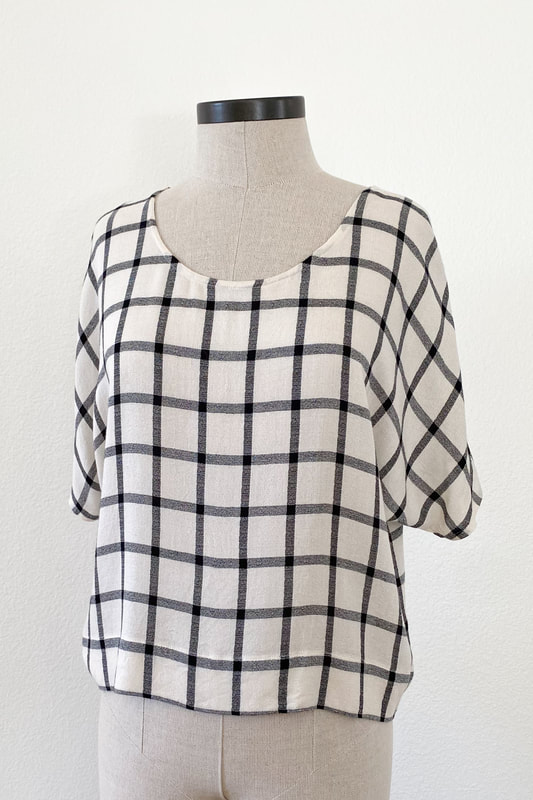
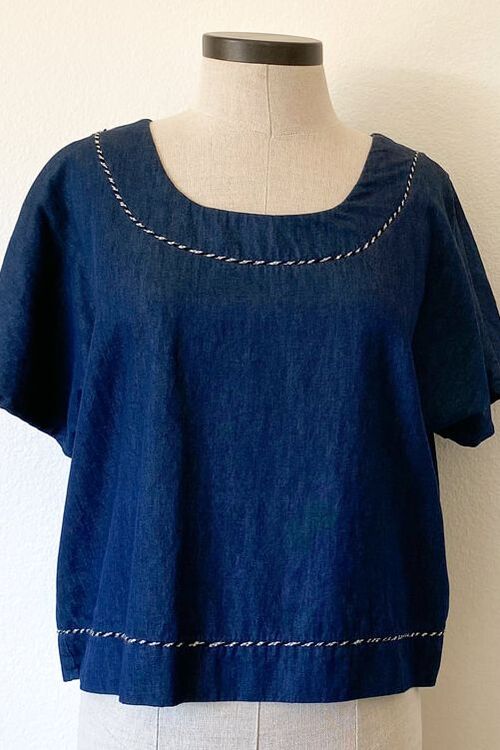
Here's the Count The Ways Top in a viscose twill, chambray with yarn topstitching (learn how to do that here), a windowpane plaid with a binding turned to the inside and even French terry (I made matching Coffeehouse sweatpants to match and wear that outfit almost every day).
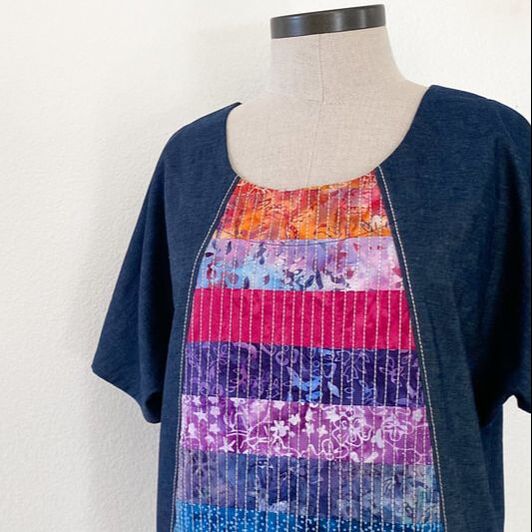
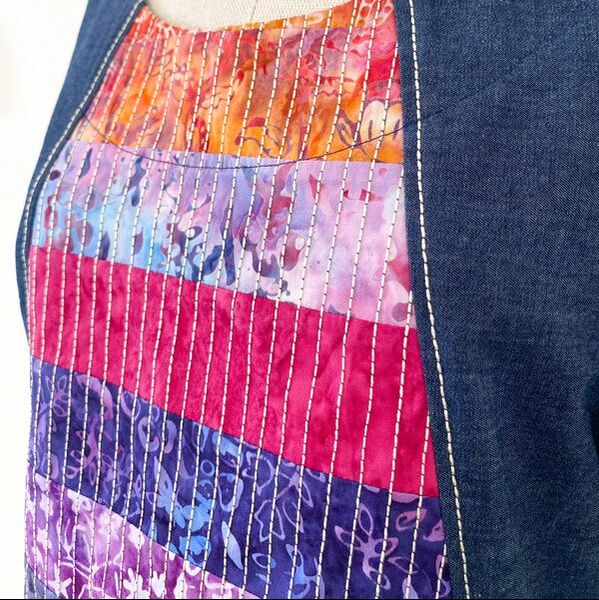
And here I did a pieced version using leftover chambray, batik scraps and lots of topstitching.
The Count The Ways Top on sale in the shop for $7.80! What are you going to make?
0 Comments
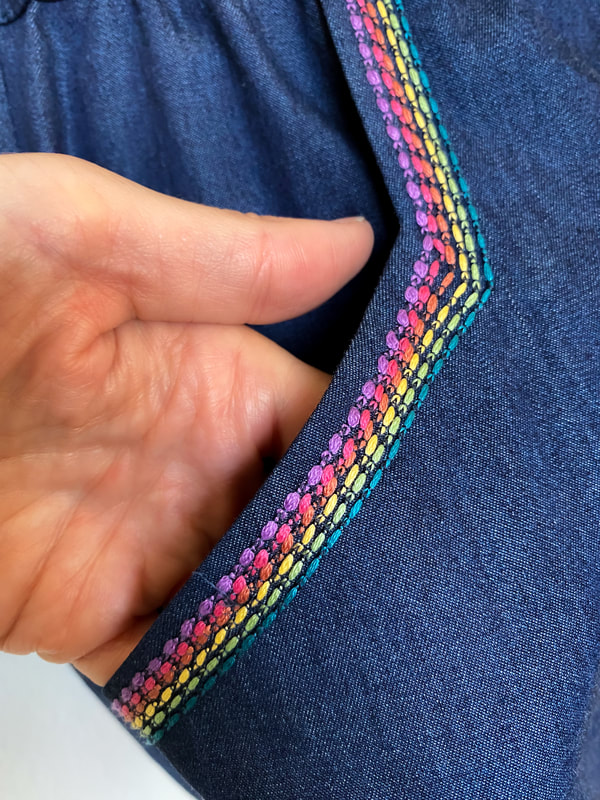
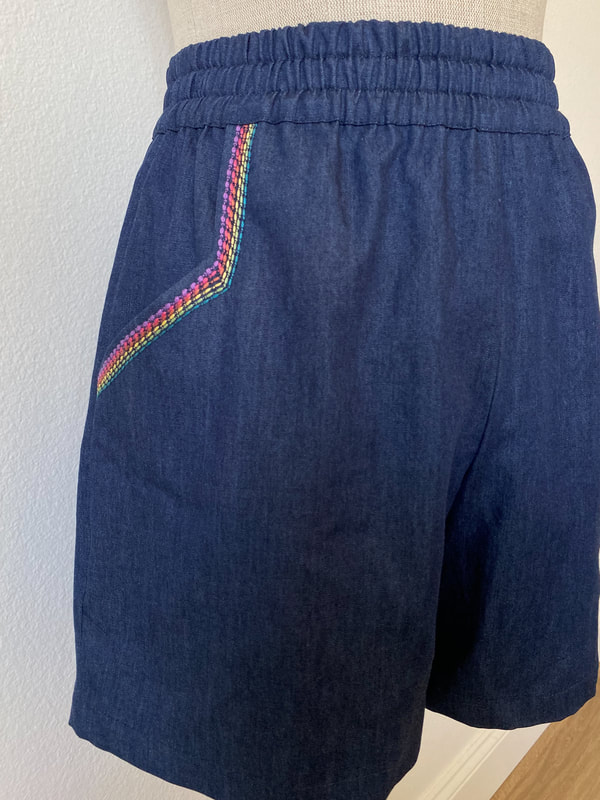
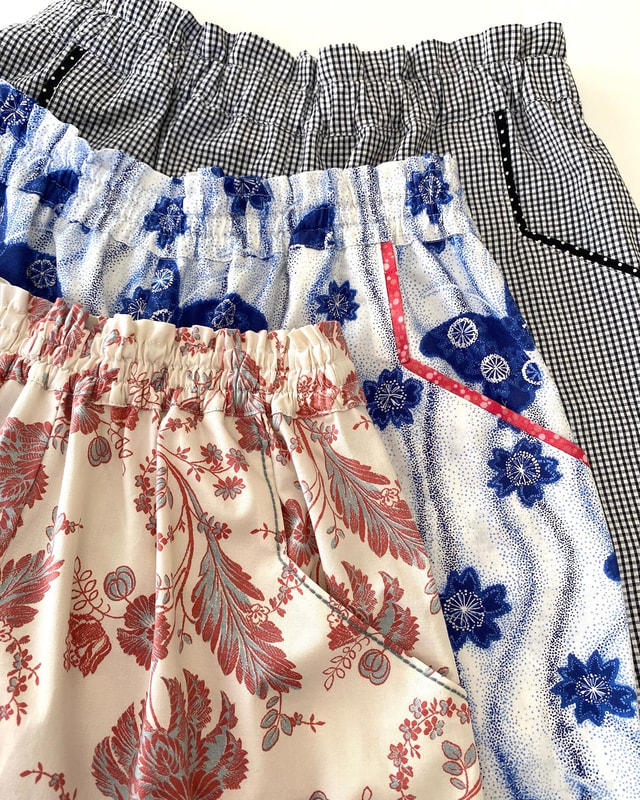
 I have a quick stash busting project to share with you today and if you follow me on Instagram or Facebook you'll know I've been on a Coffeehouse shorts kick lately. I'm not sure why it's taken me so long to make this pattern into shorts but, so far this summer I've made 3 Coffeehouse PJ shorts and this pair of dark chambray shorts with a blast of color.
I cant' get enough of the stitching! These take less than a yard of fabric, which make them the perfect stash buster, and I used left over bits of embroidery floss in the bobbin of my machine for the colorful stitching. So easy! It took me longer to decide on the colors than it did to actually do the stitching.
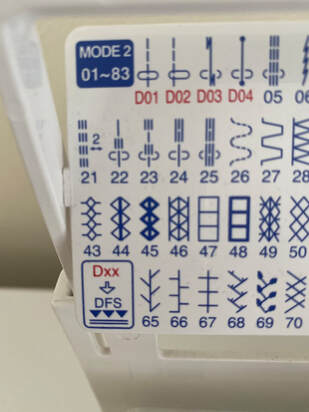
I used stitch 22 on my Janome, loaded embroidery floss in the bobbin and stitched from the backside. Turns out pretty doesn't it?
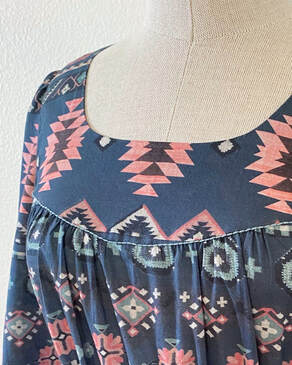
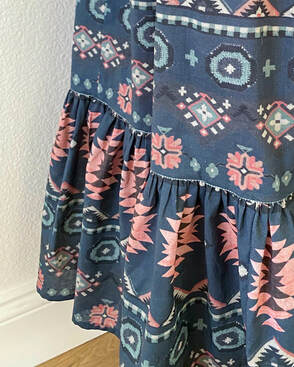
For the fit I was looking for I raised the waist 1" and put in 3 rows of elastic instead of one (it's really comfortable!) The pattern is on sale for $7.80 in the shop if you don't already have it. Here's a pic of the the PJ shorts I made from small pieces of fabric I didn't know what to do with. Grab the fabric pieces that are too big for the scrap bag but not quite large enough for a full project and make yourself a pair! There's a Morrison Dress coming next!  I've got something really different (at least for me) today on the blog! A tiered Margo Dress! I've been so inspired by the tiered Margo hack Michelle did in her Sew News article (if you haven't picked it up at the bookstore...there's still time) I decided to give Margo a new spin myself! Lot's of new elements here and hopefully some inspo for your spring and summer sewing. Gathers, full sleeves and a southwest print from Mood Fabrics all together give a brand new feel to my dearly loved, and often used Margo pattern. 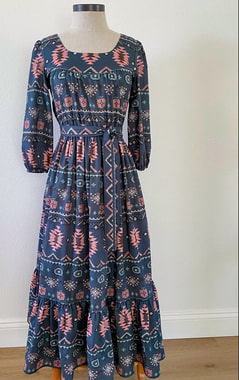 I took the Margo pattern with long sleeves, added an elastic waist and a tiered skirt and finished it off with inset pockets and embroidery floss topstitching. Here's a quick low down so you can make your own!
It really is easy (let's face it, we're really only adding rectangles for tiers) and here's how I did it step by step (wow, my brain queued up "Step by Step" by New Kids On The Block!):
And for some fun I used dusty aqua embroidery thread, using this method, at the yoke and each tier. It really separated the tiers and added to the boho feel. 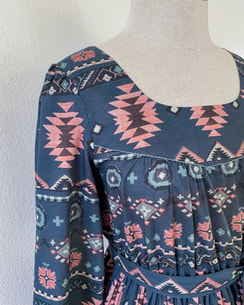 I can tell you the hardest and most time consuming thing about this project was the pattern matching! The cutting took a whole lot longer than the sewing!. I bought a swatch first (in a different colorway) and liked the print but decided on this color instead. It came as quite a surprise to me when this fabric came and the scale was so much LARGER than the swatch! We need a challenge every now and again, right?
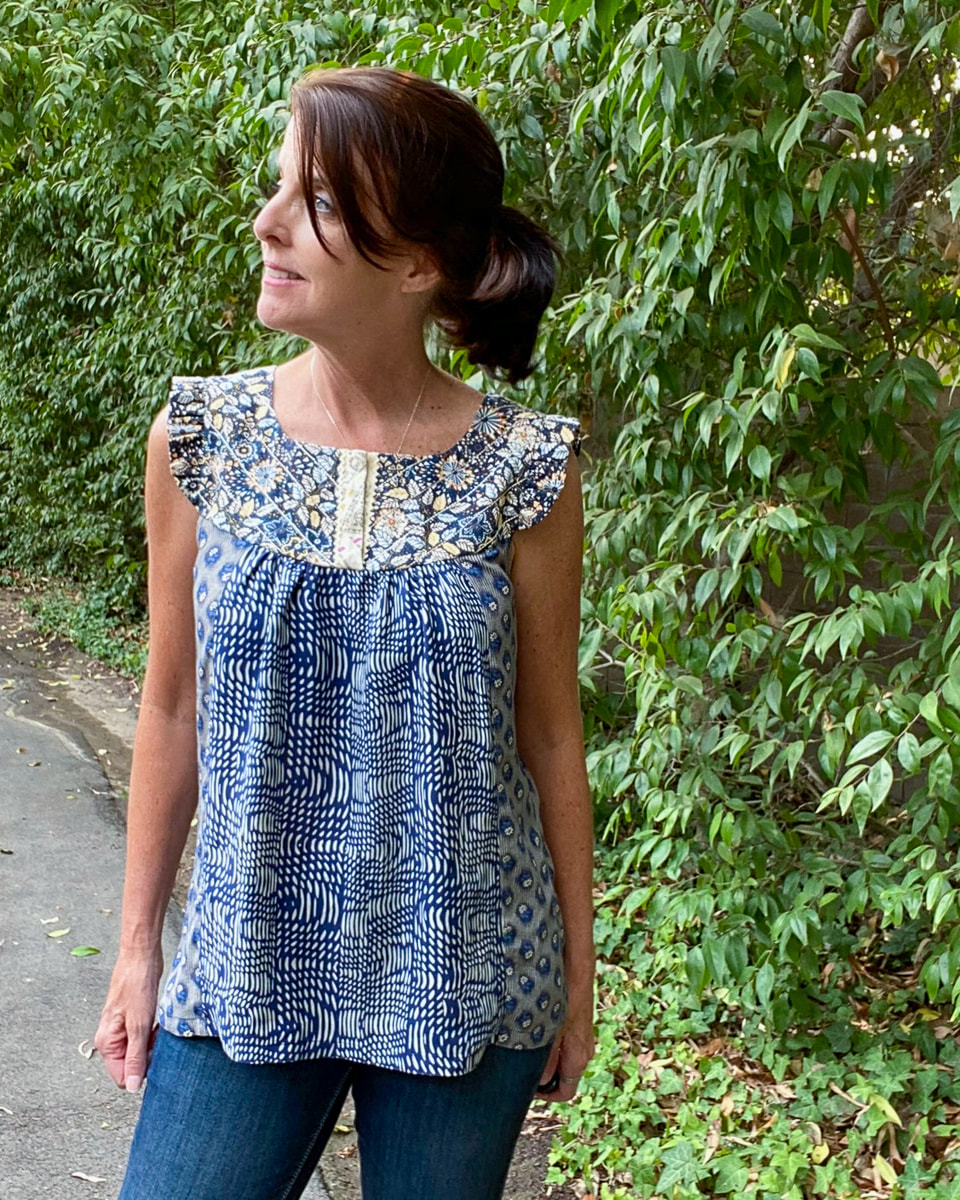
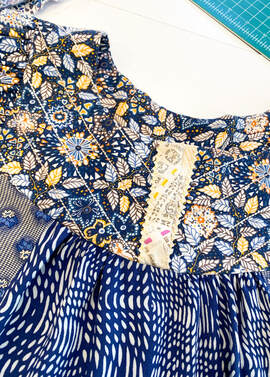
Another Margo hack is coming next. Stay tuned and grab the Margo Blouse pattern for just $7.80 in the shop! More to come.... Diane 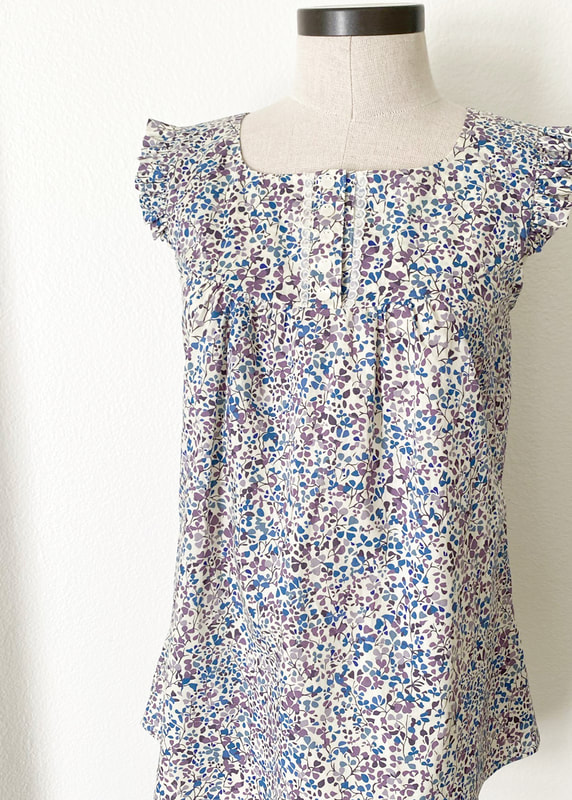 The May Margo inspiration continues with this sleeveless summer Margo Blouse made from Liberty lawn. I'm always grabbing for sleeveless tops in my closet in the morning (it's usually so hot here) so I'm always looking to add more options. The Margo Blouse is a great option without sleeves and since I only had a tiny bit of this lovely Liberty print, I knew I had to get creative. I eeked this blouse out of 1 1/4 yards!
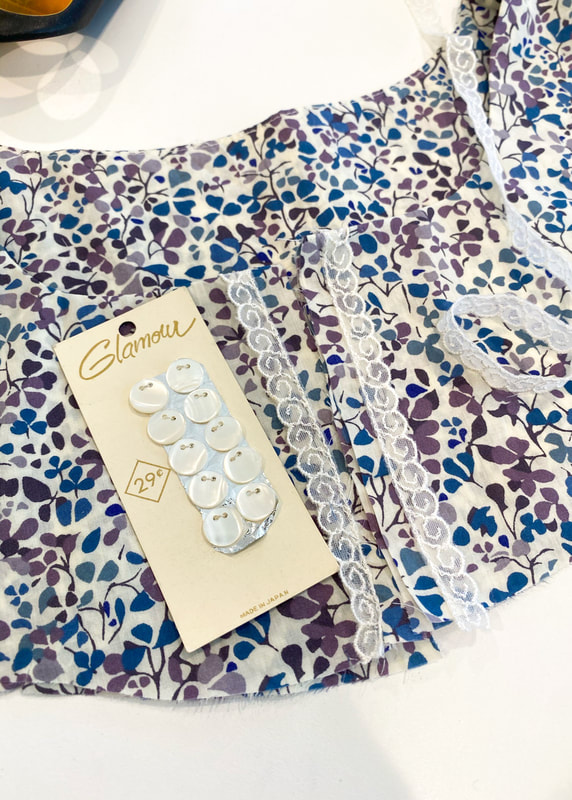
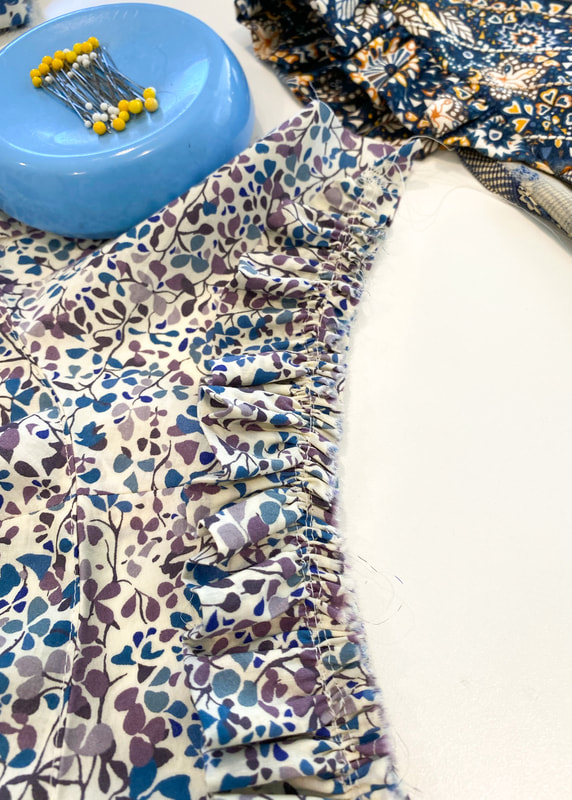
A while back I made this Margo hack from some scraps I had in my stash from other projects. Some were quite small but I knew I could adjust the yoke and the bodice to fit even the smallest pieces. I raised the yoke and added a split in it, left off the sleeves and added a ruffle instead. Turns out, I wear this blouse all the time. I have all the details here if you'd like to read about it. 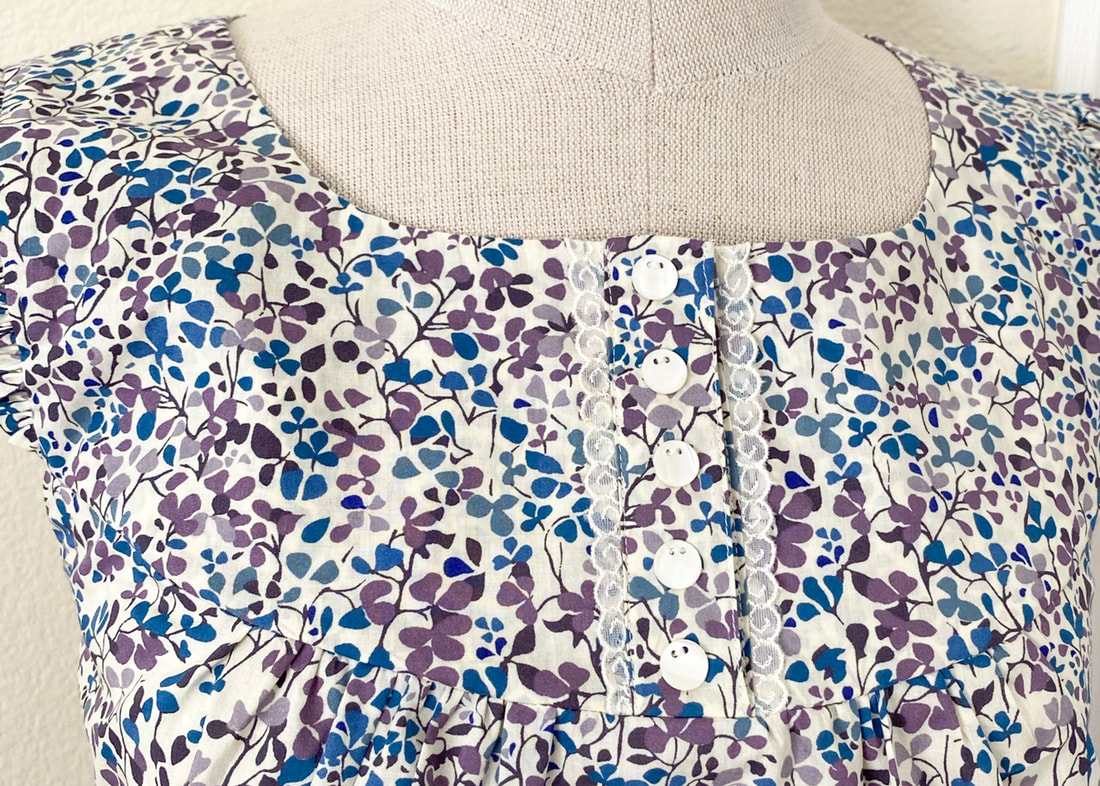 On this version I used the pattern just as before and added vintage lace on the front placket.
I've had these "buttons" in for a long time and I've never known what to do with them since they aren't functional but they are really pretty. This is the perfect project since I don't need the buttons to close but did want something else to make it special. Please take note...the card says they were 29 cents! They really are vintage. 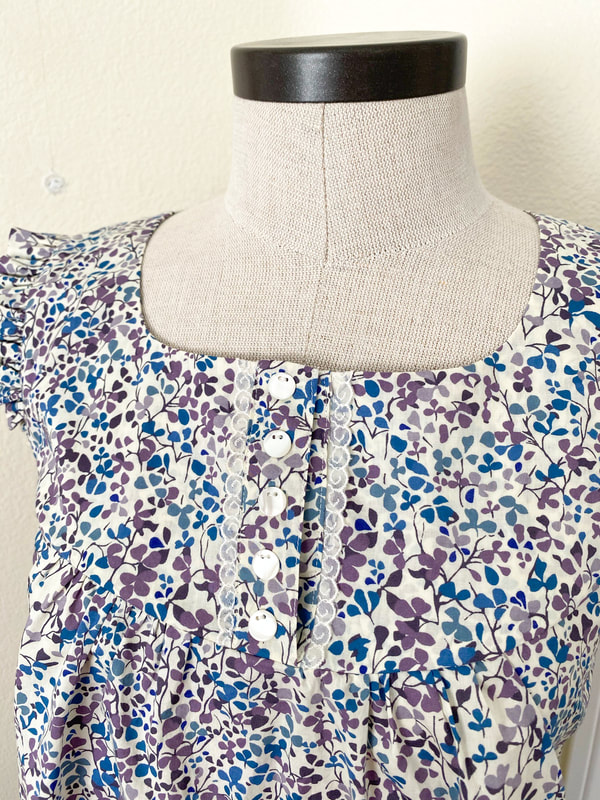 The weather is getting hot here so I've already worn this a lot with jeans and with blue Coffeehouse Pants. I have another Margo in the works...this time in a pretty gauze. Stay tuned!
Diane 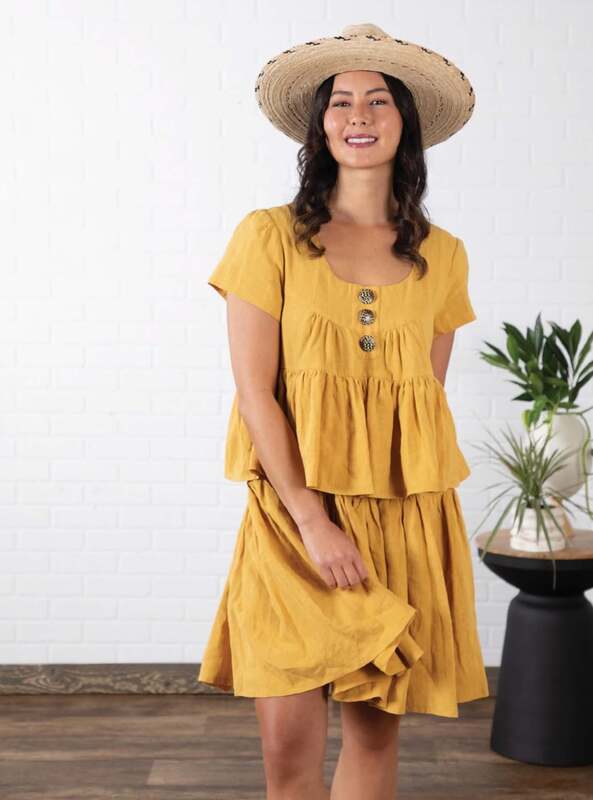 Some exciting news! The Margo Blouse is featured in the Spring edition of SewNews Magazine! Michelle of That Black Chic blog and the editor of Sewn Magazine, did a fun article on adding tiers to the Margo Blouse! You're gonna want to pick it up not just for the Margo Blouse but also some other nice how-to's for spring. 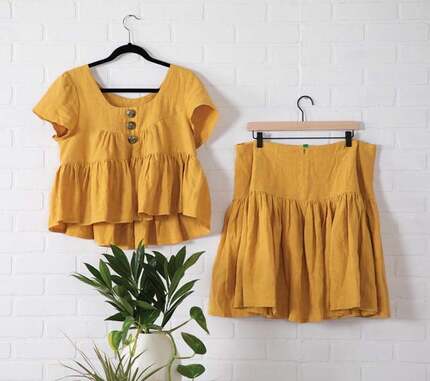 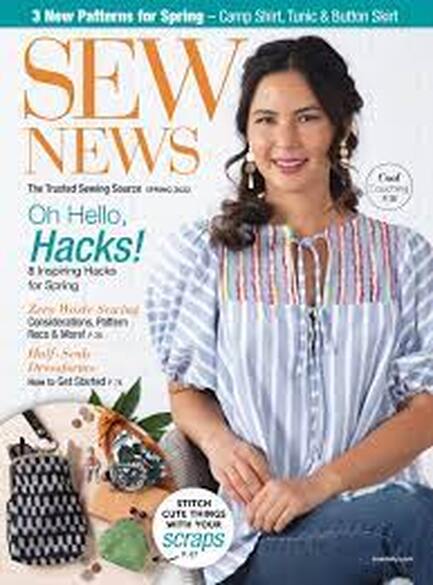 The Margo Blouse pattern is just $7.80 in the shop. And more summer inspiration is on it's way to the blog using the Margo Blouse. More soon!
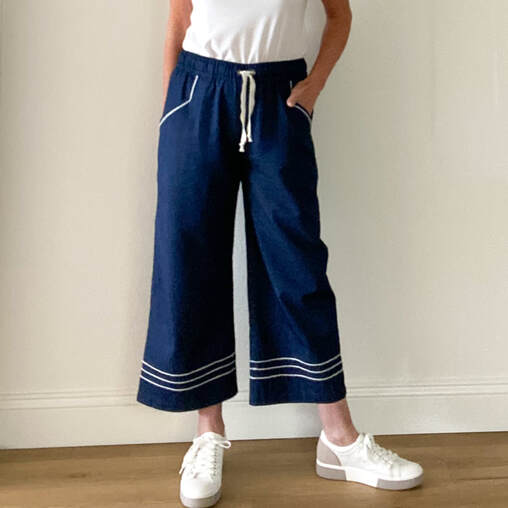 I've been experimenting in the sewing room lately because I've been inspired by many of the details you sewists out there are putting on your clothes. I'm ready to make fewer garments with more details and embellishments. My lifestyle and the climate I live in really lend itself to simple, comfortable and easy to wear clothes. The Coffeehouse Pants are just that and are a blank slate for creativity!
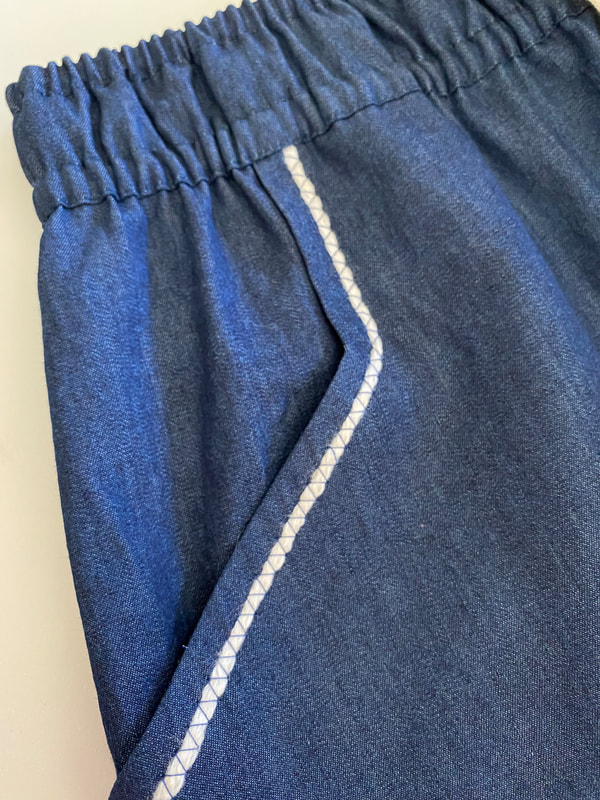
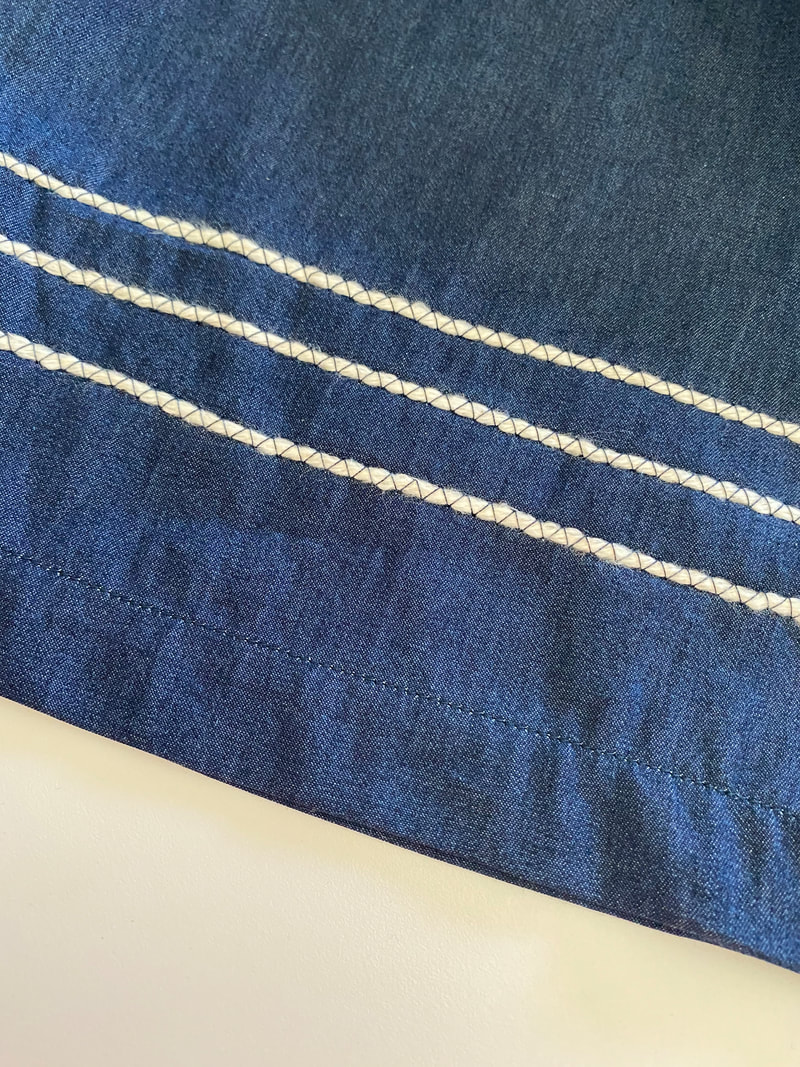
These are an elastic waist, straight leg cropped pant. I've made so many of these and I wear Coffeehouse Pants at least 4 days a week. But in all of my makes, I've never embellished the pant leg. I've been experimenting with "couching" which is a technique where you take a fiber, in my case I used scraps of yarn that I had from left over crochet projects, and use the zig zag stitch or other wide stitch to anchor it down. 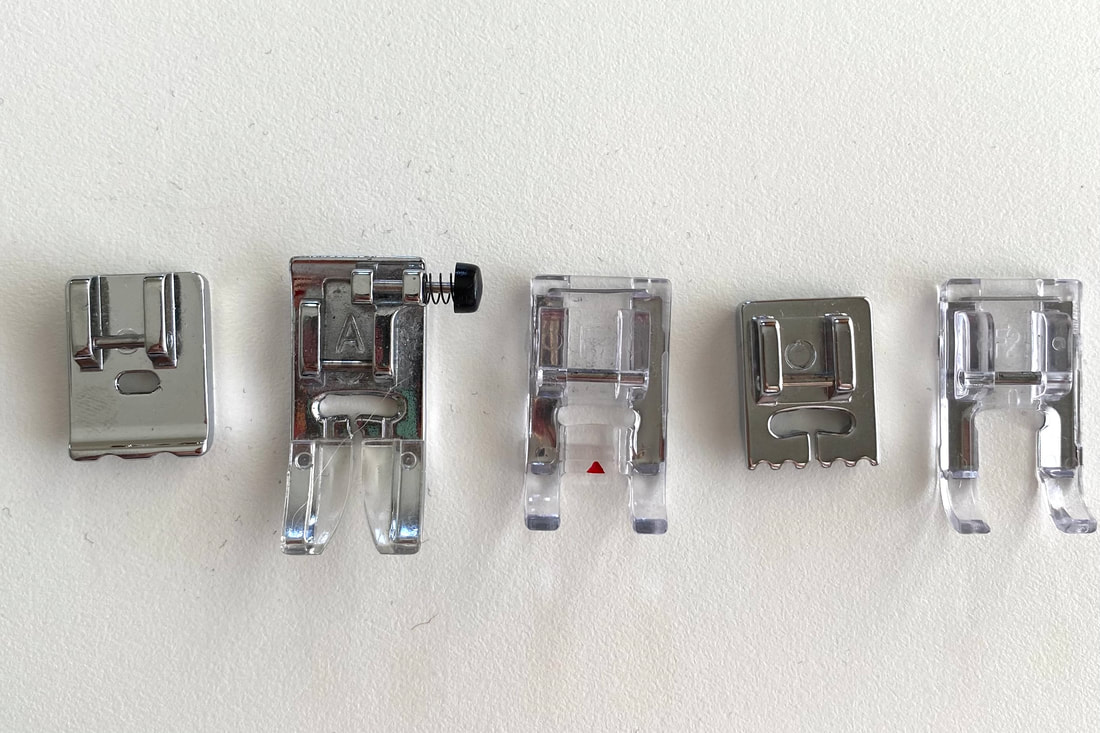 I used the "trial and error method" (turns out I've used this method A Lot in my sewing career... eh-hem!) with lots of different feet on my machine and found there were actually several ways to do this. I tried (from left to right) the piping foot, regular foot, clear view foot, pintuck foot and open toe foot. All but the open toe foot worked for me but my favorite is the clear view foot (that little arrow keeps me right on track and I'm able to load the yarn under the back of the foot and through the opening keeping it feeding smoothly). This foot or a foot very similar probably came with your machine so you may be able to get by without purchasing something new...although new feet are really fun! 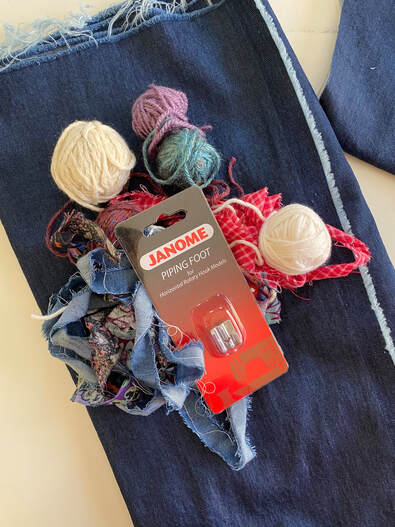 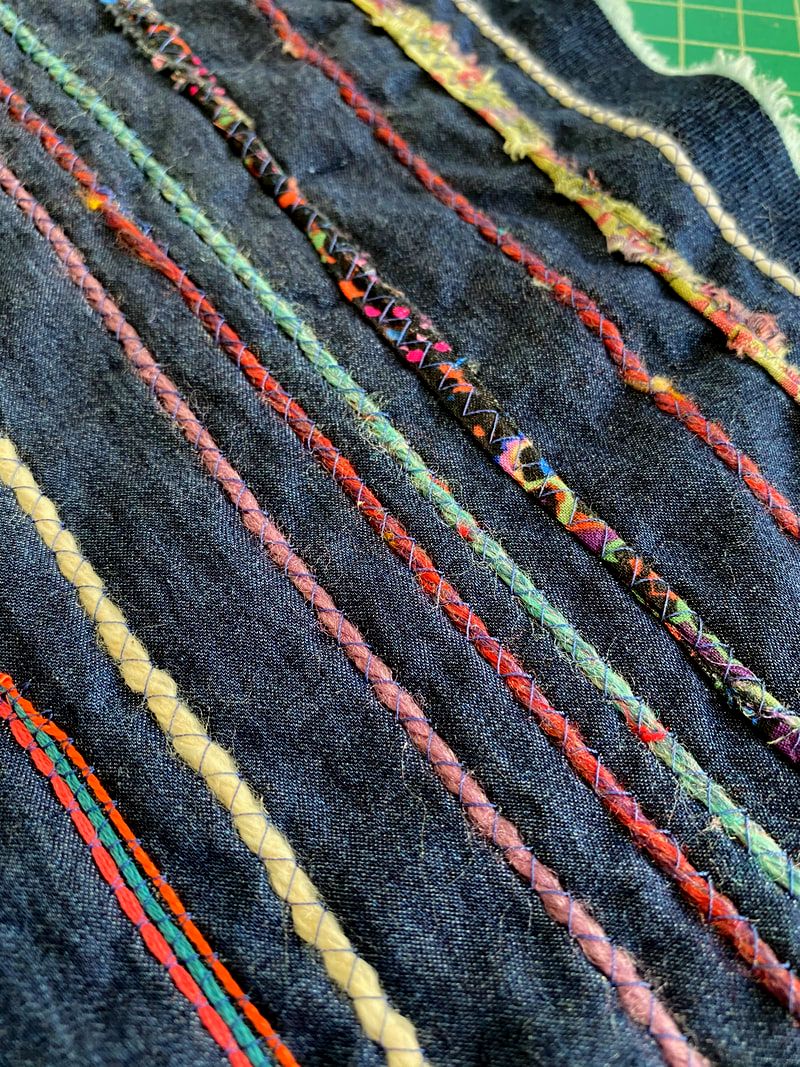 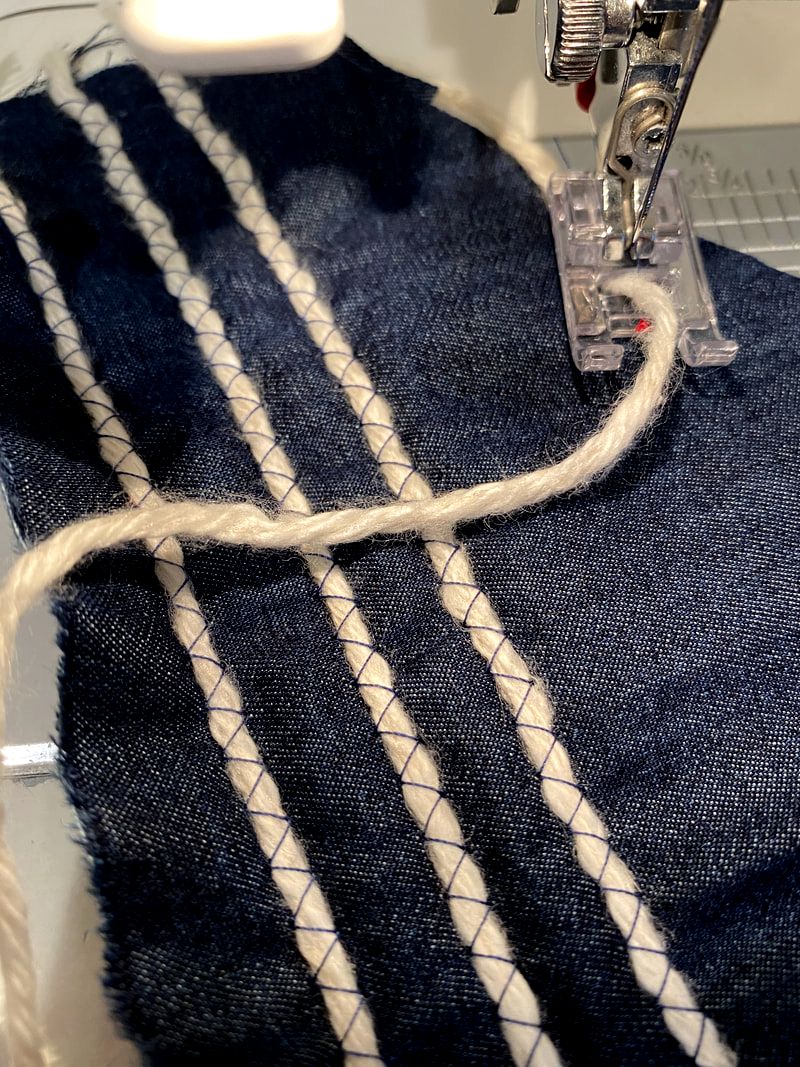 To experiment I used worsted weight yarn, double and triple yarns and scraps of fabric. I'm not gonna lie, it was difficult for me to decide which way to go. I decided to go with the creamy colored nubby yarn (you can see how I loaded it through the foot above) but do expect to make other pairs with the same fabric and different colored embellishments. Already, I made a denim top with black and white yarn. To say I got obsessed with all of this could be accurate but I prefer to think of it the same way my friend Cari did..."Diane, you have your creative flow going." Yup, that's it, I have "flow". Everybody needs a friend like that! 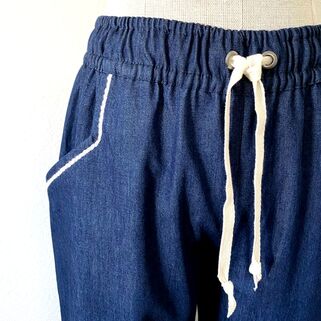 I used a 4 ox. dark wash denim which really is the weight of a chambray, widened the leg slightly and added a twill drawstring with grommets. I added the yarn to the pockets and 3 rows of stitching 3/4" apart beginning 2 1/2" from the hem. They're comfortable, fun and it feels good to make something creative and unique and "in the flow"! 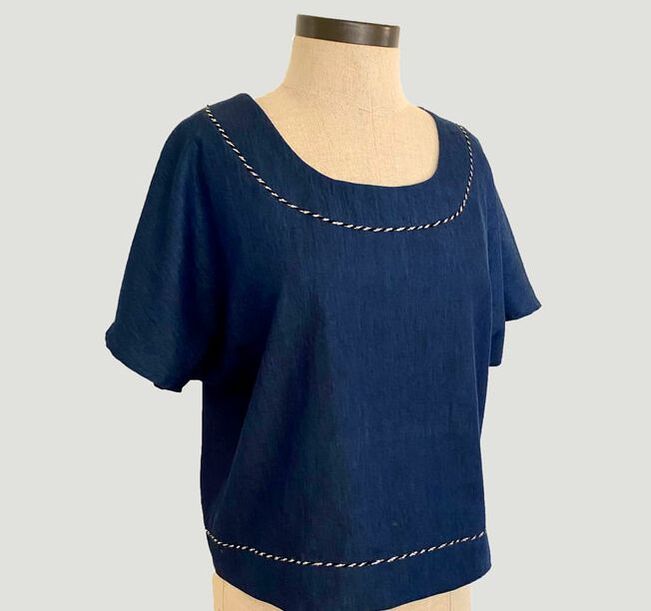 Here's sneak peek of the top I made with black and white twisted yarn. It's a pattern that's coming out very soon!
The Thanksgiving Sale is here so now's the time to grab the Coffeehouse Pants pattern or ANY PATTERN FOR 20% OFF, no code needed now through the 28th! Happy Sewing Friends! Diane 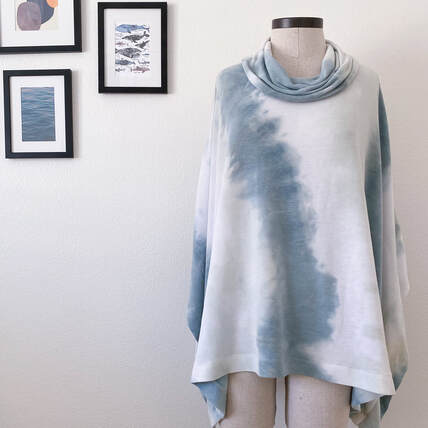 I have a brand new pattern just in time for fall and winter! The Wintertide Poncho is an easy to sew (I mean really easy!) and quick cowl neck poncho pattern with contrast bands. And as an added bonus...no need to worry about fitting! Make it up in a beautiful wool sweater knit for a sophisticated topper or sew it in a tie-dye French Terry you can throw on instead of a hoodie. Gift giving season is coming soon and this would be a quick and easy piece to sew up for a friend! It's on sale for just $6 so grab it and enjoy! I'd love to see what you make so tag it #wintertide poncho! 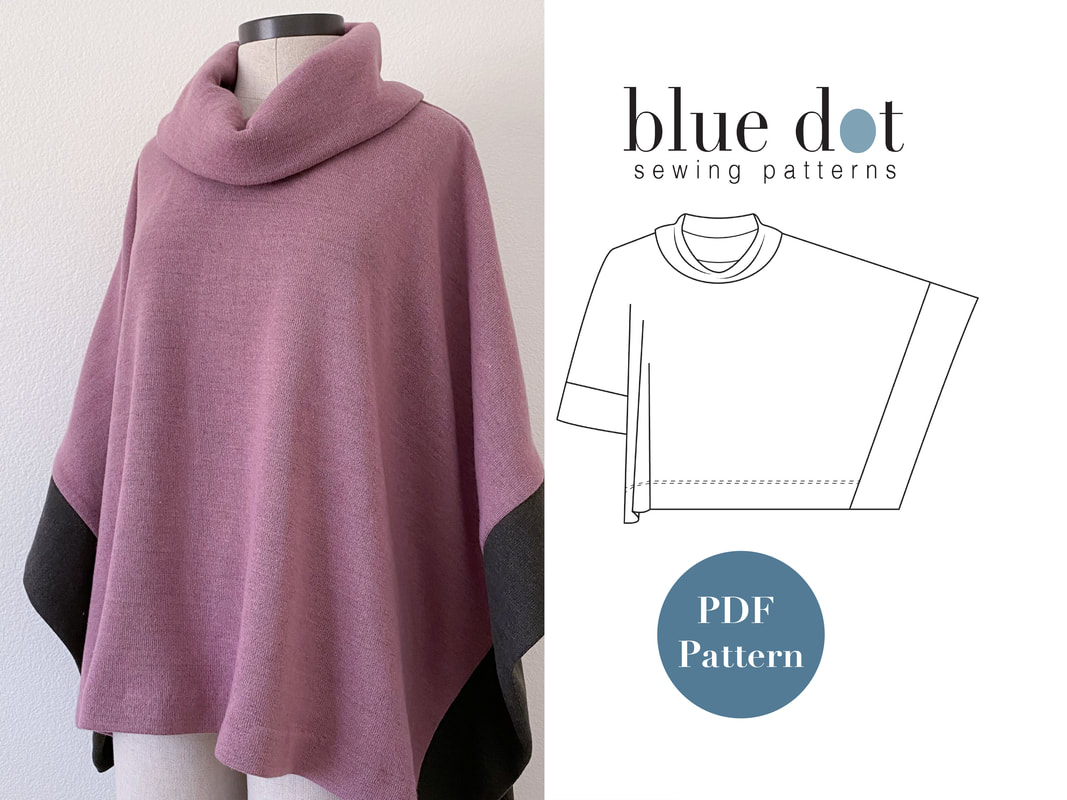 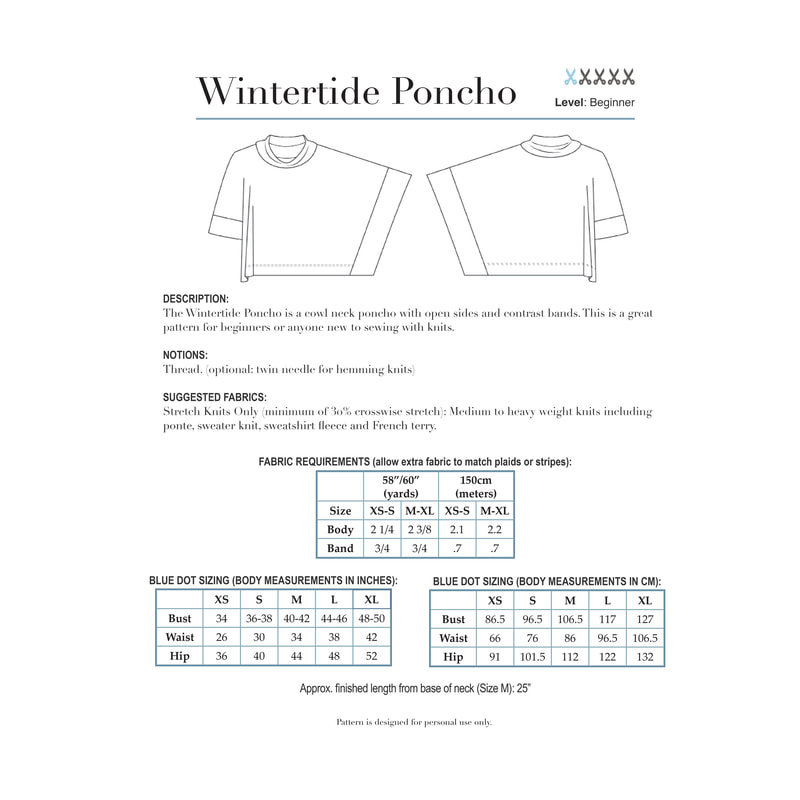 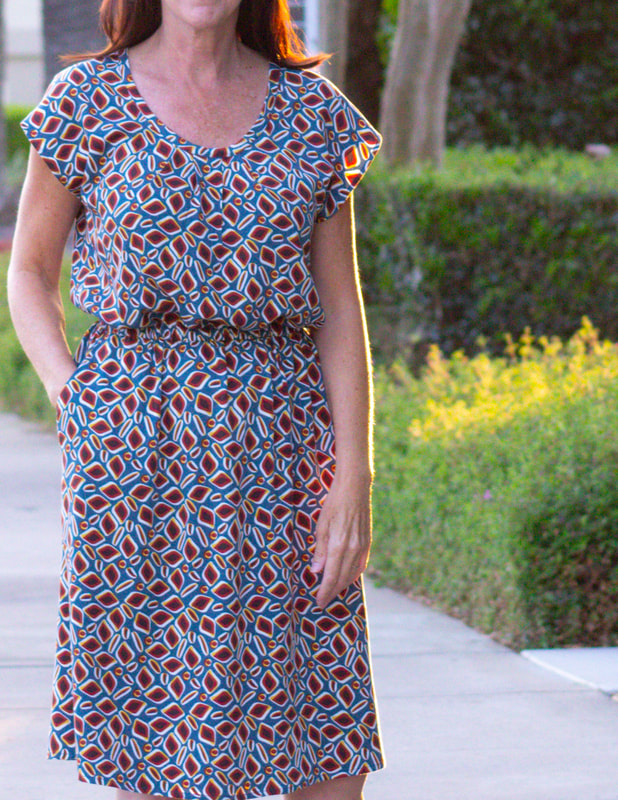 I have a new Morrison Dress here all ready for the fall. It still stays pretty hot here until November so I like to have a couple of pieces in my closet that look like fall but are still cool enough for the weather. This fits the bill perfectly. I used this "Van Gogh" viscose twill print from PDX Sewing Studio with a liquid drape and beautiful colors for fall...teal, rust, gold and black.
The Morrison Dress is the easiest pattern to put together and my favorite part of making it is the neckband. I feel so accomplished when it's all stitched down and beautiful. The instructions call for the band to be stitched to the wrong side first and then turned to the front for topstitching from the right side. It's so much easier than the traditional method. The Morrison also has an easy sleeve hem technique too!
Happy Sewing Friends! And keep an eye out for a new fall pattern!
Diane 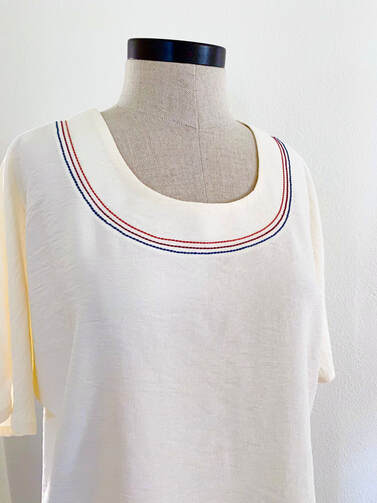
I had some fun in the sewing room recently and took one of my favorite hackable patterns, the Georgia Top, and made this creamy contrast stitch top that will take me from summer right into fall. I documented the whole process and I have it here for you in a video. Enjoy!
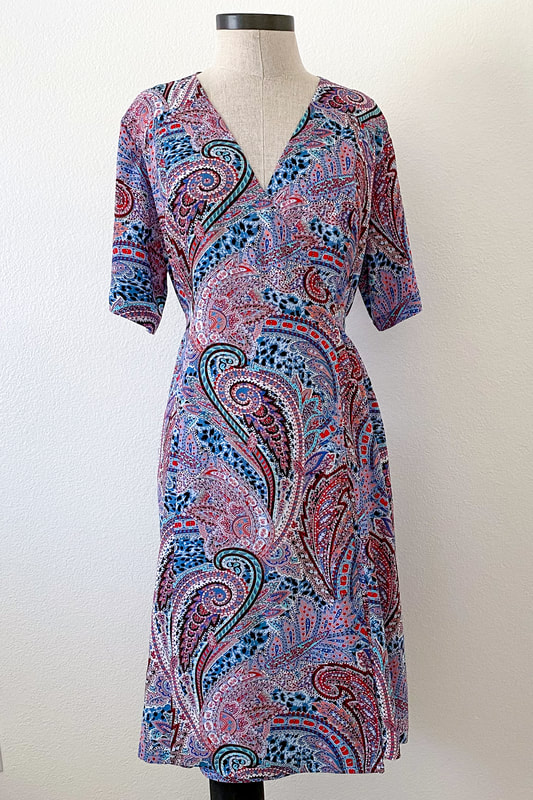
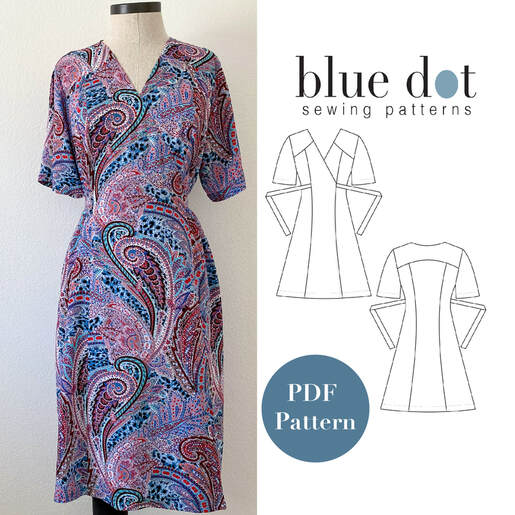 It's here! The new Andrea Wrap Dress and Top PDF pattern! And get it for 20% off with code BDPANDREA through August 4th! This pattern has been so fun to design as it was inspired by a dress I made and loved (and wish I had saved) from the 90's. Of course I updated the look so it's modern for today but it still has the easy to wear feeling from the 90's. Is that Counting Crows I hear playing in the background? 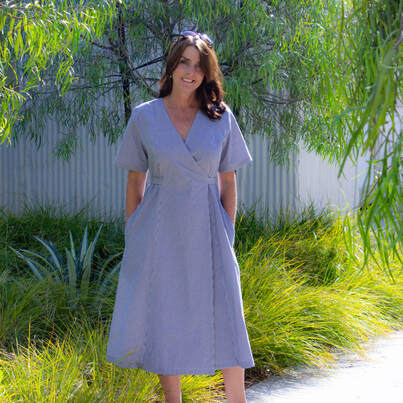 The Andrea Wrap Dress comes in 3 lengths, a hip length top, knee length dress and midi length dress. It's easy to fit and ties just above the waist (no closures!) so it's an easy project for beginners and flattering on most body types. Make it up in gingham for a fun summer dress, a beautiful silk crepe for an elegant event or cozy it up for fall in a flannel., 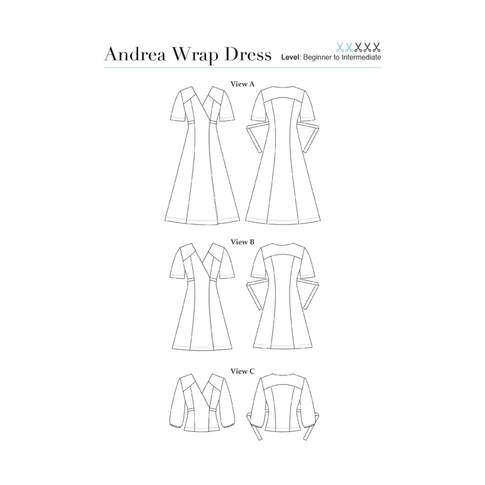
 Grab the Andrea Dress Pattern during the 20% off during the New Release Sale. Use code: BDPANDREA. I can't wait to see what you make!
Enjoy! Diane |

About MeHi! I'm Diane, a wife, mom, sewing teacher and pattern designer from sunny Southern California. I share my sewing adventures here on the Blue Dot Blog formerly Gatorbunnysews. For more info click here. 
Categories
All
Archives
October 2022
|


 RSS Feed
Proudly powered by Weebly