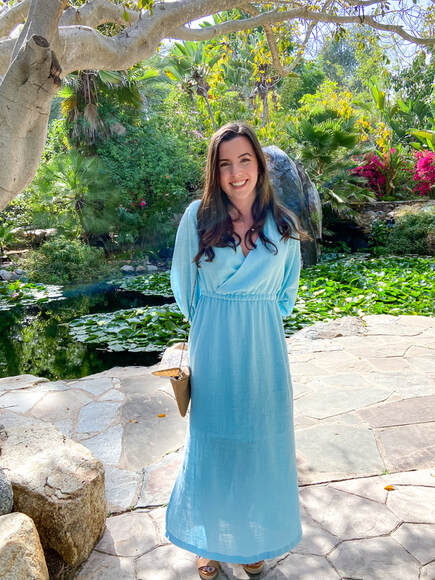
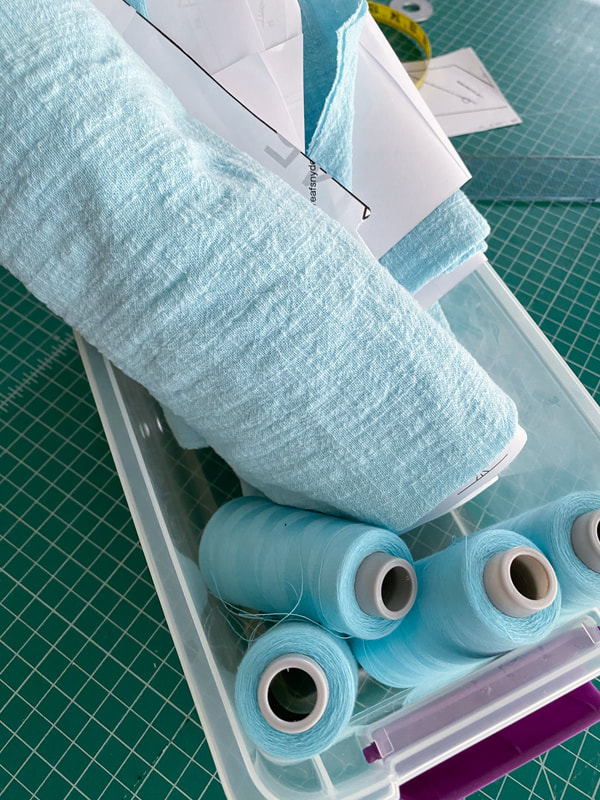
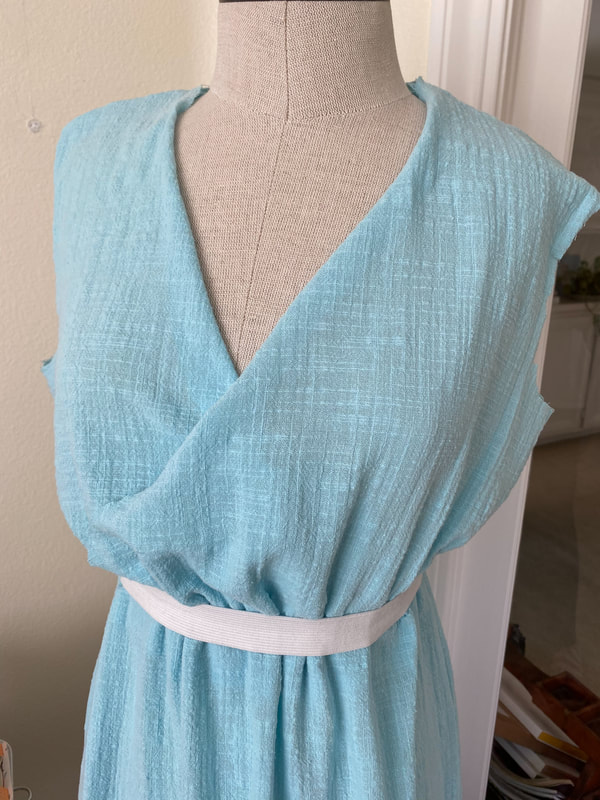
 A bright blue, breezy dress for a girl with a beautiful smile is the way to kick off summer sewing, right? I really enjoyed making this blue gauze dress for my daughter and I think she felt good about having something pretty to wear out after having so many months in, It's a simple and fun make and easy enough for a beginner or if you need a dress quick! 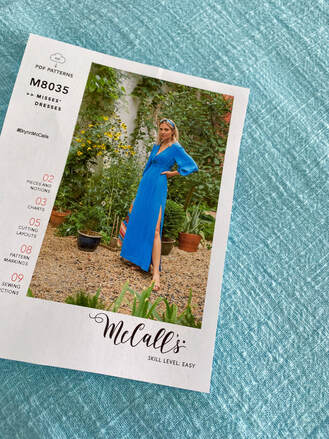 I used McCall's 8035 and this was my first time trying their PDF patterns. Now I sew with PDF patterns all the time (needless to say) and also with the Big 4 but I have to say I don't recommend using Big 4 PDF patterns. This printout was 55 pages!!! Just for the tile! I know one of the things we indie designers take lots of time on is the layout of our tiles because time and paper are precious resources. Also, there was no test square anywhere on the pattern so I printed out the skirt pieces and verified the finished measurements on the pattern to be sure my settings were right. That said, otherwise it was a good pattern. She chose a cotton/rayon gauze for the dress I got from Stylish Fabric on Etsy. I have to say this fabric is wonderful! I don't think it was even $8 per yard and it's soft and drapes a little bit closer to the body than some gauzes. It comes in lots of colors and washes really well.
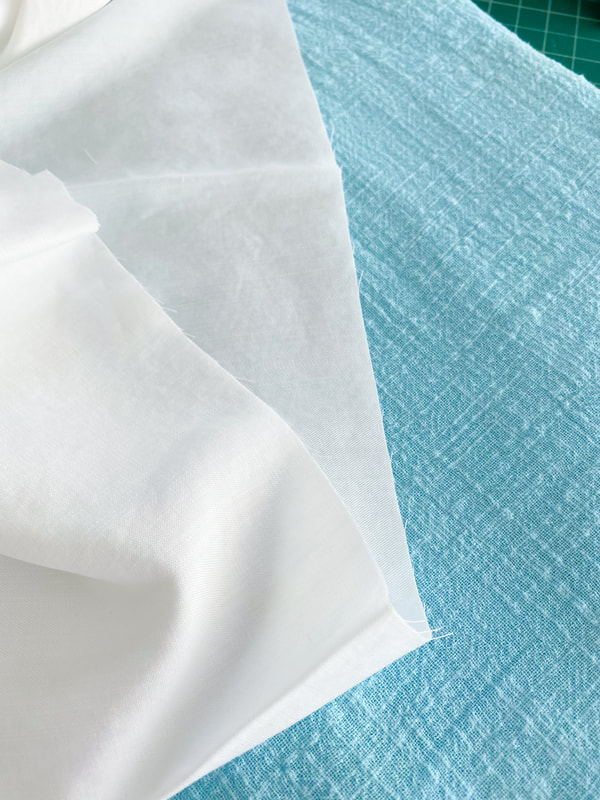
Lining cotton garments always send me into a quandary because most typical linings defeat the purpose of why we wear cotton garments. I decided to use this very lightweight white challis and it turned out to be the perfect option. I lined the bodice and half of the skirt (lots of maxi's are lined just to above the knee these days) and left the sleeves sheer. By complete luck, I had the perfect color serger thread and these days I've been cutting projects ahead and grouping them by serger color. Don't we all hate the serger rethread? The pic on the right shows where I was in construction for the first fitting. I basted just the bodice and skirt together (no lining) and wrapped the elastic around her to make any changes. I ended up shortening the bodice slightly and bringing in the side seam 1/4" on both sides. I also added a slit on one side. 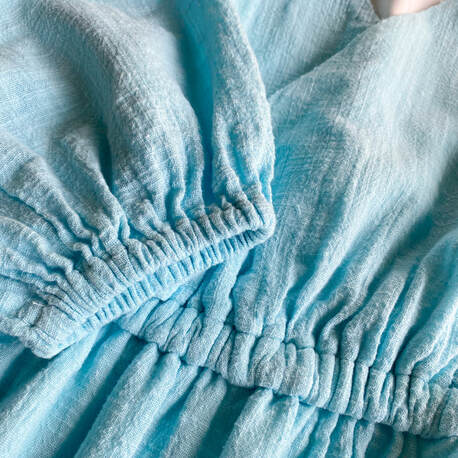 I prewash all my fabrics before I sew them with no fabric softener. The extra stiffness in the fabric helps with accurate sewing and crisp ironing. But after I finish the garment I do wash with softener. The stitches disappeared and the texture of this fabric got so yummy after washing. I purchased several gauzes this spring to see what I liked, and I was impressed by this one partly because when I press it, it still retains the "gauzy" texture. 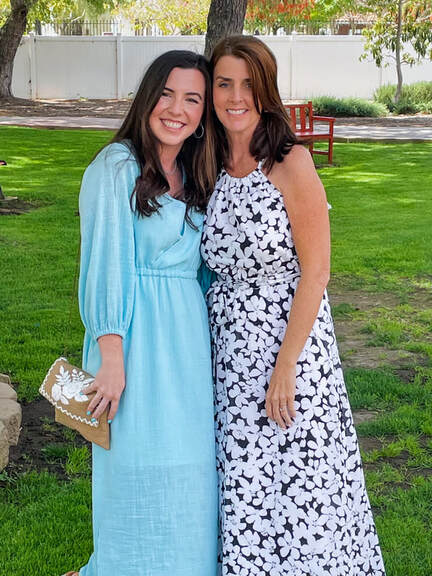 Mother daughter day! I'm wearing a self drafted dress I made about 6 or 7 years ago that I still love. Lots more projects on the sewing table. I'll share soon! Diane 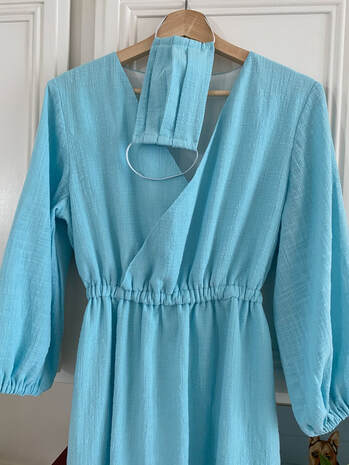
1 Comment
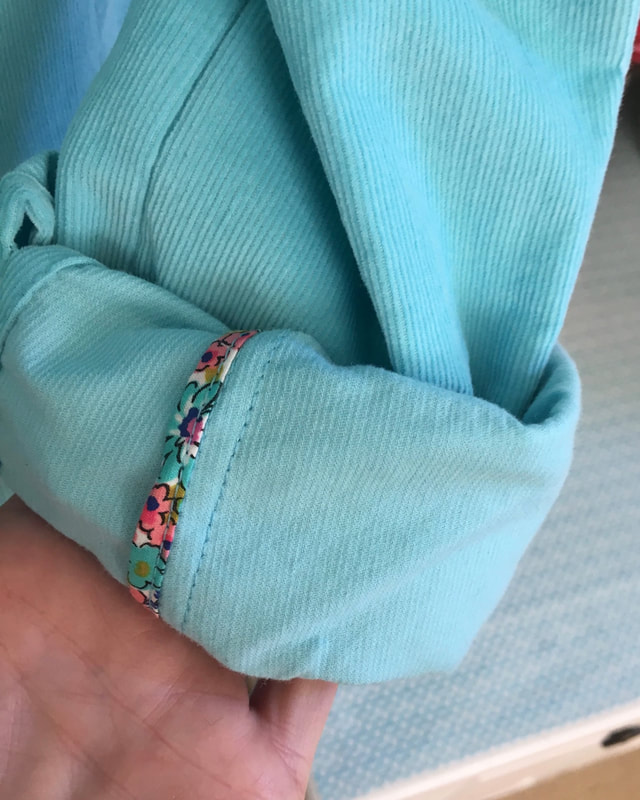
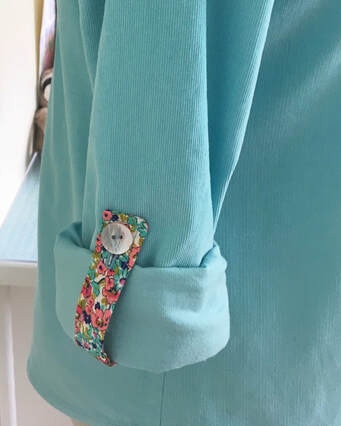
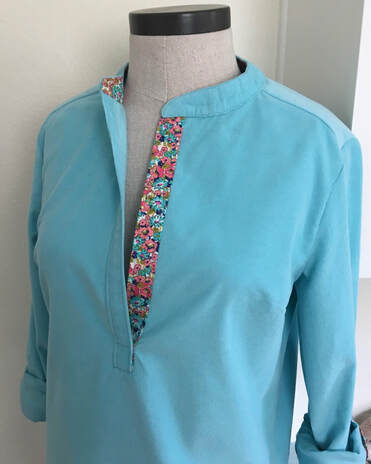 Sometimes you find yourself in a place you'd never expect or even know is possible. It’s happened to all of us too many times to count, right? Well, I’ve found myself over the last few months in just such a place and I’m using sewing to get me through. I’m a pattern designer and up until 7 months ago I was also a sewing teacher. My dream job. First hand, I was able to see the life changes that come when someone learns how to take a flat piece of cloth and turn it into something. It can be truly magical! I’ve seen sewing mend a heart from a broken engagement and give someone who’s no longer a caregiver a sense of purpose. It’s helped those people who have, like me and maybe you, had a life change. 2 years ago I started feeling not quite like myself. It’s actually a long and drawn out story that I won't bore you with but over a period of several months and many doctors, I found myself plagued with vision issues, body weakness, numbness, fatigue, speech problems and difficulty walking and navigating stairs. My family, friends and students watched me change and I tried to hide my problems but it was getting more and more difficult and scary. After 16 months of doctors I landed in a brilliant university neurologist’s office and she ran hoards of tests and found I had Lyme disease. What? Shocking for all of us since they say “Lyme disease doesn't exist in California” which is a dirty lie, by the way, that thankfully my doctor didn’t believe. I was losing my sweet mom to pancreatic cancer at the time of my diagnosis so I put off treatment while I took care of her. Soon after I said “Goodbye” to my mom, I underwent treatment that cleaned out the Lyme bacteria but left me with additional nerve and muscle damage. Thankfully, I’m now on my way to recovery with physical and occupational therapy and the help of an army of family and friends. This really is going to be about the blouse, I promise.  Before this all happened, the “things” that made me tick were sewing and distance running. I now walk very slowly with the help of a bright blue walking stick I named “Eileen” which is an improvement over my former walker which I didn’t name (probably because I lost my sense of humor for a bit there). I may not be a distance runner anymore but I am happy with the leg progress I’ve made as I can walk further as each month goes by. My hands have not healed quite so quickly so sewing has turned out to be difficult and I’ll go so far as to say disheartening. But given my new disabilities/changes I’m trying to figure out how to get back in touch with myself while feeling separated from the things that made me tick (pun completely intended). But we’ve all been here. Well, maybe not exactly here but here in the sense that we all have hiccups and interruptions in our lives that take us away from the things that make us us. In my case it’s physical but maybe for you the interruption was a wonderful thing like having a baby, getting a new job or moving to a different city or something difficult like being a caregiver or recovering from a loss. So how do we find our way back? Or, the better question is how do we stay in touch with ourselves while embracing our current situation? Pretty philosophical for a sewing blog, but those of you who consider yourselves “makers” and you have trouble “making” for whatever life reason have all pondered this.  I can tell you the solution to some of my problems started with this shirt. Who knew McCalls 7360 would help me climb this hill? I call this shirt the “Happy Shirt” for obvious reasons, it looks happy. But really this should be dubbed “The Occupational Therapy Shirt” not as sexy a moniker but certainly accurate. When I first tried to sew after my treatment, I wasn’t strong enough to cut fabric and could only sit up for a short period of time. It was discouraging and thus I stayed away from my sewing room. I had ideas and the desire to sew but it was difficult to bring myself to try. With my initial sewing failure fresh in my mind, one of my first occupational therapy goals was “to cut fabric.” I’m not sure my therapist has ever had a patient with that goal but there it was. With practice and by using both hands (and the help of new easier scissors from my thoughtful husband and son) I did it! Since this went well I decided to really use sewing to help me heal. My next goal was to make a shirt with a collar. Don’t you just wonder what my therapist thought? My therapist said “Okay, in how long? Let’s quantify it. Don't think about how long it would take the “old Diane” but how long it will take you now.” “Well, the 'old Diane' would make this in 4-ish hours so the “current Diane” can do it in 8 hours. I’ll allow myself twice the time.” I said. “Great! Keep track of your time and let’s see how it goes. If it takes you longer it doesn’t matter, just do it.” She said. Setting goals has always worked for me and this new goal freed me up to walk into my sewing room, turn on the timer and start. Somehow this approach separated me from the disappointment of before and the sadness that comes with thinking about what I can’t do anymore and allowed me to move forward. More than 14 hours later here it is, my goal achieved! Yes, it took me more than 3 times what it would’ve before and the quality of my work is not the same but the maker in me is alive once again.
My doctor recently said to me when I asked how long it would take me to recover “We aren't going to talk about time, we are only going to talk about progress.” You can imagine how hard it was for the impatient me to hear that. But I thought about it for a few days, really digested it and decided to own it. It’s been just about the most helpful thing I’ve heard. I made something. That’s progress. We aren’t going to talk about the time it took. I’ve physically adapted to so many things and I can adapt my thinking too. It doesn’t matter how many things I make in a month or how perfect they are, I just need to make progress. Are you here too? Have you had a baby and you don’t have time? Can you find 15 minutes twice a week to make progress? Did your life change involve moving to a different place and you don’t have room to sew or a job where you work more? Can you pick up some hand work that will move your skills forward as you work in your kitchen or on your lunch break? Sewing is a great way to help me get back to me. I watched it happen in my students and now it’s my turn. Oh and by the way, I loved this pattern and the butter soft Robert Kaufman corduroy from Fabricland. I made a contrast under placket, tab and collar facing with 1/2 yard of the cotton lawn print. I even had enough of the floral to bind the sleeve seams so the rolled up sleeve looks finished. This shirt is a keeper…for so many reasons. If you made it to the end of this very long blog post, I thank you for taking the time. It felt good to get it out. Happy Sewing Friends! 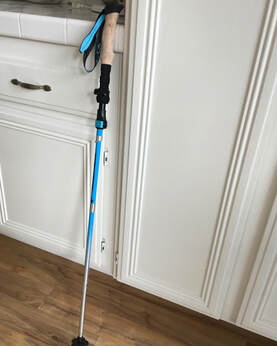  McCall's 7254 has been in my stash for quite a while and for the life of me I can't figure out why I waited so long to make it. I purchased this super soft French terry from LA Finch fabrics with the idea that I would make a hoodie, but when it came it was a little too soft and lightweight to hold a zipper and this pattern came to mind. It took a few minutes but I dug around my pattern stash until I found it. 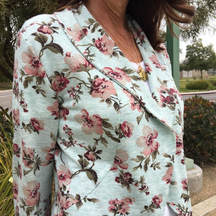 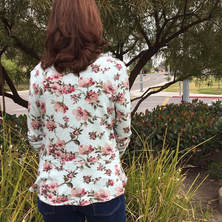 If you've never made a jacket before then this pattern is for you for a couple of reasons: it's designed for knits so setting in the sleeve is really easy, the collar and peplum are sewn in one circular seam (what could be easier?) and it's quick! It was start to finish sewing in about 2 hours! If you're new to knits, a ponte knit would be a great (nice and stable) and would be a great weight for the style.  Of course I picked a windy day to take these pics but what do you do? I did end up making a hoodie and I'll be blogging about that soon!
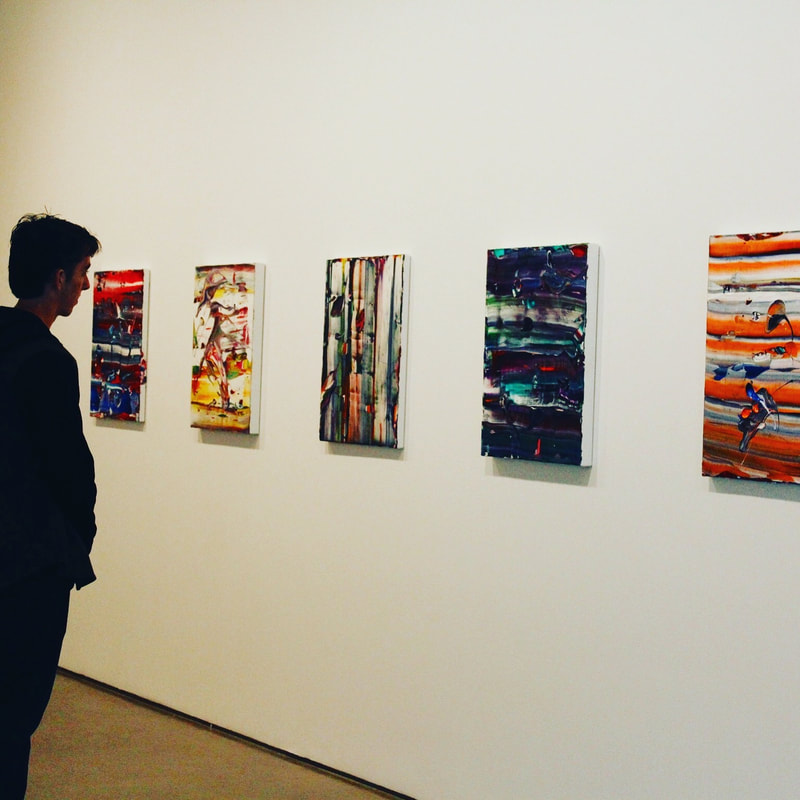
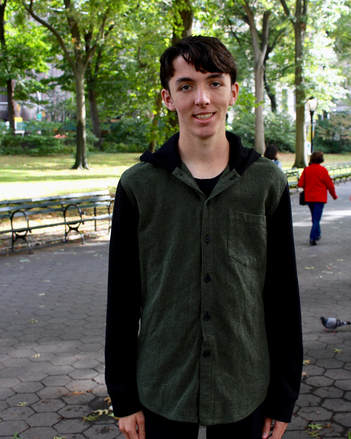 There's nothing better than when you sew and gift and you know they like it and it fits! But when it's for your teenage son it's even better. That's what we have here...Mom got it right on this one. Our son is very easy to please but he also doesn't like to have a lot of "things". This is a wonderful trait (I wish I was more like this) but it does make giving him a gift a little bit tricky. Our family went to NYC for my husband's show a couple of weeks ago and I was so excited we were going to have everyone in the family together I decided to make something new for everyone in the crew.  My original plan was to make my son a flannel shirt so I cut out McCall's 6044 (my go to men's shirt pattern) but as I started constructing it, I realized he has a flannel hoodie in his closet that gets tons of wear and honestly could use a little break. So I made the body of the shirt using 6044 and I made the sleeves and hood from McCall's 7447 out of sweatshirting. The patterns were perfectly interchangeable (the sleeve popped right in and the hood was the exact length of the neckline). The only changes I made were lining the hood and adding twill tape to the neckline. This was a fast shirt. It's amazing how much faster a hood is from a collar and a knit sleeve is from a cuffed sleeve with a placket. Win, win here! This post isn't picture heavy but I'm not complaining since he was okay with me at least taking a photo and posting it. It was a dream trip with the family in NYC and the best part was seeing my husband's paintings up and on the wall in a beautiful space. Love!
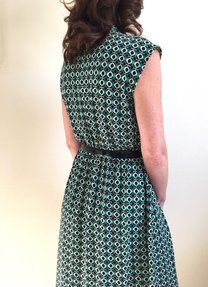
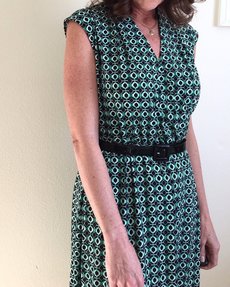
 One of my students brought this fabric into class and I immediately fell in love! Not with my student (although she's wonderful and has amazing taste) but with the fabric. I thought about sliding it into my work bag when she wasn't looking or offering to buy it from her but instead she told me she got it from Craftsy and I was giddy to discover it was still available! Yay! For those of you that haven't purchased fabric from Craftsy, all of the their fabrics either come in kits or in precut lengths. I purchased a 4 yard cut so I still have enough for a blouse or shell.  I made McCall's 7381 View A in a size 12 straight out of the envelope but ended up making quite a few changes after I wore it the first time. This is a polyester/spandex knit and although I usually sew with natural fibers, I love the way this dress looks, feels and washes (which is a good thing since I purchased another knit just like it.) The dress calls for a woven fabric and has quite a bit of ease built in, so sizing down to a 10 would've minimized the alterations I needed (and the amount of time it took to take it apart!). 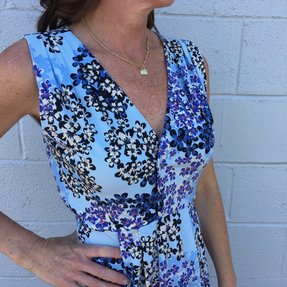 Here are the changes I made:
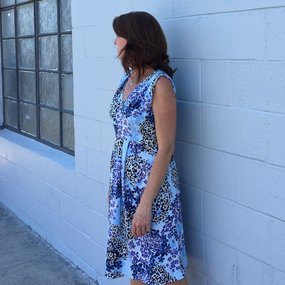 I'm happy I took the time to make the changes even though it took me almost as long to make the changes as it took to make the dress. Every time I need to make changes that require a lot of ripping out I spend days deciding if I should do it or not. I'm always happy when I take the time. "Unsewing" can be very discouraging but I highly recommend taking the chance sometimes. 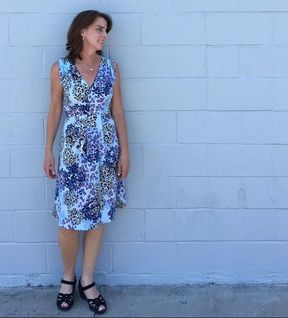 I've been sewing faster than I've been blogging so I have more to share with you. Summer sewing is in full swing and I couldn't be happier.
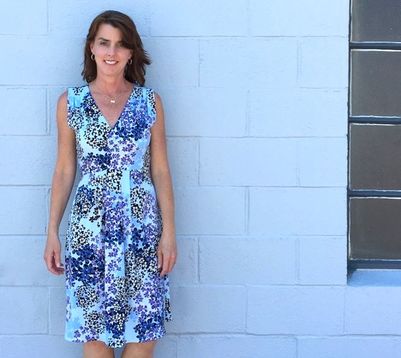
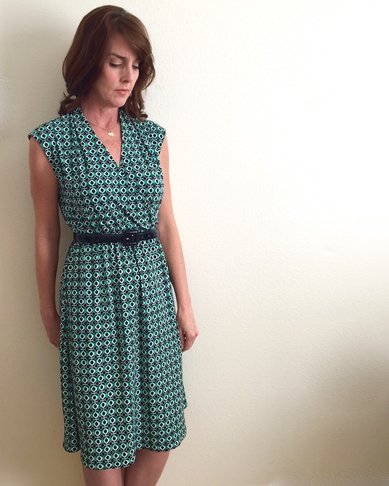 This is a brand new pattern from McCall's that I picked up at the, you guessed it, pattern sale. When I walk outta the store with a new stack of patterns in hand I feel like I just made money and that feels great! Especially when I pick up one I can use over and over like this one. 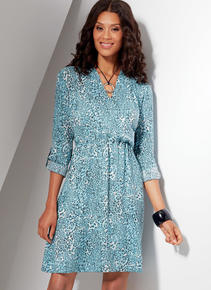 It's McCall's 7534 and although I was thinking ahead to spring when I made this it is truly a seasonless dress. A simple cardigan would make this great in the fall. The pattern in suitable for woven fabrics although I chose an ITY knit. It's not a fabric I choose very often even though there are plenty of them out there but it turned out to be a perfect choice for this dress. It's comfortable, flows nicely and washable.
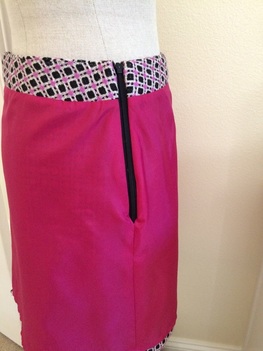
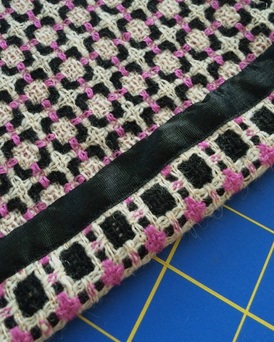
The pattern is really simple and goes together quickly. The most time consuming part of putting it together was matching the graphic design before I cut it out. I added 4 inches to the length as I'm a knee length gal but other than that I made it just like the pattern. 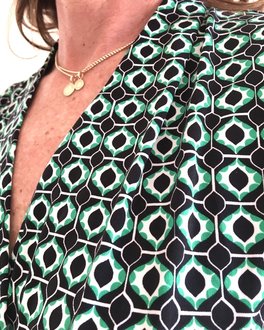 I can certainly add this to my TNT pattern list. I'm excited to make it again. Wouldn't it be cute in one of those drapey linen/rayon blends in a pretty color? Happy Sewing Friends! 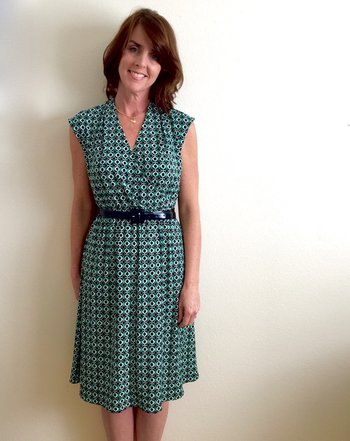 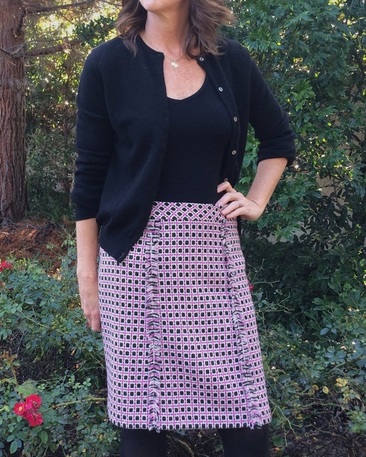 It’s week #2 of the “Bottoms-Up” skirt series. Last week I made a gray and black Ally Skirt but this week I have a wintery but colorful plaid skirt that’ll spice up my closet. 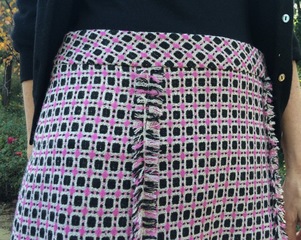 This beautiful wool boucle from Fabricland was one I couldn’t pass up. Clearly, it would make a stunning jacket but I would wear a skirt so much more. Chanel boucle jackets often have fringe trim so why not add some trim to my skirt as well? 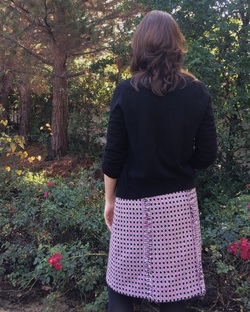 I used McCall’s pattern 7096. It’s fairly new pattern and has front and back seams that would lend themselves to fringe. I made view A in a size 12 because I found it ran a little big and it still sits too low on the hip for me. I figure by the time Thanksgiving is over it’ll be just perfect. 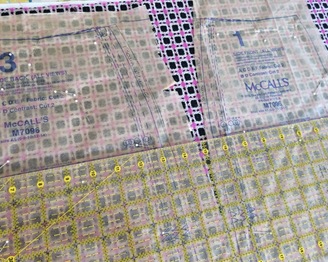 I took my time cutting the plaid (for obvious reasons) and cut all pieces in a single layer to make sure I got the match right on. The best way I found to ensure everything lined up was by using my 24” quilting ruler across all of the pieces. And after all of that painstaking work lining it up, I used the Accufeed on my machine (essentially a built-in walking foot) to keep those plaids in place. 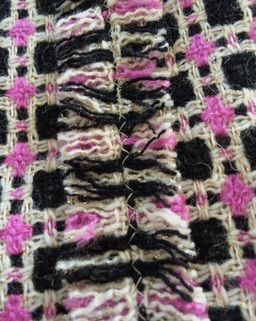 The fringe may look difficult and time consuming and it may make you think I’m clever, but it’s so simple you won’t think I’m such a genius. I sewed the front and back seams wrong sides together, pressed them open from the front, and did a long zig-zag stitch down the center seam to stabilize the seam for fringing. I simply pulled threads (while I was on the phone with my sweet mom) and it was done! It really is that easy.
This is an unlined skirt pattern and for sure a wool skirt needs to be lined. I wrote a “How to Line an Unlined Skirt” post to show how to make a pattern for a skirt lining. The lining was made without the front and back seams to eliminate bulk. I then attached it to the yoke. Check it out! 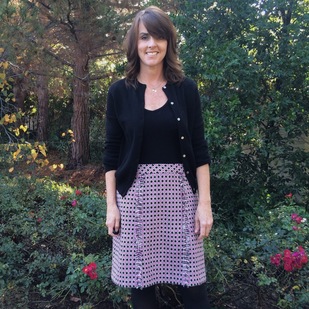 I have a purple skirt in the works for week #3. Doesn’t every girl need a purple skirt?
Happy Sewing! Diane 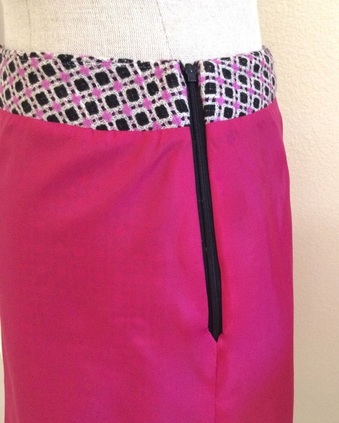 Deep down inside, I must be a little granny because I love to line my skirts (I've been known to wear a half slip but don’t judge). Cotton, linen or otherwise, making the the inside as pretty as the outside is part of the fun of sewing. I recently made McCall’s 7096, a six gore unlined skirt, out of a wool boucle. Needless to say I wanted it lined. Since I have a skirt blog series coming up soon, A "How To" for skirt linings seems appropriate. 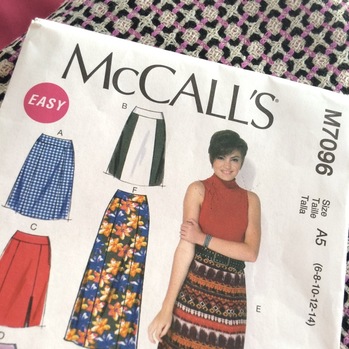 A lining should be as smooth as possible as the last thing we want to do is add bulk to the inside of a garment. Making a lining with as few seams as possible is the goal. I turned this six gore skirt into a simple one piece front and one piece back lining. Here’s how to do it: 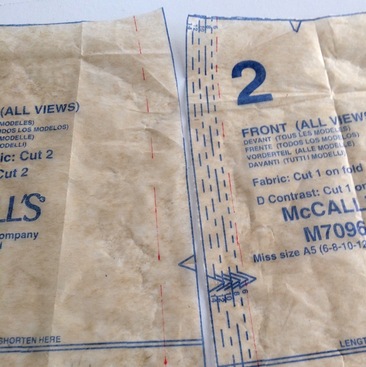 Draw the stitching lines on the front and side front pieces along the front seamline. 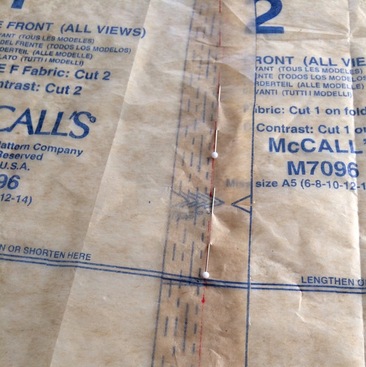 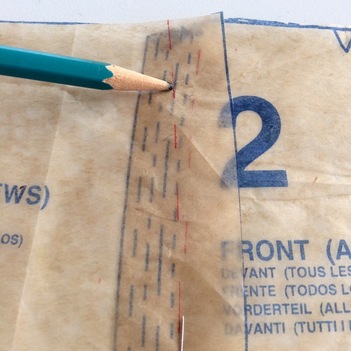 Overlap the stitching lines and pin together. Go as far as you can while keeping the pattern pieces flat. They will spread into a “V” near the top. 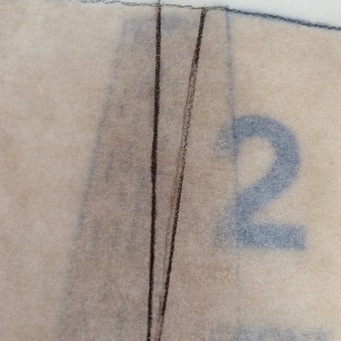 Place tracing paper over the pinned pattern pieces and trace the outside and the “V” at the top of the pattern. This forms the new dart or pleat. 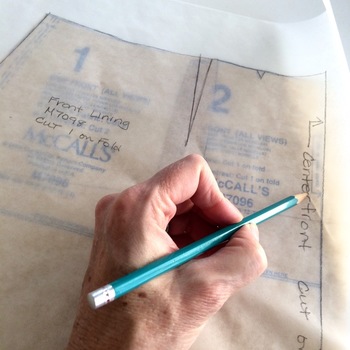 Make all the pattern markings on the new pattern and repeat for the back. Cut off the hem allowance from the original pattern (in my case I cut off 1 1/2” as stated on the pattern.) There it is! Easy peasy, right?
Enjoy! 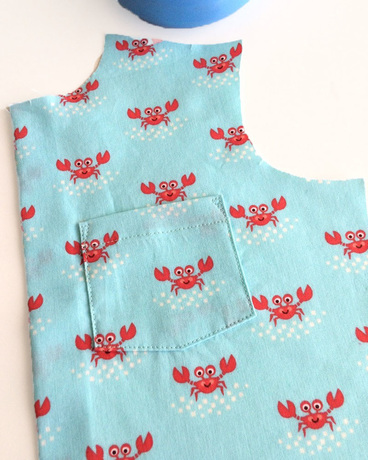 I made the tiniest little boy shirt out of this fabric and since the shirt was so small, I wanted to minimize the busyness of the pattern by matching the pattern on the pocket. Actually, if I were to be completely truthful, I really wanted to match the pocket because I love matching patterns and probably would never have another chance to line up "googly eyes". Learning to match a pocket is quick and this method works for prints, stripes as well as plaids. Here's how to do it: 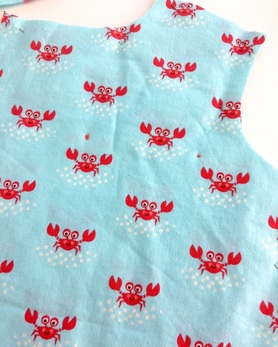 1. Transfer pocket placement dots to front of shirt. 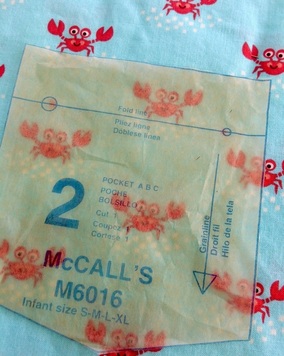 2. Place pocket pattern on the shirt so dots match. 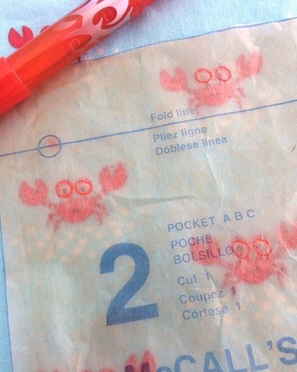 3. Trace design of fabric onto tissue ( I marked the "googly eyes" of the crab using a water soluble marker just in case it bled through the tissue and onto the fabric. This may or may not have happened in the past. Hmmm.) 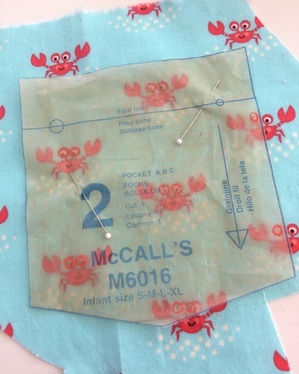 4. Place pocket pattern over shirt fabric, matching "googly eyes". Cut out the pocket. Here's how to prep the pocket and stitch it on: 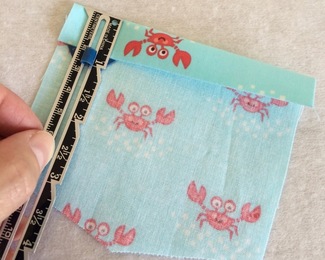 1. Fold over hem allowance. 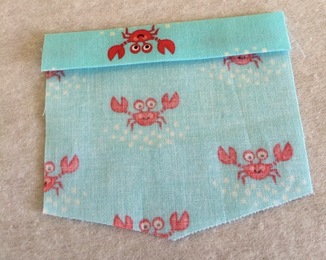 2. Fold under 1/4" under hem allowance for clean edge. 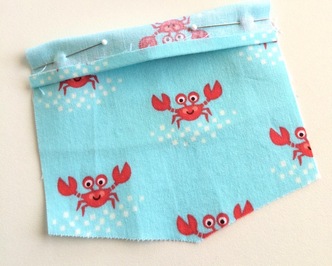 3. Fold hem back along the foldline, right sides together. 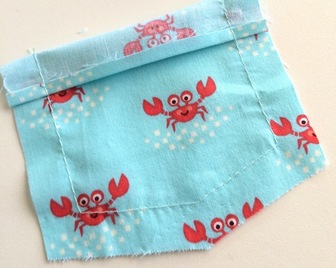 4. Stitch along hem allowance line (in this example it's 5/8"). 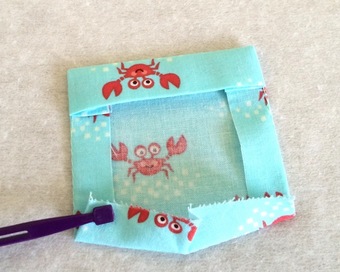 5. Turn the hem so the right side is out and press in along stitching line. Using the line as the guide insures that the pocket is even. 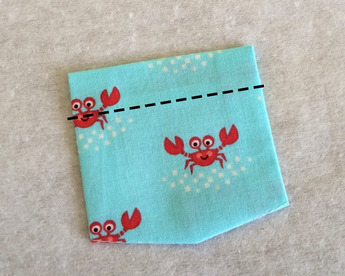 6. Stitch along top of pocket at hem (I completely forgot to photo this part...we will use our imaginations and pretend it's there, uh-hem.) 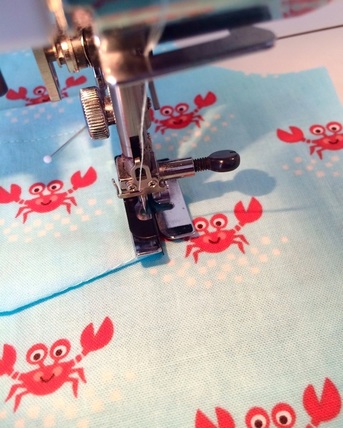 7. Place pocket on shirt, pin in place and stitch (I use my ditch foot for a really clean line.)  There's our pocket all ready to go! |

About MeHi! I'm Diane, a wife, mom, sewing teacher and pattern designer from sunny Southern California. I share my sewing adventures here on the Blue Dot Blog formerly Gatorbunnysews. For more info click here. 
Categories
All
Archives
October 2022
|


 RSS Feed
Proudly powered by Weebly