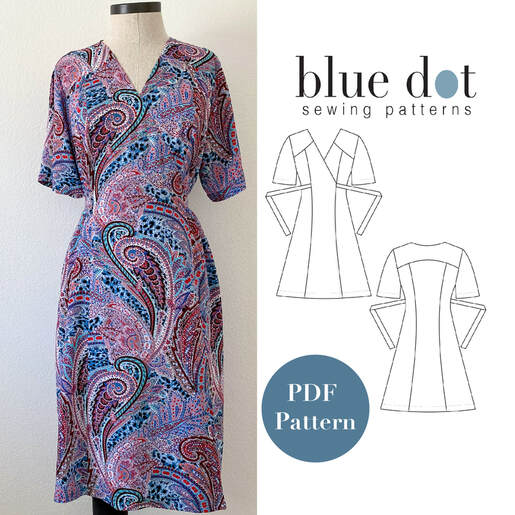
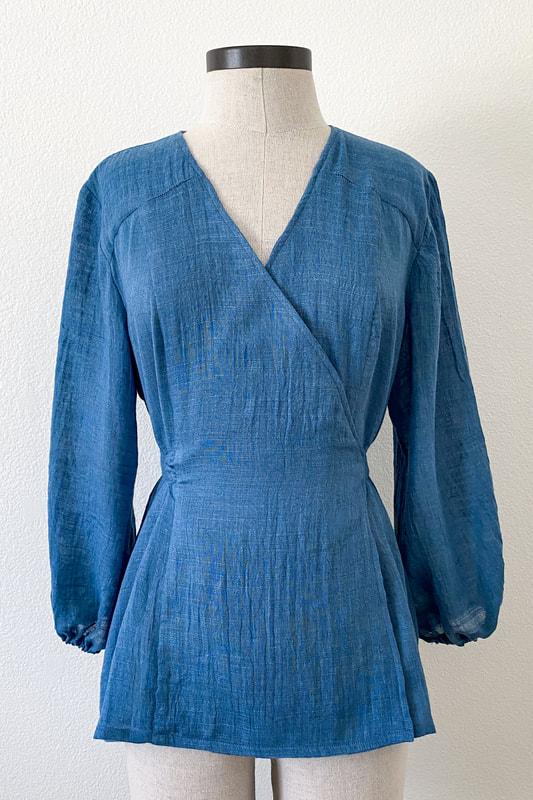
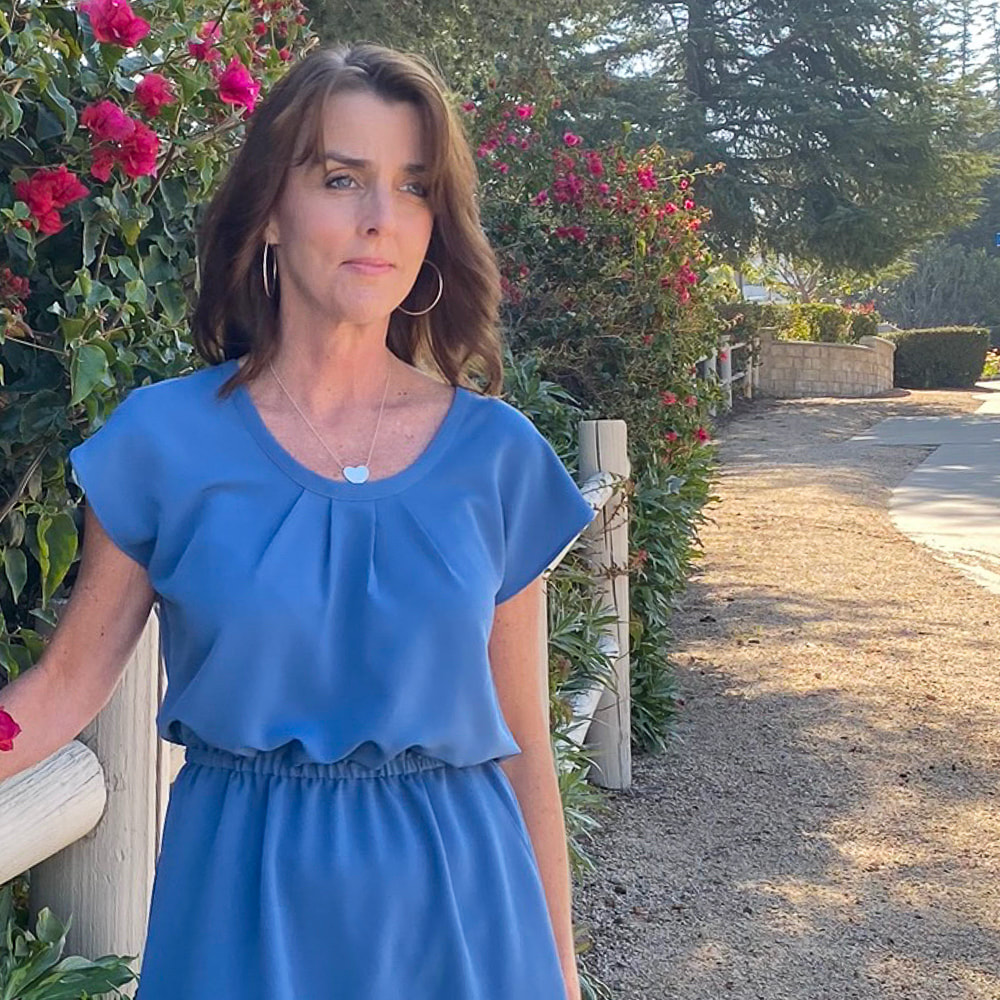
 It's here! The new Andrea Wrap Dress and Top PDF pattern! And get it for 20% off with code BDPANDREA through August 4th! This pattern has been so fun to design as it was inspired by a dress I made and loved (and wish I had saved) from the 90's. Of course I updated the look so it's modern for today but it still has the easy to wear feeling from the 90's. Is that Counting Crows I hear playing in the background? 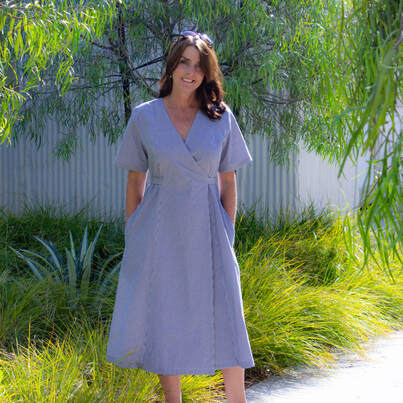 The Andrea Wrap Dress comes in 3 lengths, a hip length top, knee length dress and midi length dress. It's easy to fit and ties just above the waist (no closures!) so it's an easy project for beginners and flattering on most body types. Make it up in gingham for a fun summer dress, a beautiful silk crepe for an elegant event or cozy it up for fall in a flannel., 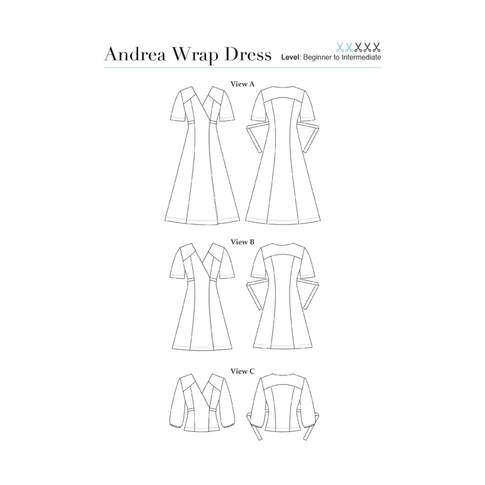
 Grab the Andrea Dress Pattern during the 20% off during the New Release Sale. Use code: BDPANDREA. I can't wait to see what you make!
Enjoy! Diane
0 Comments
 March 1st is the day! I will be releasing a new skirt pattern that I'm really excited about! The pattern will be 20% off the first week but for a super special discount, join our newsletter or Facebook group. More coming soon!
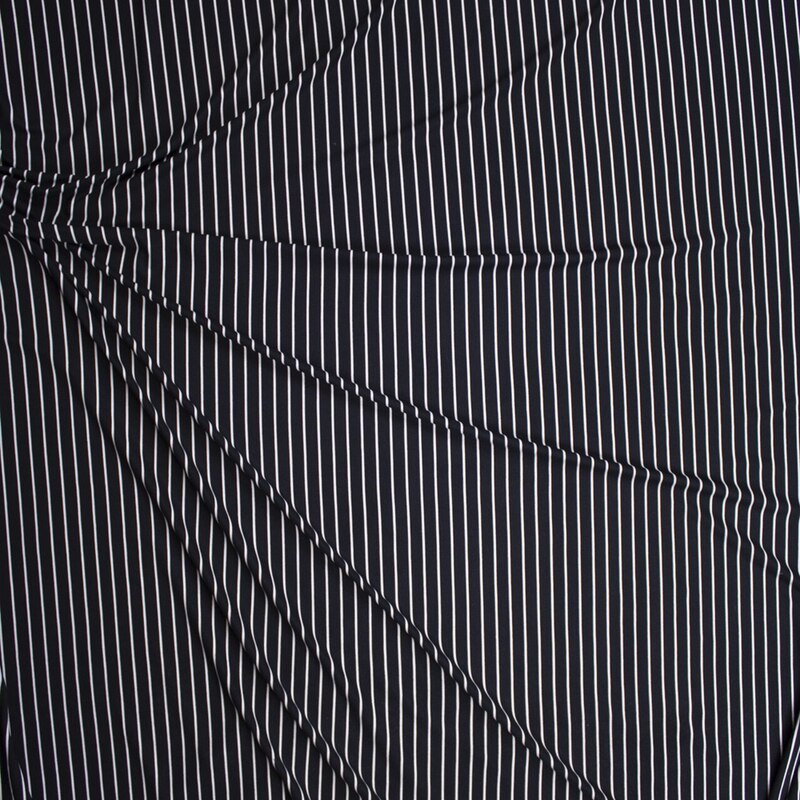
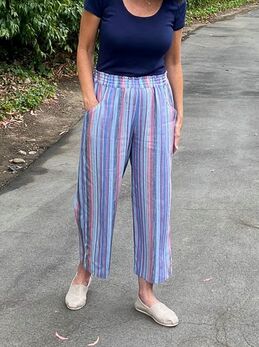 I recently made a pair of super soft Coffeehouse Pants in a rayon/linen blend. Now those of you with any experience with stripes, know it can take some finesse to make them look good. In the case of an uneven stripe, the school of thought has been that they can't be matched. But I'm here to say that they can! We should start by defining an uneven stripe. An uneven stripe has different stripe colors and widths that don't form a symmetrical pattern. Here is an example of pants in uneven stripes that haven't been matched:  Usually when we make pants we attempt to match the stripes in the center front and center back so they form a "V" shape. But here, there's no match at center front. Here's how to fix it. Normally when we lay out fabric, we fold the fabric in half lengthwise. With an uneven stripe, you get stripes that don't line up. If you look at the red stripes in the pic below, you can see they're almost opposite in the lengthwise fold. 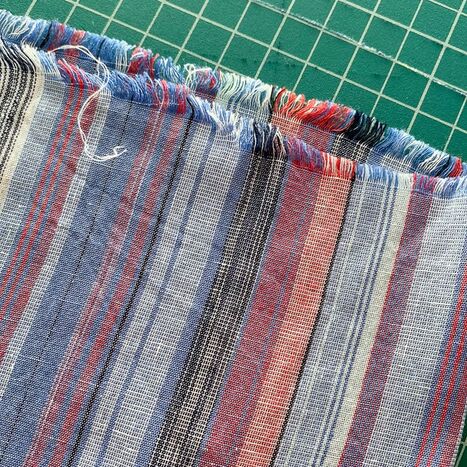 The solution comes in the way you fold the fabric before layout. If you fold your fabric on the CROSSGRAIN, you can avoid this entirely. In the photo below, I folded the fabric crosswise and now all the stripes line up: 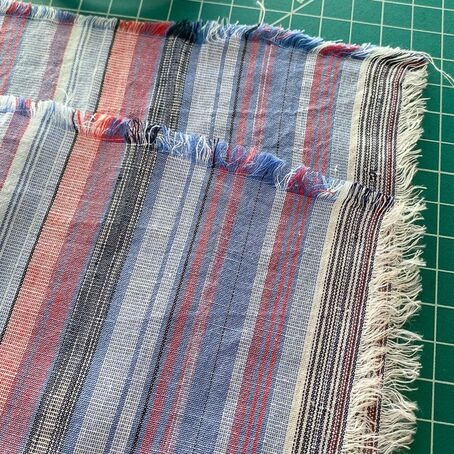 Since the fabric was folded on the crossgrain, my pant pattern pieces were laid out side by side: 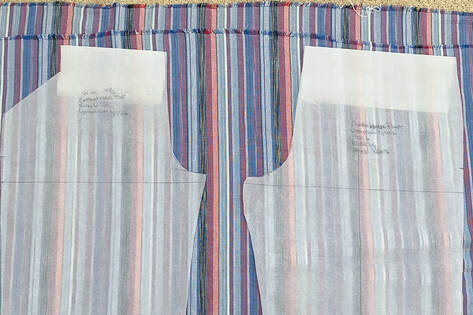 Here's the match I got on the center back seam: 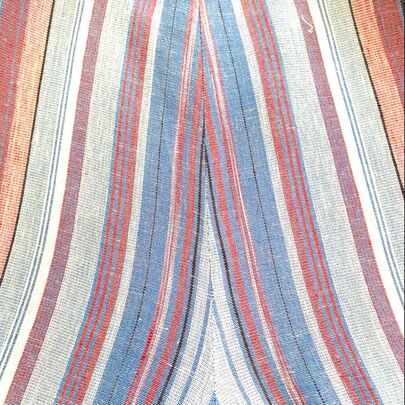 It's so simple but a complete game changer! Keep the crosswise fold in mind before purchasing your fabric for an uneven stripe project so you're certain to buy enough fabric.
I hope this helps all of you! Stay well and keep sewing, Diane 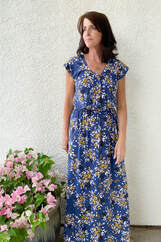 The summer sewing continues with the first maxi I've made in quite a while even though I wear them all the time. The Morrison Top and Dress pattern has turned out to be the basis for this summer's wardrobe. It's easy, quick and since I'm home most of the time right now, comfortable. 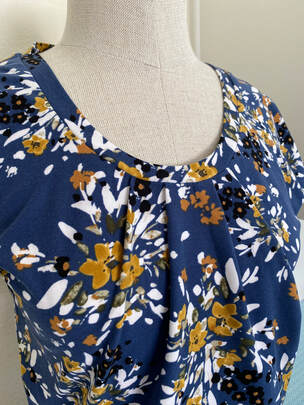 I purchased 2 yards of this double brushed poly online with the idea of making a dress or jumpsuit. When I got it I figured it might be too much print for a jumpsuit (plus how did I think I'd get a jumpsuit out of 2 yards?) and better in a dress. I had just enough for a maxi, whew! 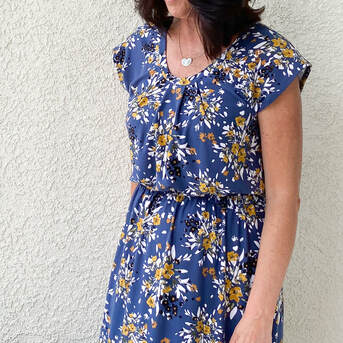 I measured my favorite maxi and made the skirt the same 41" length. After cutting, it went together in under 2 hours so it turned out to be a satisfying make. The total project was less than $20 because I already had the pattern (of course, but it's $10 on the website) and the thread. It will also travel well as this fabric doesn't wrinkle. What a dream! 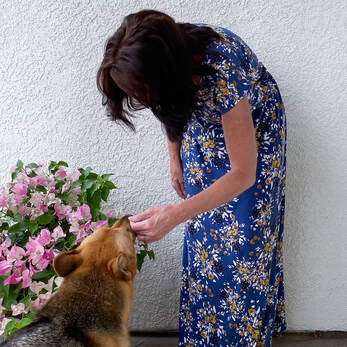 I did end up making that jumpsuit and I'll be sharing with you very soon!
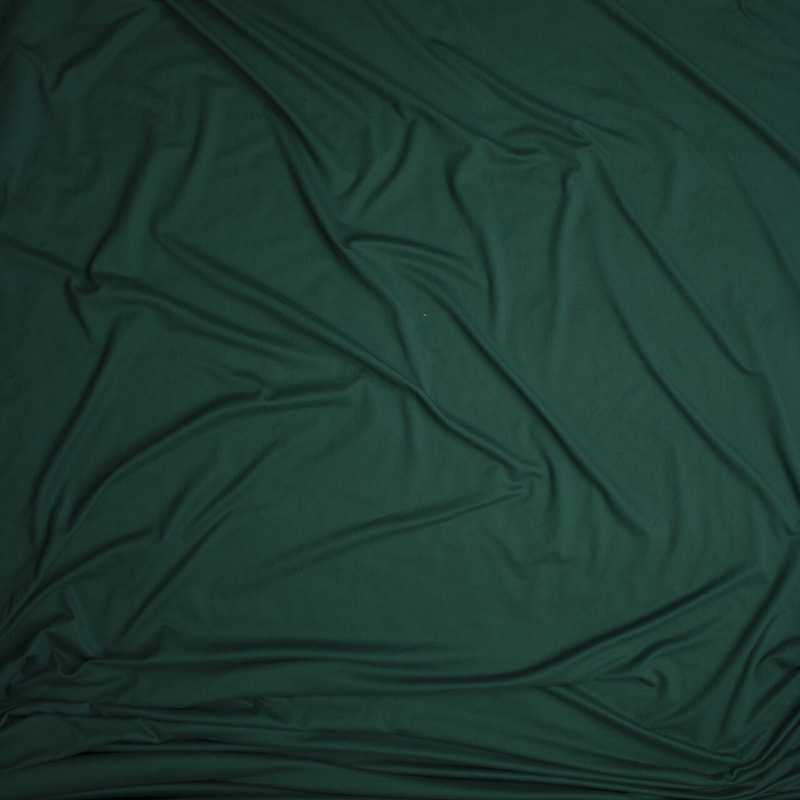
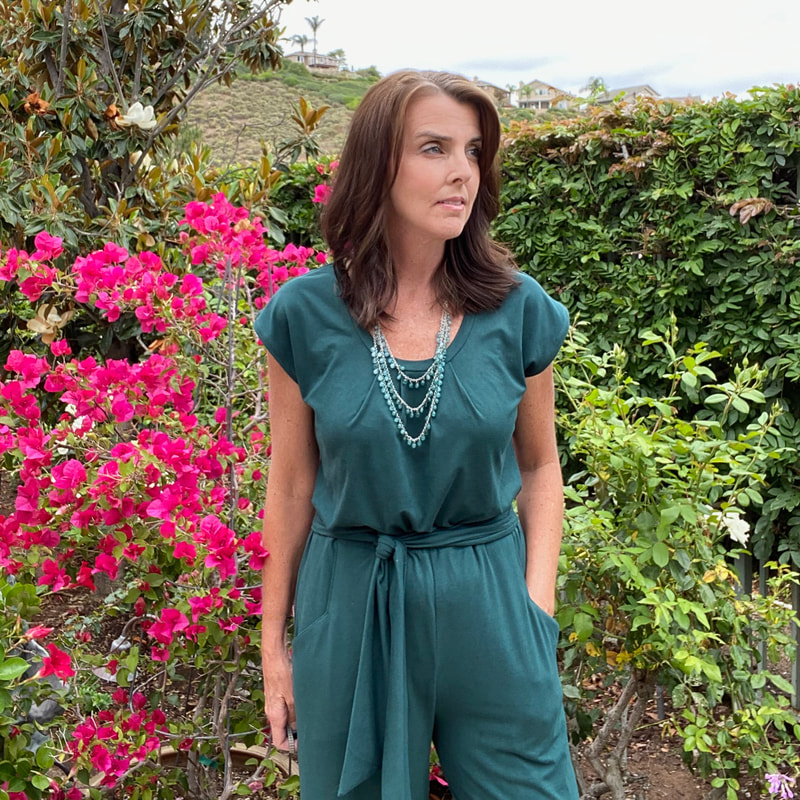
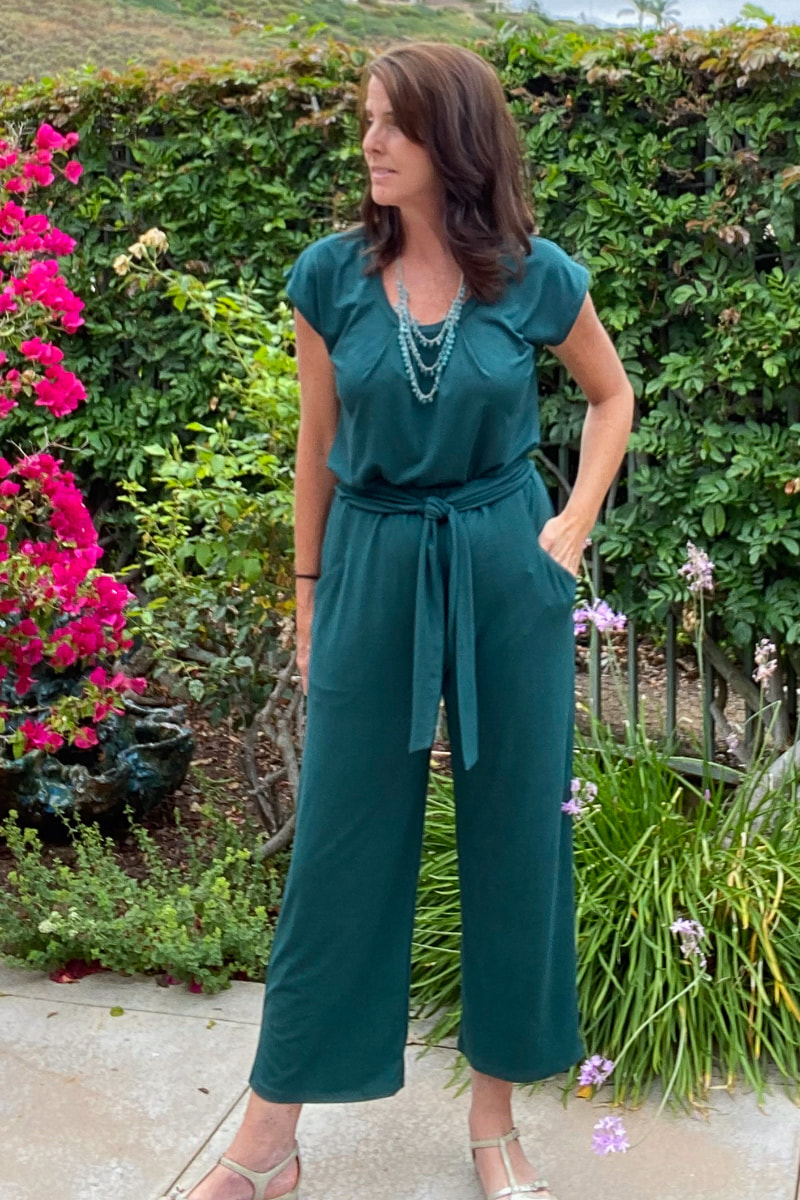
Be safe friends! Diane  Jumpsuits are all the rage, both in the stores and in the pattern books. I’ve been inspired by all the different versions out there (I love this one from Made By Laquana) but I have to admit, I’ve been reluctant to make one since I really don't want to deal with the "operational issues" that come with wearing a jumpsuit. The best part of sewing, however, is we have the opportunity to solve these fashion issues that might otherwise hold us back. I made up two of my most used patterns in the same fabric and now have my faux jumpsuit and as a bonus, two additional separates for my wardrobe. I'm excited to be a guest blogger for Cali Fabrics and have the opportunity choose fabric from their large collection of knits for my "jumpsuit". The emerald green double brushed poly from Cali Fabrics was my jumping off point for this project because I knew I wanted something comfortable and in a beautiful color (it comes in a large selection of both solids and prints, too!). If you haven’t used double-brushed poly before, it’s definitely a knit to try. It’s stable (keeps it’s shape), soft, washable and doesn’t curl when you work with it. If you’re new to knits and need something light to mid weight, this is a great place to start. And on top of it all, it’s pretty wrinkle free so it travels well. The fabric has a 59" inch usable width and took 4 yards to make the top, pants and tie. I paired the Morrison Top and Coffeehouse Pant patterns (both are in a "Summer Bundle" sale for $15!) because they are versatile enough to adapt to a project like this. Needless to say, I have several versions of these patterns already in my closet but reinventing them as a jumpsuit makes them look completely different. I sewed the top in a straight size 6 and made a few easy changes to the pant pattern to give it the “jumpsuit” look I was after. Here are the changes I made: Widened the pant leg 4”: At the pant hem, I added 1" to the width at both the inner and outer leg and blended the seams. Added 4” to the rise: I raised the rise on the front, back, pocket and pocket facing pieces. This included 2 1/2” to bring it to true waist and 1 1/2” for a fold over casing. Used 3/4” elastic: Instead of the 1 1/2” the pattern calls for, I used narrower elastic since it would hit at the true waist. Made a fold over casing instead of a waistband: This reduced bulk at the waist. Added a 3” x 58” self tie. I cut a 7" x 59" piece of fabric, folded it over, right sides together, and stitched.  As I was making this outfit, I realized this would be a great option for a capsule wardrobe. Make up these two pieces in a navy or black double brushed poly and you'll have a great foundation for a mini wardrobe. Add a striped cardigan and floral skirt and you'll have a weekend getaway capsule that's easy to pack and wrinkle free. So many projects, so little time!
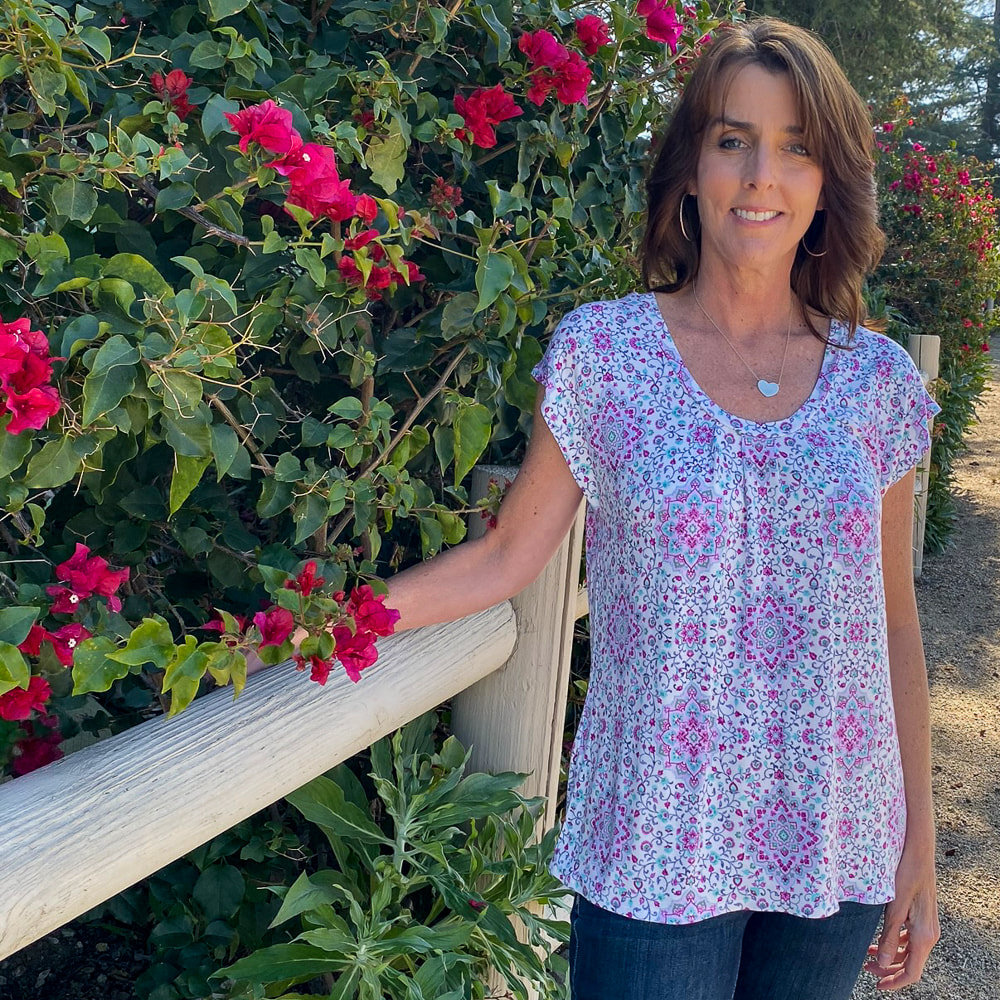
I want to thank Cali Fabrics for the beautiful fabric and inspiration. It's always a pleasure working with you and your gorgeous fabrics! Happy Sewing, Diane  Once it starts creeping into the 90's here, I begin dreaming of summer shift dresses (check out my Summer Frock Pinterest Board), The ideal dress is comfortable in the heat, versatile enough to work in (water plants, sew and run errands too) and look good enough to go out to dinner because let's face it, who wants to cook when it's this hot?! Enter the Margo Dress!  As many of you know, one of my goals as a pattern designer is to create versatile patterns that can be used over and over. It's so much easier to start with a base pattern that you know works and use it as a jumping off point for creative and unique pieces. The Margo Blouse is one such pattern.  I used 2 yards of iridescent linen from my stash and coordinating DMC embroidery floss for the contrast stitching. Here are the changes I made:
That's it! Making the dress shorter or adding tiered ruffles would also make a beautiful romantic dress for the summer. Embroidery or lace added to the yoke would make a fun, bohemian feel. So many options! I have a Margo Blouse Pinterest board for even more ideas.
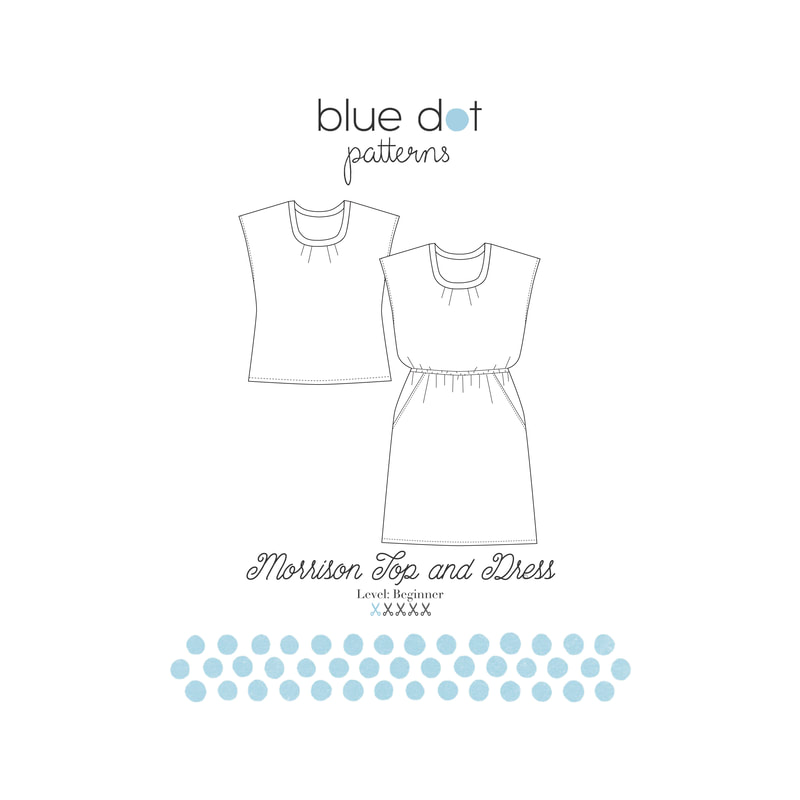
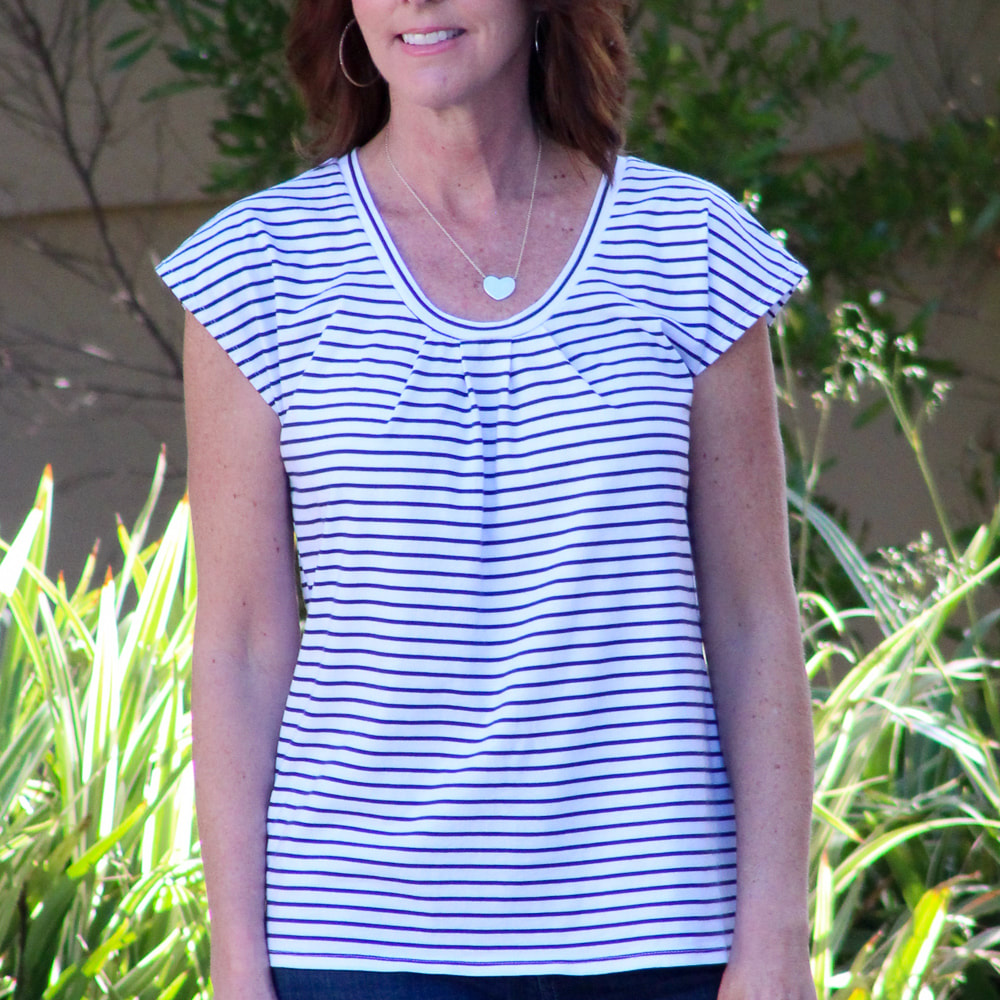
Happy Sewing, Friends! Diane 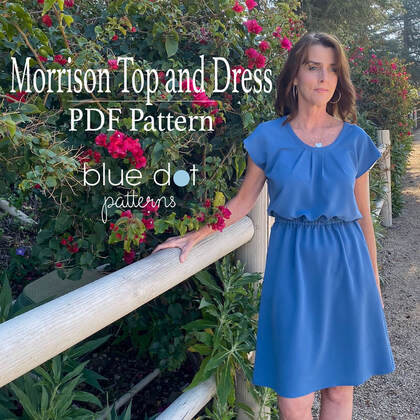 Yes! I have a new pattern to share with all of you! It's the Morrison Top and Dress PDF Pattern! This easy to sew sleeveless top or dress pattern has a scoop neck and pleated bodice. The dress has an elastic waist and side pockets (of course pockets!). And both can be made in either knit or woven fabric. The pattern package comes with full color, illustrated instructions, tiled pattern and copy shop file. It comes in sizes 4-18 and sells for $10! 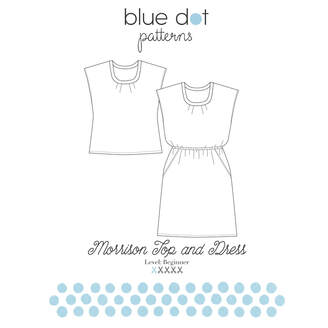 This pattern came out of a gap I had in my own closet. I was in desperate need of tops that were as easy to wear as a t-shirt but a little more elevated. As I was designing this I realized I could add the option of making it in a woven and then would also have a versatile and comfortable shell. Then I just kept going and added the dress. I can tell you I live in these dresses especially because I work at home and want something that's comfortable but isn't sweatpants! Uh-hem! I just pull it over my head, add a necklace and I'm good to go!
If you're new to sewing this is a great pattern for you because it's easy to sew and easy to fit. Start with the top as your first project because it only has three pattern pieces then move on to the dress as your second project. And if you're a seasoned sewist you can use this pattern as a quick wardrobe builder and as a great basic to be creative with. You can add piping to the pockets (one tester did this and it's adorable!), change the bodice pleats to gathers, add a drawstring with eyelets and a tie...the options are endless. One of my goals as a designer is to create affordable AND versatile patterns that can be used over and over again!  I had some wonderful testers that helped me with the Morrison Pattern and I'll be sharing their makes soon along with some tutorials on making this your own.
I really hope you enjoy it! 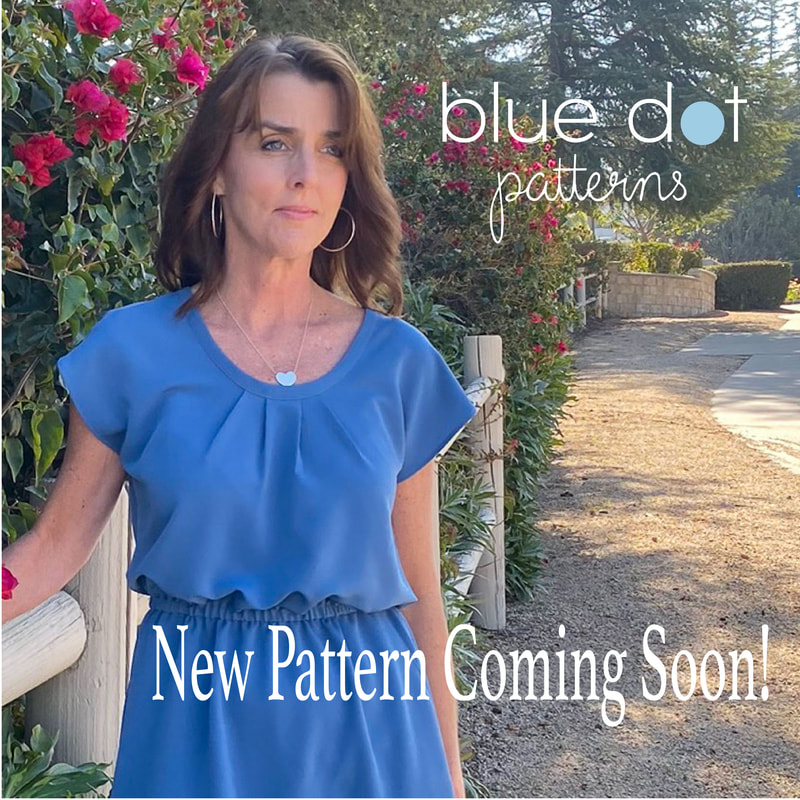 I'm excited to announce my new PDF pattern, The Morrison Top and Dress will be released March 4th! It's an easy to sew and fit top and dress pattern suitable for all sewists, including beginners!
Join my newsletter for a new release coupon!!! Can't wait to share it soon!
Every holiday I stand in my closet and look for something that is both dressy and comfortable and this year I’m going to have some lovelies to choose from! We usually do quite a bit of entertaining at our place this time of year and with that, quite a bit of cooking so comfort is key. But as hostess, I want to look festive and feel pretty. You’re probably thinking "I love velvet, it’s luxurious, soft, glamorous but hard to sew, right?" Wrong. This crushed velvet is an easy first step into sewing your first velvet garment because this isn’t velvet in the formal sense, it’s stretch velour which for sewing and I would argue, wearing, is even better. I have some tips here that will have you crushing on this fabric.
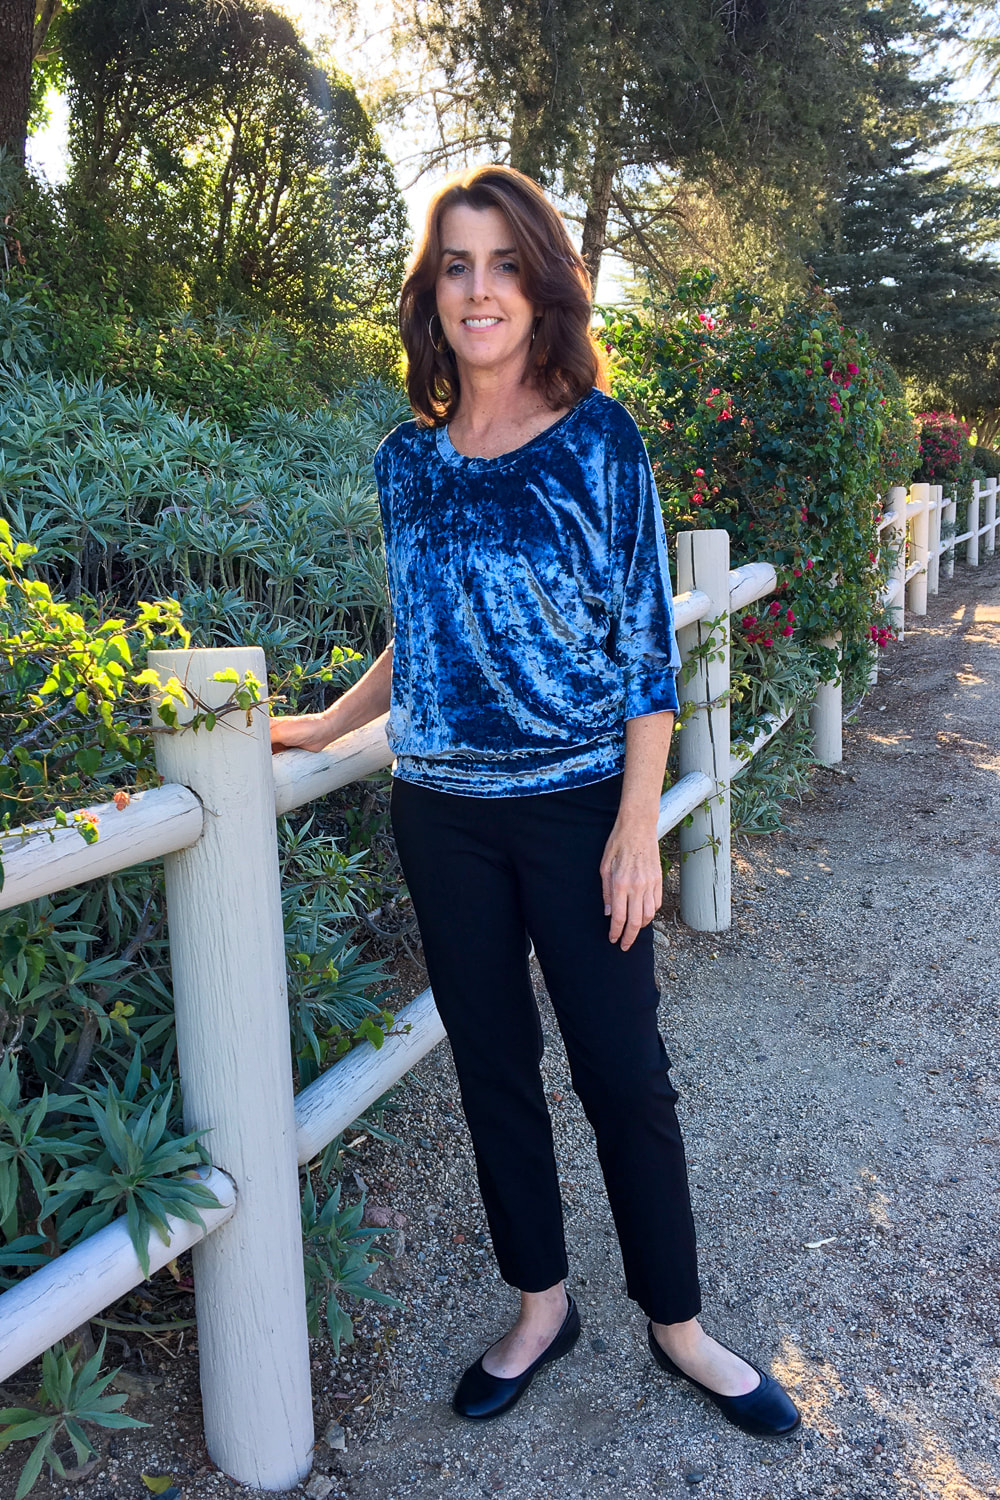
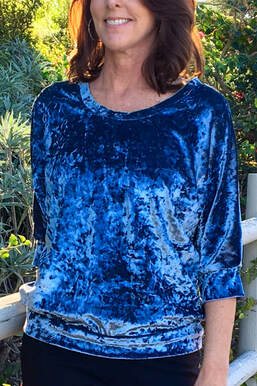
Well I'm pretty excited to be a guest blogger today for Cali Fabrics and couldn't resist appeasing my velvet fix with their gorgeous collection of crushed velvets. There are several rich colors of this fabric on the Cali Fabrics website and I couldn’t choose just one so in true “fabricaholic” form I went ahead and picked two! I chose the romantic dusty light blue and elegant wine color for my holiday makes (but you can check out more colors here). 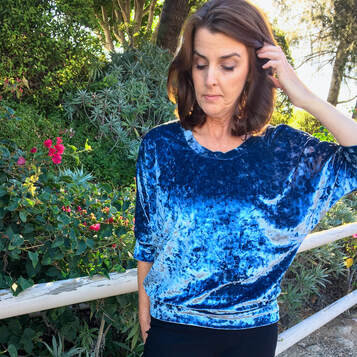 I took out my tried and true Blue Dot Patterns Georgia Top (of all my patterns I’ve made this the most and use coupon code CALIFAB and get 20% off the pattern for all of November!) to make a dusty blue luxurious (and very quick) sweatshirt. I made it straight out of the package minus the topstitching and it was quick and simple because this pattern doesn’t have any hems. I cut and sewed this in under two hours! I will probably wear this on Thanksgiving as it’s comfortable, washable (key when cooking, right?) and I’m pretty sure everyone will want to hug me.
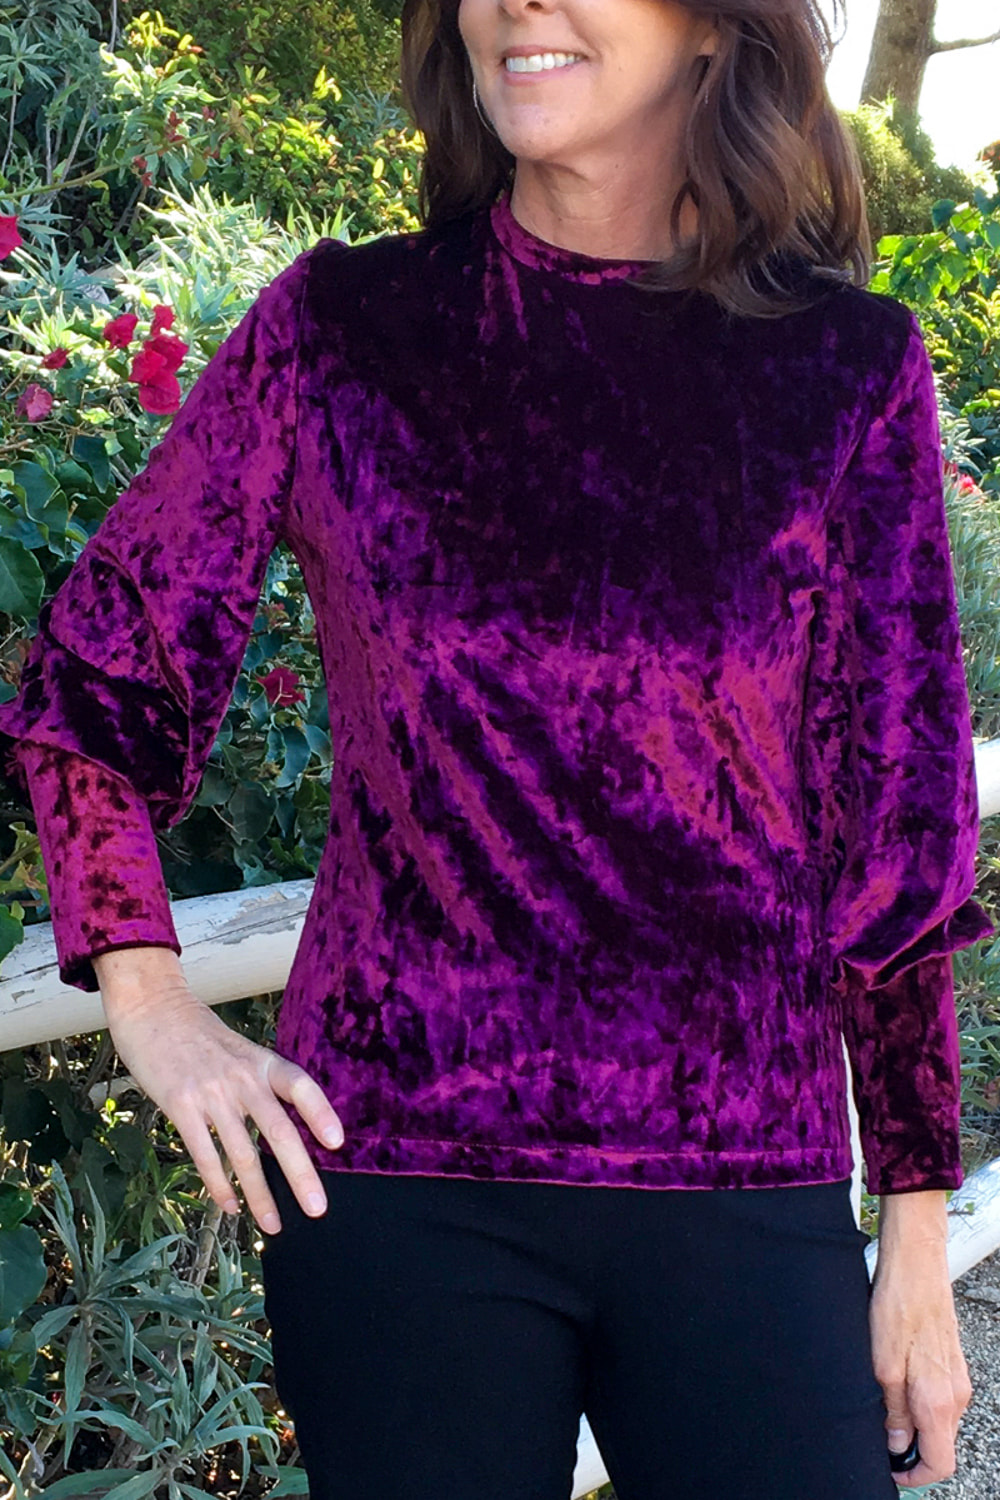
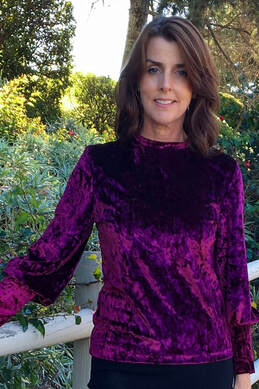
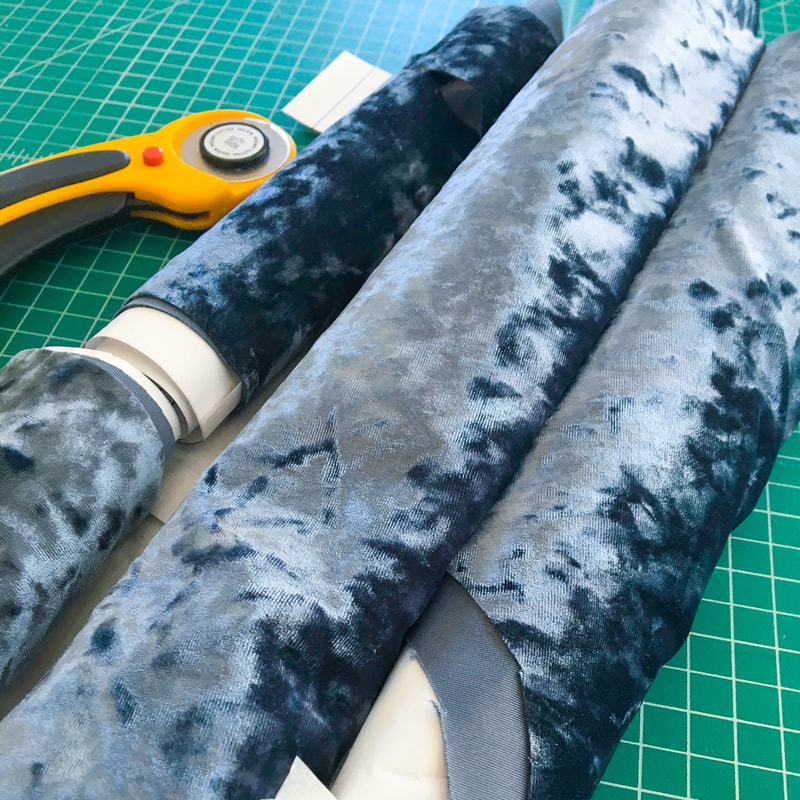
For my next make I used the wine crushed velvet to sew up Simplicity’s fall release 8982. I bought this pattern as soon as it came out because of View C. The sleeves are divine! This top is almost as simple as the Georgia Top but adds set-in sleeves, gathers at the cuffs and a hem. Still, nothing difficult here and with the stretch velvet, the sleeves slid in like a dream and I used a twin needle for the hem. This top is just as comfortable and very easy to dress up. It looks good with black jeans but also would be great with a skirt and heels. Hopefully someone will invite me to a New Year’s party (wink,wink) because I’ll be ready with this top, black pants and sparkly earrings. Now here are some tips that’ll help you overcome your fears and help you fill your closet with stretch velvet: Choose the right pattern: This crushed stretch velvet has great stretch and recovery so it’ll work on a pattern for knits, but what’s most important in choosing a pattern for this fabric is the design. Simple lines and fewer pieces are a great way to insure success and since the fabric shines on it’s own anyway, there’s no use choosing something complicated. Both of the patterns I chose have 5 pieces each and require very little pressing. Which takes me to my next point... Careful when pressing (you don’t want to crush your velvet): I try to press as little as possible when working with any velvet but when you do need to press, use the coolest iron setting that will work and press from the wrong side...always. In addition, press velvet against velvet. You could use a fancy needle board but why when you can use a scrap of velvet? Have your scrap velvet face up on your ironing board and your project face down so the pile of both are together. On curvy seams, I laid my scrap over my ham to press. Be mindful of the nap: This fabric has a one way nap so when cutting and sewing make a quick double check to be sure everything is facing the same direction.
Roll your fabric to eliminate creasing: After cutting, I rolled my pattern pieces with my velvet to keep creases from forming. Test your stitches: I do this on every project. Since this fabric is technically a knit, a ball point needle and a narrow zig zag stitch with a long stitch length worked well for me but use whatever works for you. The stretch stitch on my machine (it looks like a lightning bolt on the stitch guide if you have one) is too close together so if I have to take a seam out (gulp) it’s too hard to take out! If you have a walking foot, use it: It’s not necessary but it will help.  You’re not going to believe me when I say this but use a fabric glue stick if you need to: When it came time to fold up my hem and I wasn’t able to press it in place, I sparingly used a fabric glue stick (not regular glue stick!) to keep everyone in place. Although it washes out and this fabric is washable, I didn’t want to make my project too gooey, so a dot here and there on the hem and when folding the neckbands in half really helped.  Thank you Cali Fabrics for the opportunity to sew with these lovely fabrics.
Sewing friends, enjoy 20% off the Georgia Top PDF Pattern on the Blue Dot Patterns website for the month of November! Use code: CALIFAB. I wish you well in your holiday sewing and festivities. I know you’ll look great in your velvet! Happy sewing, Diane #bluedotpatterns, #simplicity patterns, #sewover50, #holidaydressing, #holidaysewing  I wanna be your Valentine this year so I'm offering all PDF patterns in the store at 2 for $14 with coupon code BEMINE. It's only one day!!!! Offer ends 2/14/18 at midnight PST! Enjoy!
|

About MeHi! I'm Diane, a wife, mom, sewing teacher and pattern designer from sunny Southern California. I share my sewing adventures here on the Blue Dot Blog formerly Gatorbunnysews. For more info click here. 
Categories
All
Archives
October 2022
|


 RSS Feed
Proudly powered by Weebly