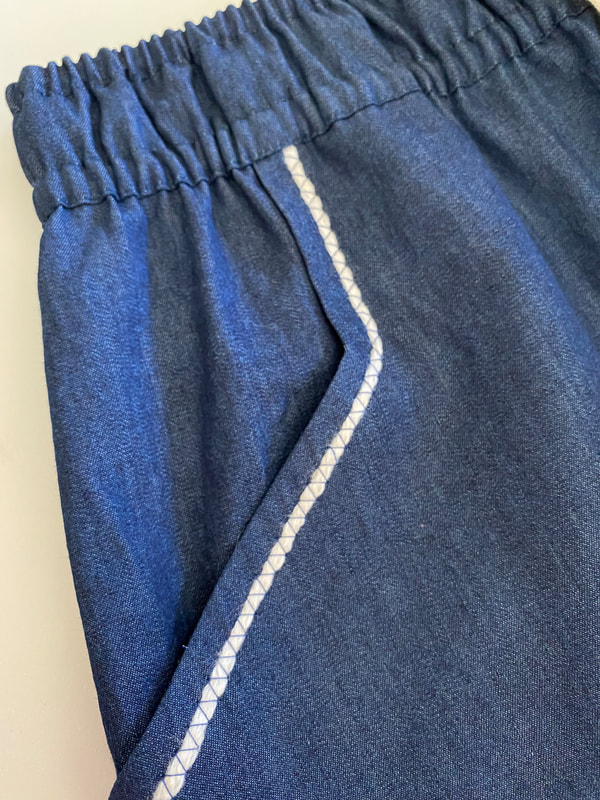
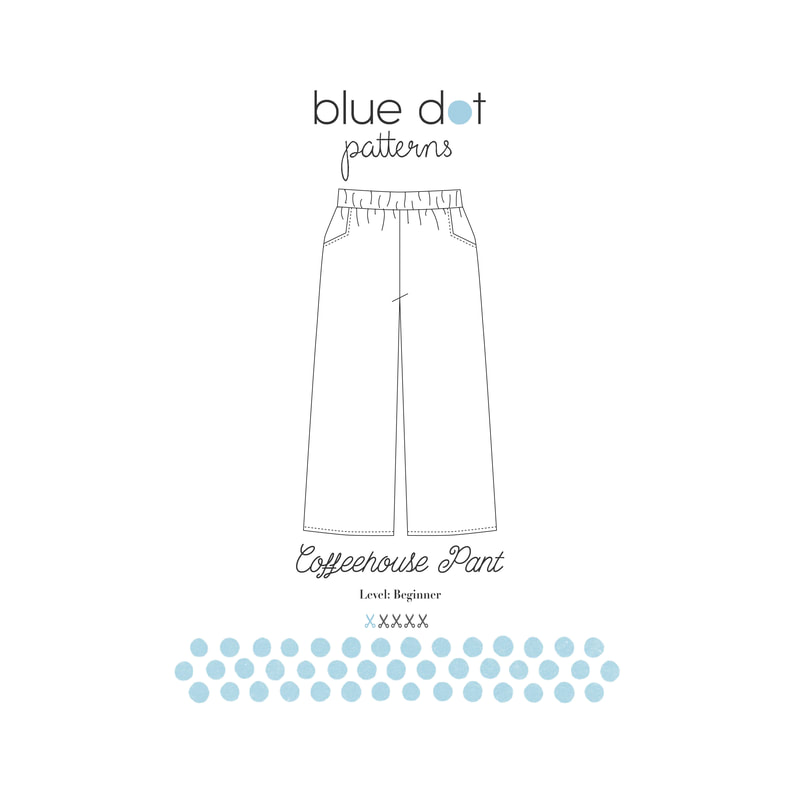
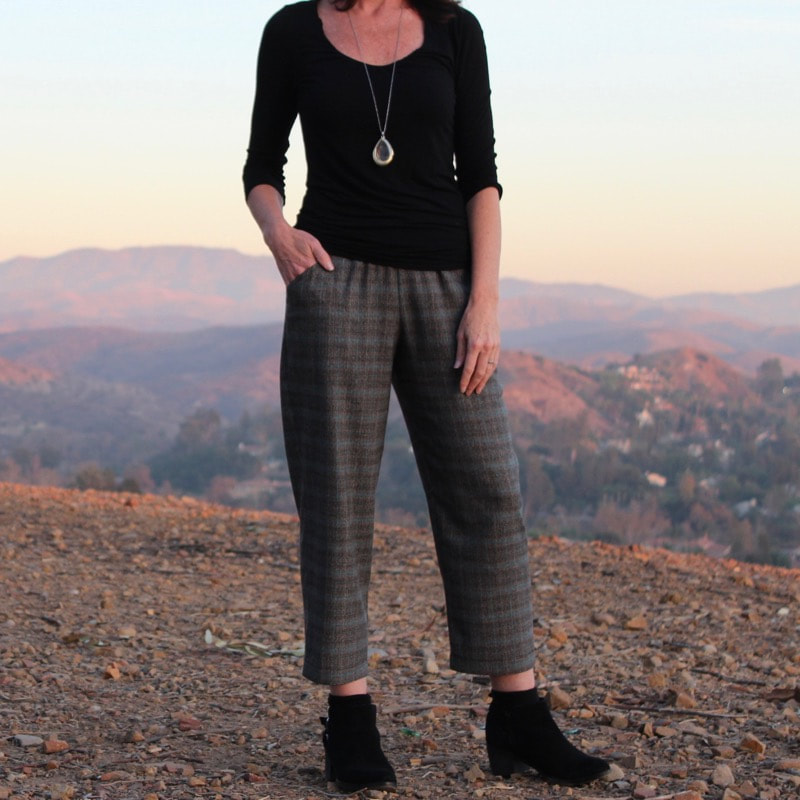
 I've been experimenting in the sewing room lately because I've been inspired by many of the details you sewists out there are putting on your clothes. I'm ready to make fewer garments with more details and embellishments. My lifestyle and the climate I live in really lend itself to simple, comfortable and easy to wear clothes. The Coffeehouse Pants are just that and are a blank slate for creativity!
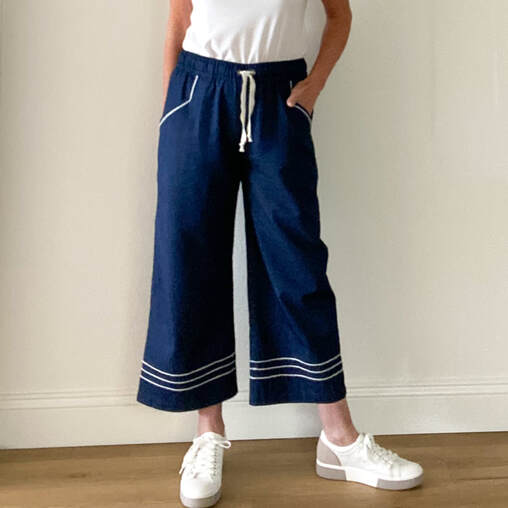
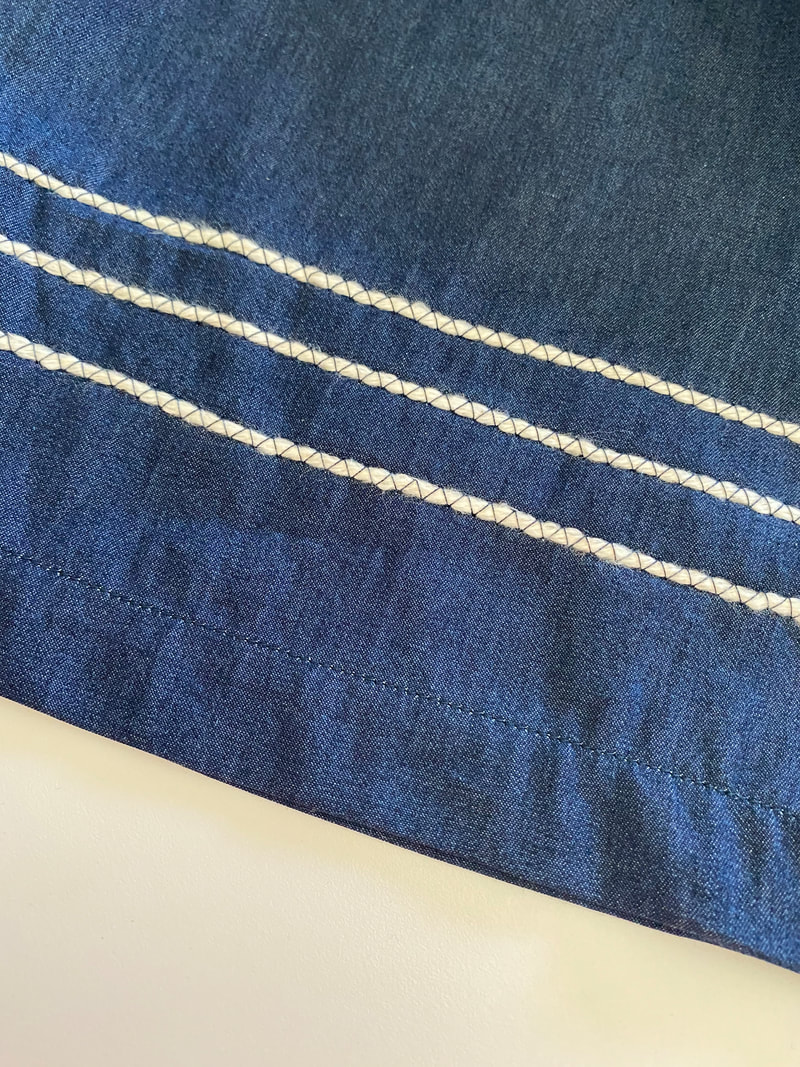
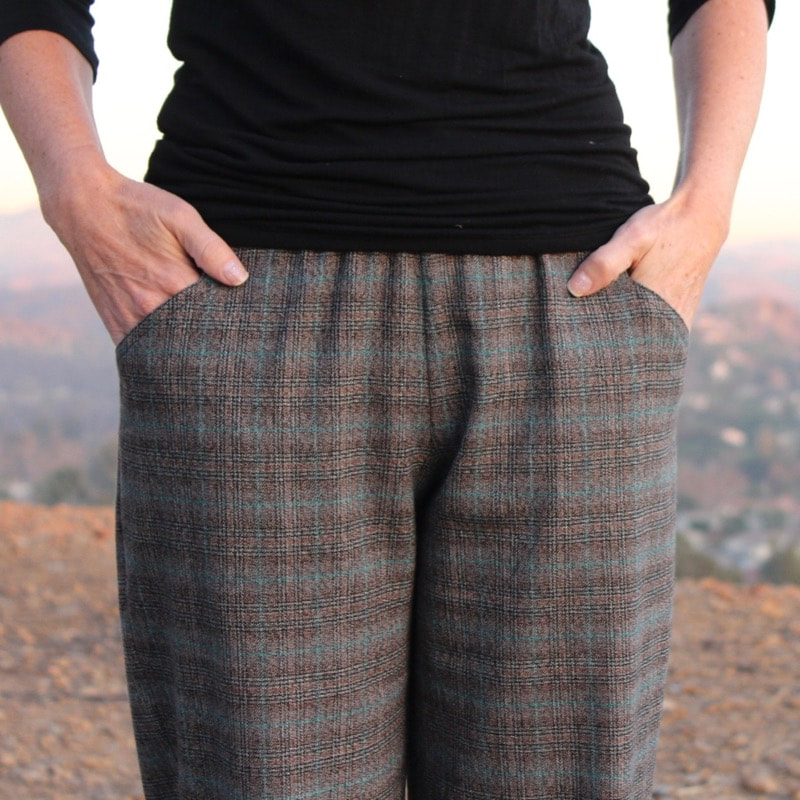
These are an elastic waist, straight leg cropped pant. I've made so many of these and I wear Coffeehouse Pants at least 4 days a week. But in all of my makes, I've never embellished the pant leg. I've been experimenting with "couching" which is a technique where you take a fiber, in my case I used scraps of yarn that I had from left over crochet projects, and use the zig zag stitch or other wide stitch to anchor it down. 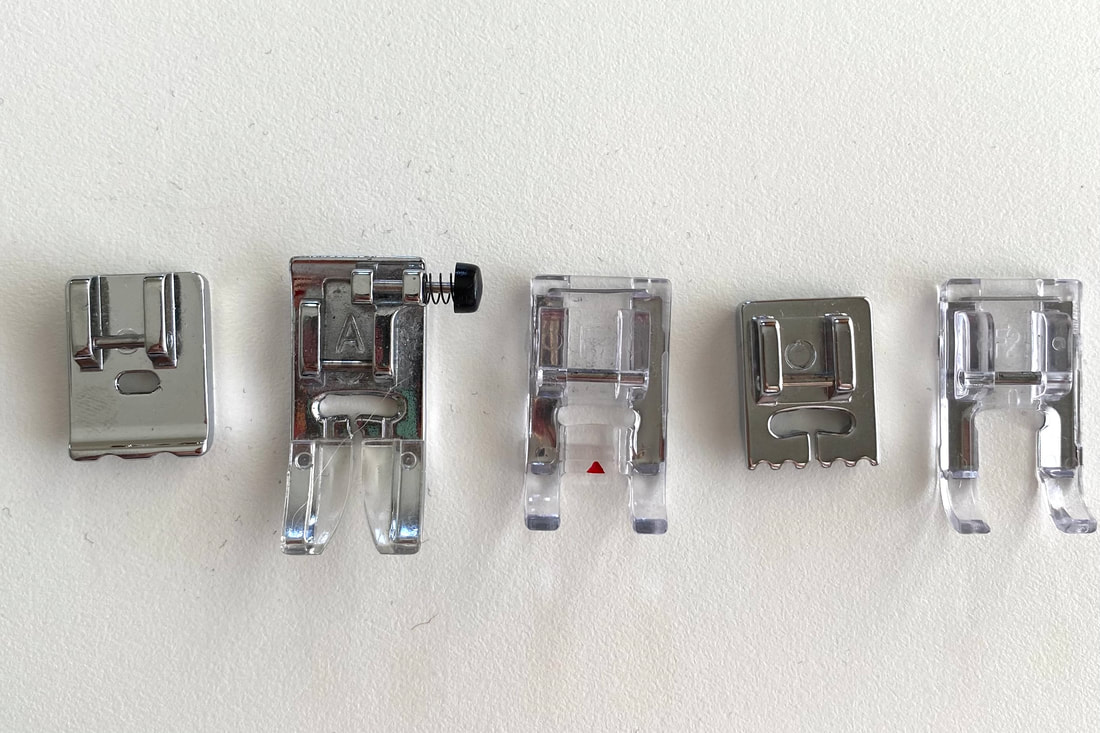 I used the "trial and error method" (turns out I've used this method A Lot in my sewing career... eh-hem!) with lots of different feet on my machine and found there were actually several ways to do this. I tried (from left to right) the piping foot, regular foot, clear view foot, pintuck foot and open toe foot. All but the open toe foot worked for me but my favorite is the clear view foot (that little arrow keeps me right on track and I'm able to load the yarn under the back of the foot and through the opening keeping it feeding smoothly). This foot or a foot very similar probably came with your machine so you may be able to get by without purchasing something new...although new feet are really fun! 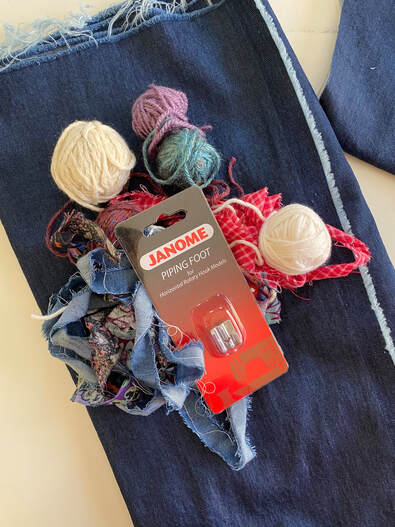 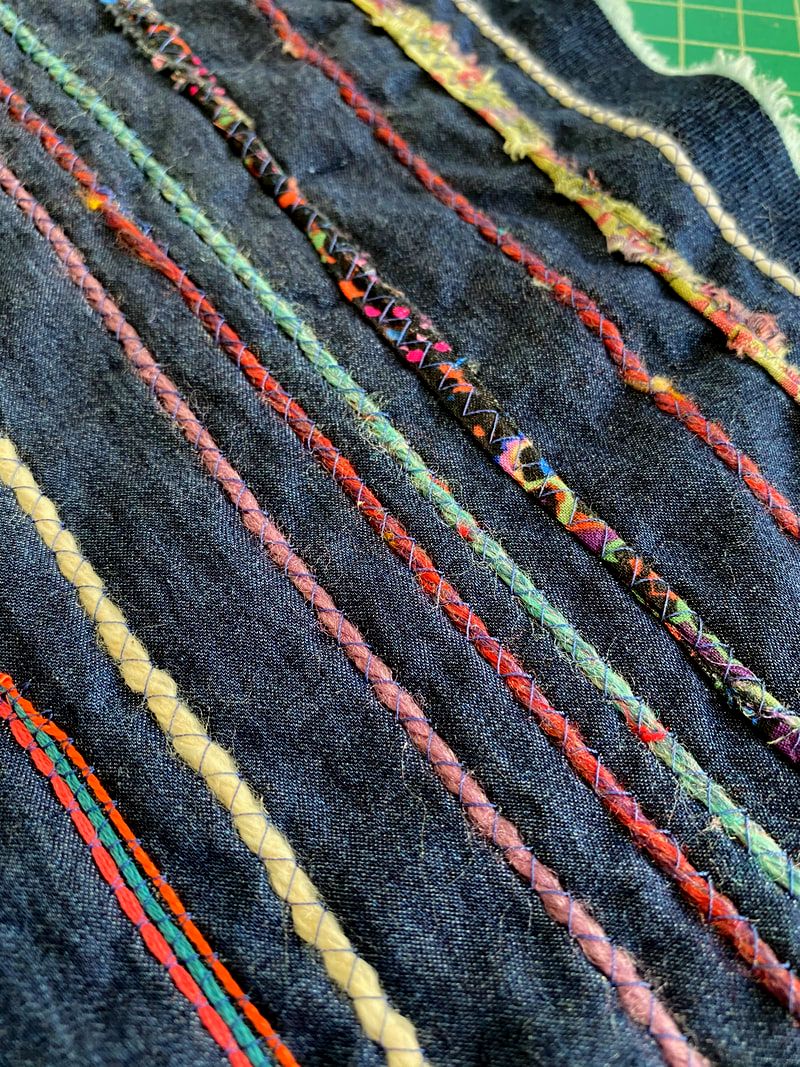 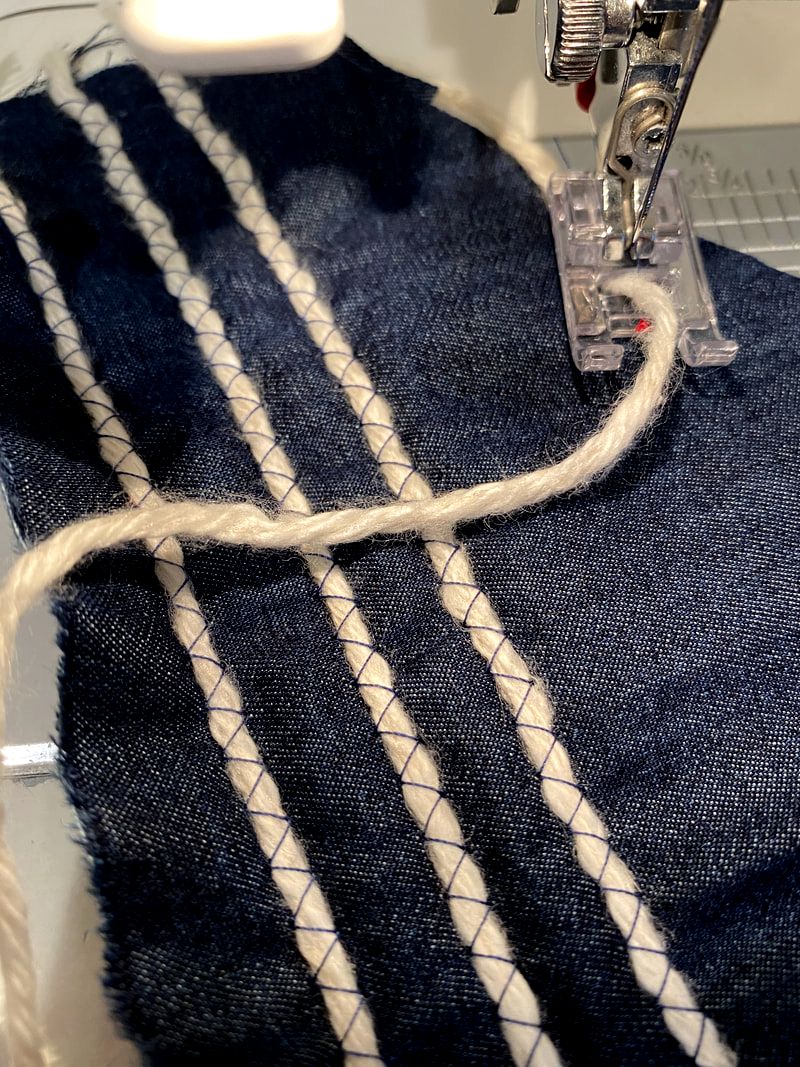 To experiment I used worsted weight yarn, double and triple yarns and scraps of fabric. I'm not gonna lie, it was difficult for me to decide which way to go. I decided to go with the creamy colored nubby yarn (you can see how I loaded it through the foot above) but do expect to make other pairs with the same fabric and different colored embellishments. Already, I made a denim top with black and white yarn. To say I got obsessed with all of this could be accurate but I prefer to think of it the same way my friend Cari did..."Diane, you have your creative flow going." Yup, that's it, I have "flow". Everybody needs a friend like that! 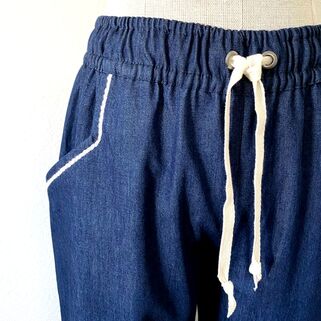 I used a 4 ox. dark wash denim which really is the weight of a chambray, widened the leg slightly and added a twill drawstring with grommets. I added the yarn to the pockets and 3 rows of stitching 3/4" apart beginning 2 1/2" from the hem. They're comfortable, fun and it feels good to make something creative and unique and "in the flow"! 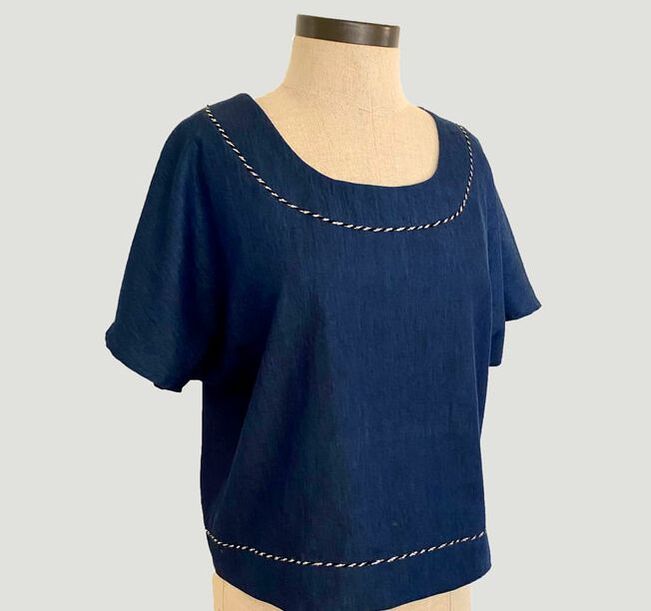 Here's sneak peek of the top I made with black and white twisted yarn. It's a pattern that's coming out very soon!
The Thanksgiving Sale is here so now's the time to grab the Coffeehouse Pants pattern or ANY PATTERN FOR 20% OFF, no code needed now through the 28th! Happy Sewing Friends! Diane
4 Comments
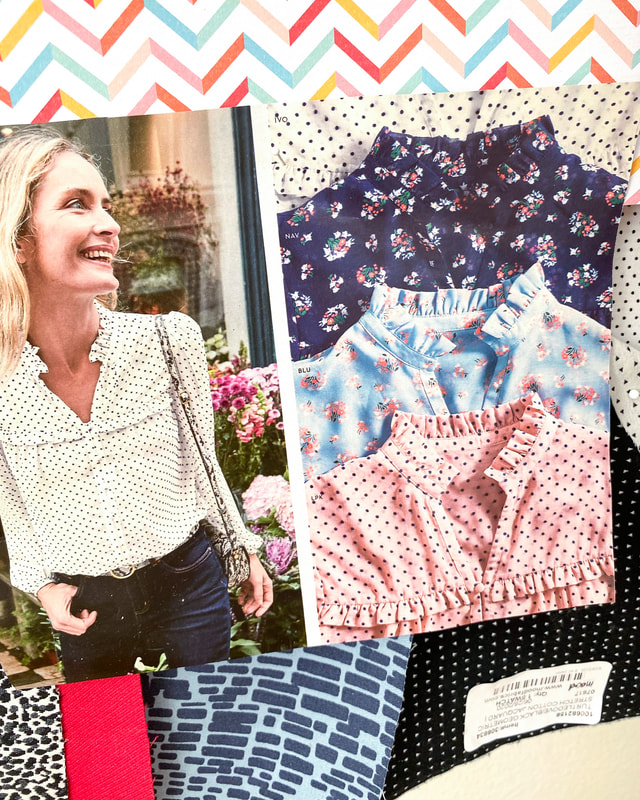
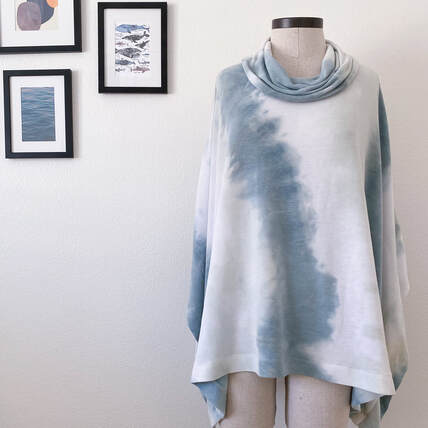 I have a brand new pattern just in time for fall and winter! The Wintertide Poncho is an easy to sew (I mean really easy!) and quick cowl neck poncho pattern with contrast bands. And as an added bonus...no need to worry about fitting! Make it up in a beautiful wool sweater knit for a sophisticated topper or sew it in a tie-dye French Terry you can throw on instead of a hoodie. Gift giving season is coming soon and this would be a quick and easy piece to sew up for a friend! It's on sale for just $6 so grab it and enjoy! I'd love to see what you make so tag it #wintertide poncho! 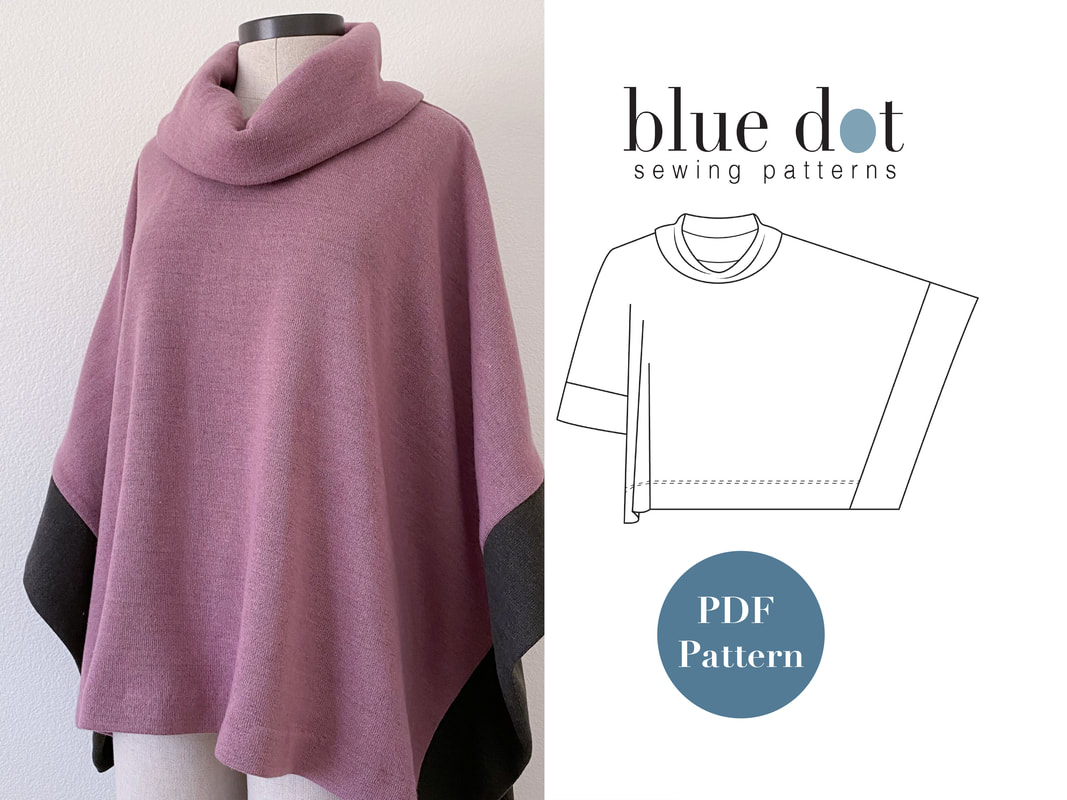 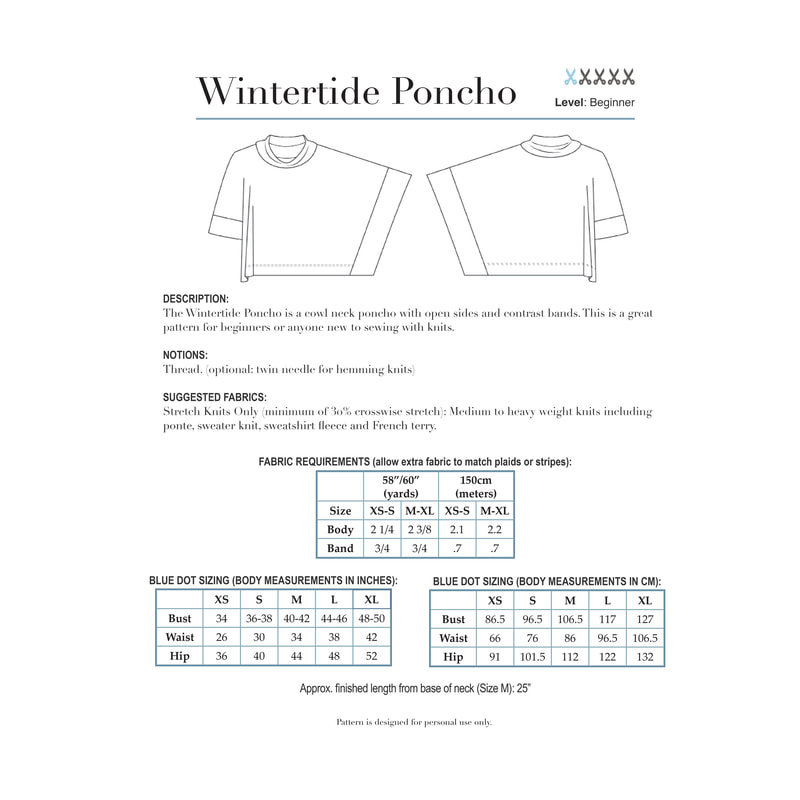 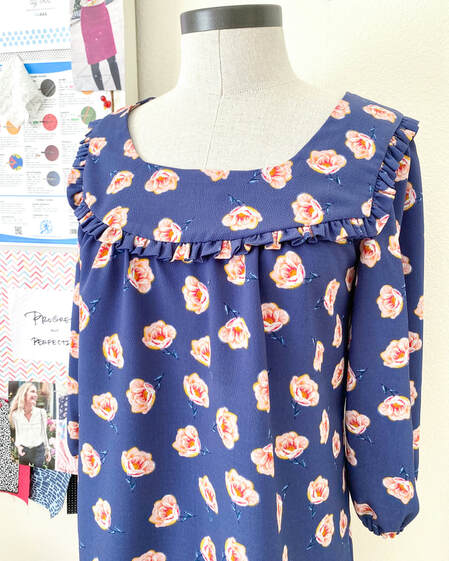 This fall I released the updated Margo Blouse and had some fun making new versions for my closet. Ruffles made their debut on the yoke of the Margo Blouse and to add to the fun I made the New Dover Jacket in pink! Although I've made both of these patterns many times, these pieces both have something special something that makes them new.
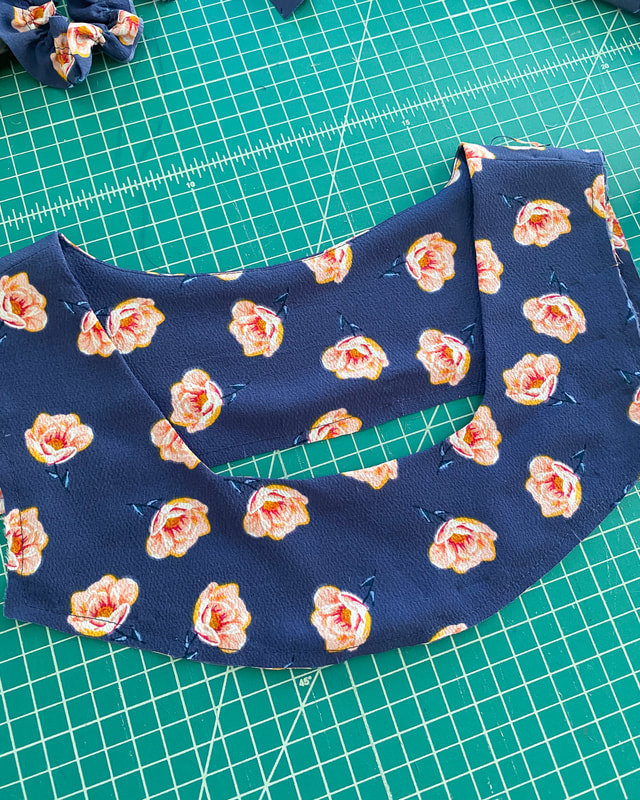
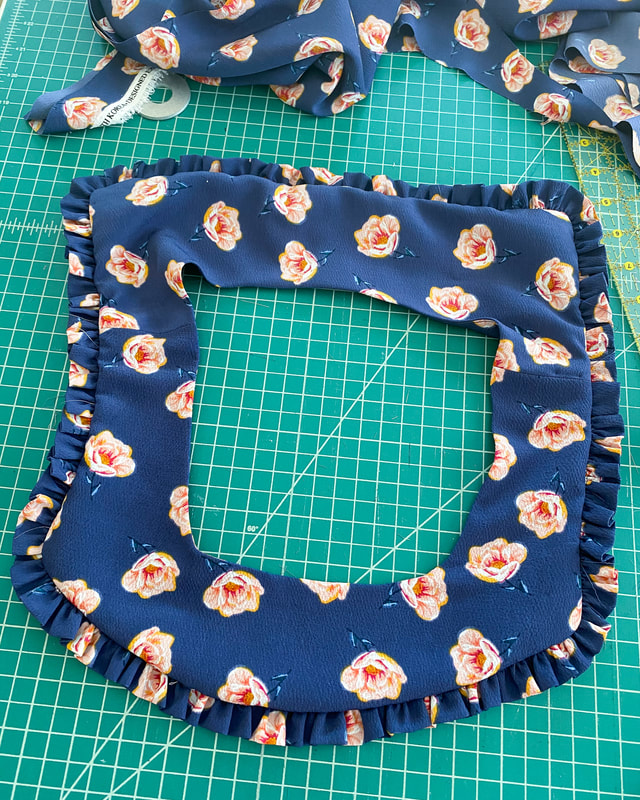
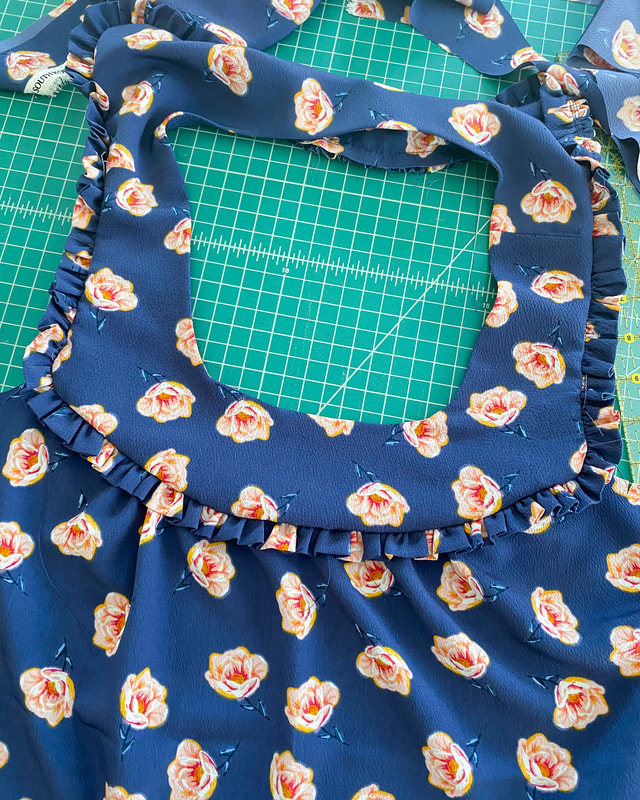
Adding ruffles to the Margo has been on my list for quite a while. My inspiration board is full of photos with inspiration for adding ruffles without adding too much frill. After lots of experimentation I landed on adding ruffles around the entire yoke, both front and back.
Here's how I did it: For a 5/8" finished ruffle, I cut 2 strips of fabric 2 1/4" wide by the width of my fabric, pieced them together, folded and pressed the strip in half lengthwise. Ran 2 rows of basting stitches, and pulled on the bobbin threads and gathered the entire strip. Constructed the yoke and facing and basted them together around the perimeter. Basted gathered ruffle to outer edge of yokes. Continued constructing blouse. 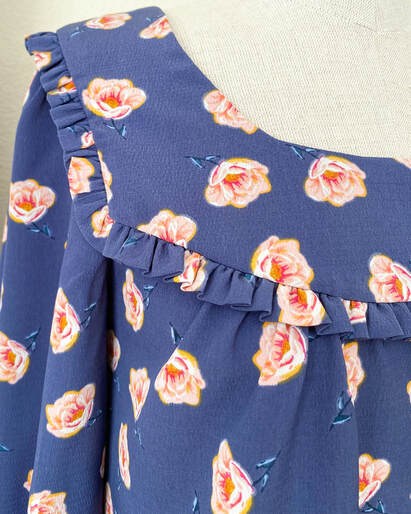 It got a little bit bulky at the corner so I did lots of grading, trimming and pressing to get everybody to lay flat. I used a poly crepe which isn't typically responsive to the iron, but I persisted and used the iron in combination with my wood clapper (if you're unfamiliar you can check one out here) and I'm happy with the finished product. 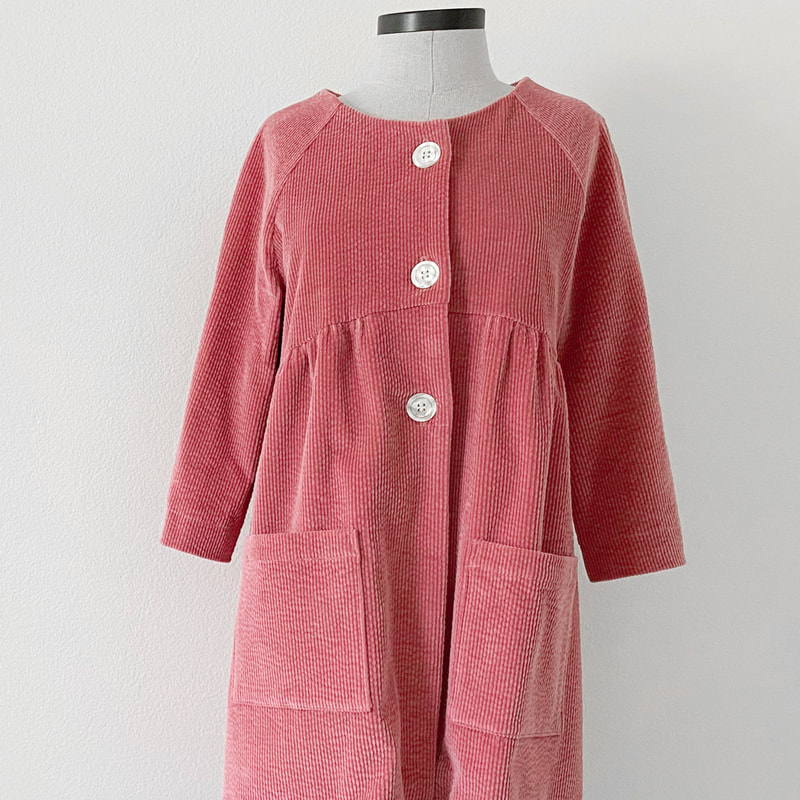 Let's face it, I can't pass up corduroy let alone wide wale pink cord. This is dreamy soft with a bit of a distressed texture and I would imagine it's just going to get softer with wear. I made the long version of the Dover Jacket and added large vintage buttons. I've worn this with the ruffle Margo blouse and also a simple t-shirt and scarf. I think it will get lots of wear this spring on crisp days. The roomy pockets are one of my favorite features on this jacket as they hold everything I need for a quick jaunt out. I didn't topstitch this version because I wanted to live with it first, but now I think I will go back and add some about 2" in around the neck and front. 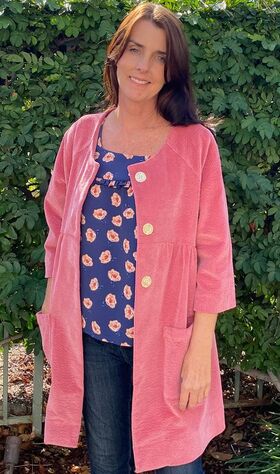 Happy Sewing my friends and may this year bring you all the good things!
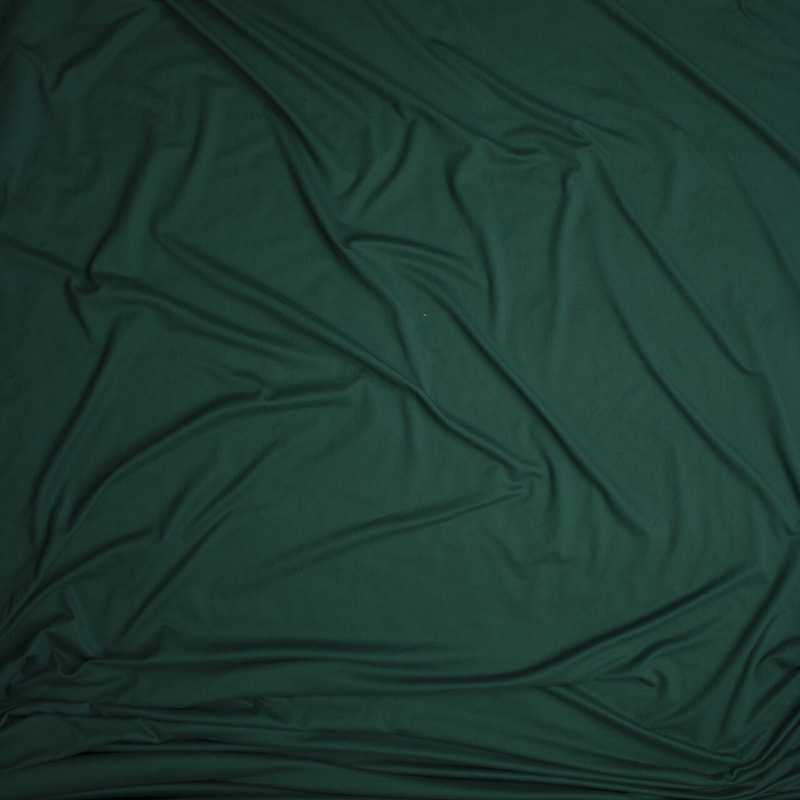
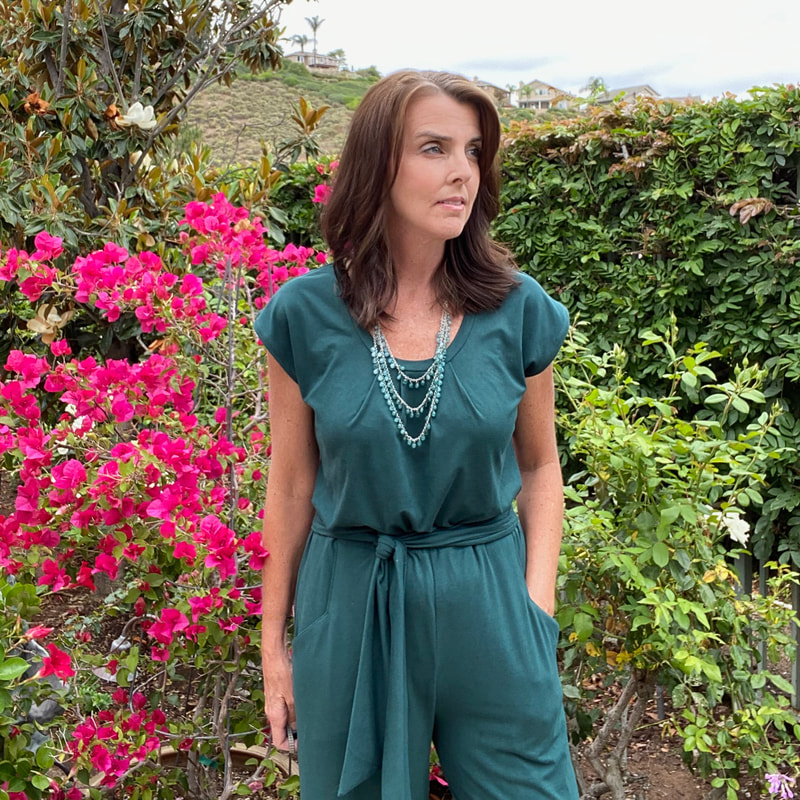
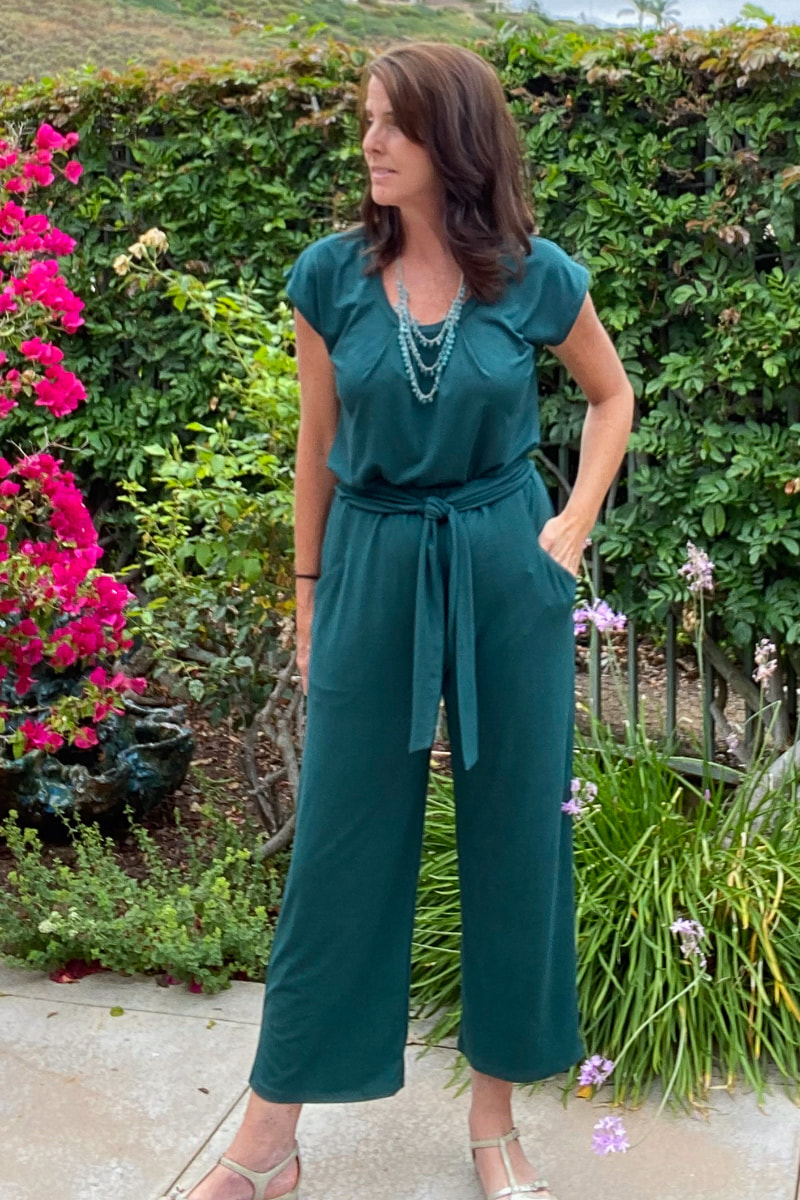
Diane 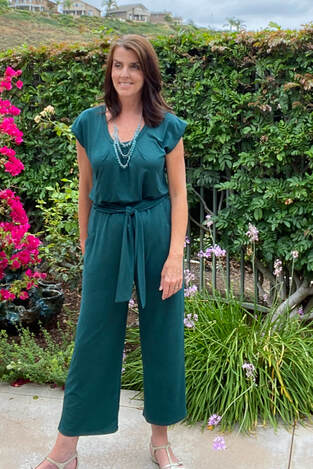 Jumpsuits are all the rage, both in the stores and in the pattern books. I’ve been inspired by all the different versions out there (I love this one from Made By Laquana) but I have to admit, I’ve been reluctant to make one since I really don't want to deal with the "operational issues" that come with wearing a jumpsuit. The best part of sewing, however, is we have the opportunity to solve these fashion issues that might otherwise hold us back. I made up two of my most used patterns in the same fabric and now have my faux jumpsuit and as a bonus, two additional separates for my wardrobe. I'm excited to be a guest blogger for Cali Fabrics and have the opportunity choose fabric from their large collection of knits for my "jumpsuit". The emerald green double brushed poly from Cali Fabrics was my jumping off point for this project because I knew I wanted something comfortable and in a beautiful color (it comes in a large selection of both solids and prints, too!). If you haven’t used double-brushed poly before, it’s definitely a knit to try. It’s stable (keeps it’s shape), soft, washable and doesn’t curl when you work with it. If you’re new to knits and need something light to mid weight, this is a great place to start. And on top of it all, it’s pretty wrinkle free so it travels well. The fabric has a 59" inch usable width and took 4 yards to make the top, pants and tie. I paired the Morrison Top and Coffeehouse Pant patterns (both are in a "Summer Bundle" sale for $15!) because they are versatile enough to adapt to a project like this. Needless to say, I have several versions of these patterns already in my closet but reinventing them as a jumpsuit makes them look completely different. I sewed the top in a straight size 6 and made a few easy changes to the pant pattern to give it the “jumpsuit” look I was after. Here are the changes I made: Widened the pant leg 4”: At the pant hem, I added 1" to the width at both the inner and outer leg and blended the seams. Added 4” to the rise: I raised the rise on the front, back, pocket and pocket facing pieces. This included 2 1/2” to bring it to true waist and 1 1/2” for a fold over casing. Used 3/4” elastic: Instead of the 1 1/2” the pattern calls for, I used narrower elastic since it would hit at the true waist. Made a fold over casing instead of a waistband: This reduced bulk at the waist. Added a 3” x 58” self tie. I cut a 7" x 59" piece of fabric, folded it over, right sides together, and stitched.  As I was making this outfit, I realized this would be a great option for a capsule wardrobe. Make up these two pieces in a navy or black double brushed poly and you'll have a great foundation for a mini wardrobe. Add a striped cardigan and floral skirt and you'll have a weekend getaway capsule that's easy to pack and wrinkle free. So many projects, so little time!
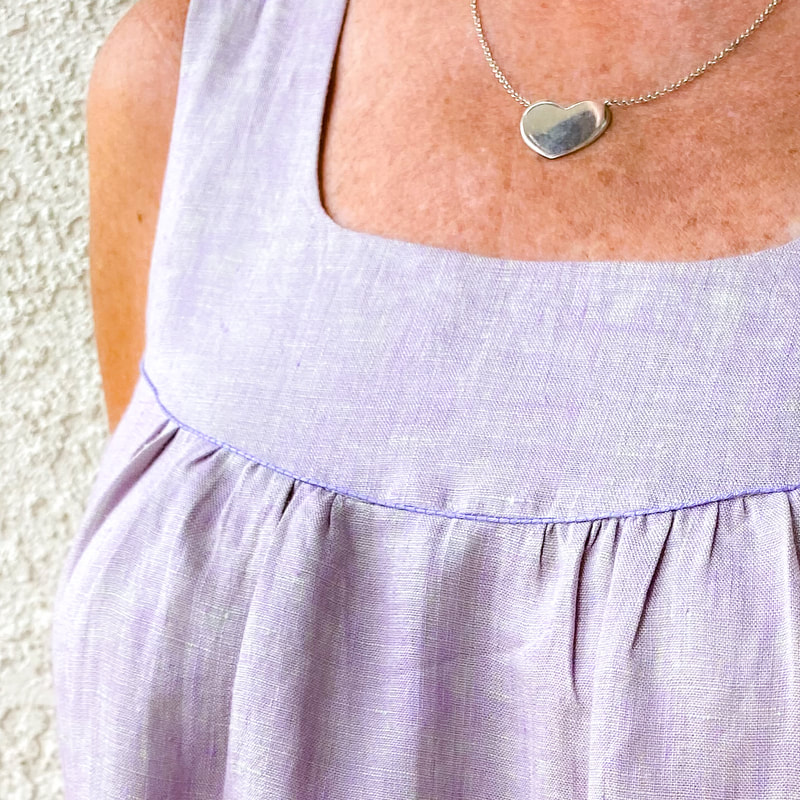
I want to thank Cali Fabrics for the beautiful fabric and inspiration. It's always a pleasure working with you and your gorgeous fabrics! Happy Sewing, Diane  Once it starts creeping into the 90's here, I begin dreaming of summer shift dresses (check out my Summer Frock Pinterest Board), The ideal dress is comfortable in the heat, versatile enough to work in (water plants, sew and run errands too) and look good enough to go out to dinner because let's face it, who wants to cook when it's this hot?! Enter the Margo Dress!  As many of you know, one of my goals as a pattern designer is to create versatile patterns that can be used over and over. It's so much easier to start with a base pattern that you know works and use it as a jumping off point for creative and unique pieces. The Margo Blouse is one such pattern. 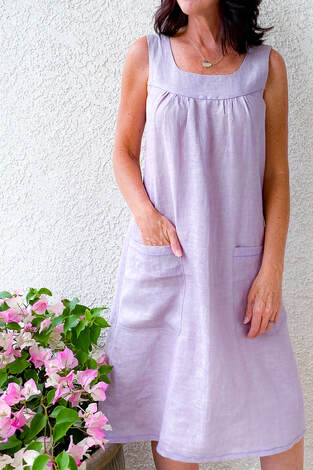 I used 2 yards of iridescent linen from my stash and coordinating DMC embroidery floss for the contrast stitching. Here are the changes I made:
That's it! Making the dress shorter or adding tiered ruffles would also make a beautiful romantic dress for the summer. Embroidery or lace added to the yoke would make a fun, bohemian feel. So many options! I have a Margo Blouse Pinterest board for even more ideas.
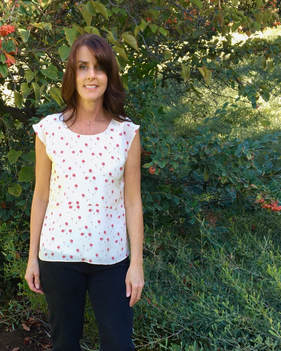
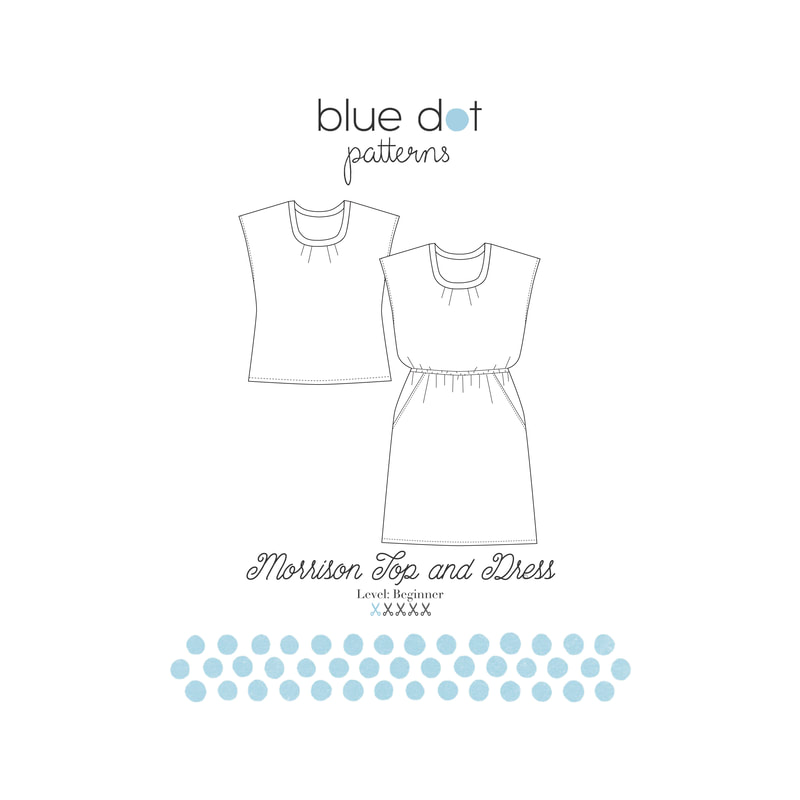
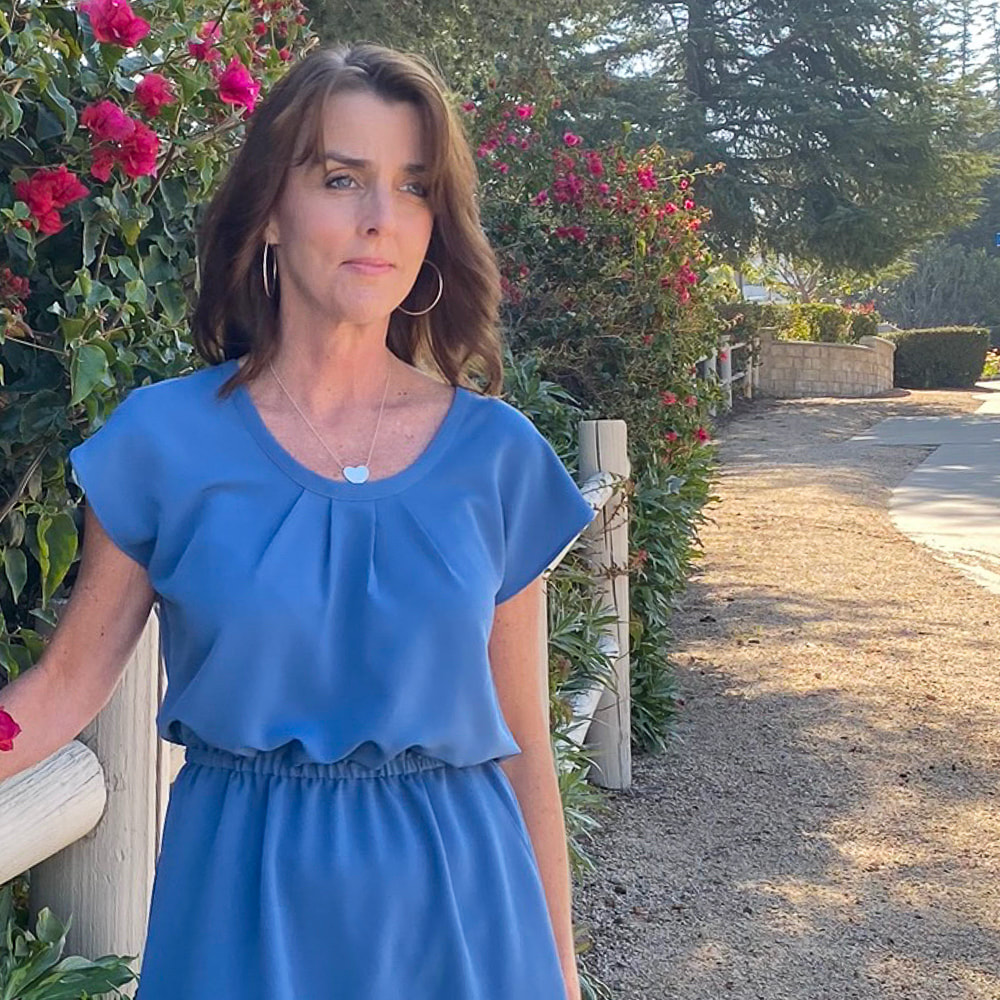
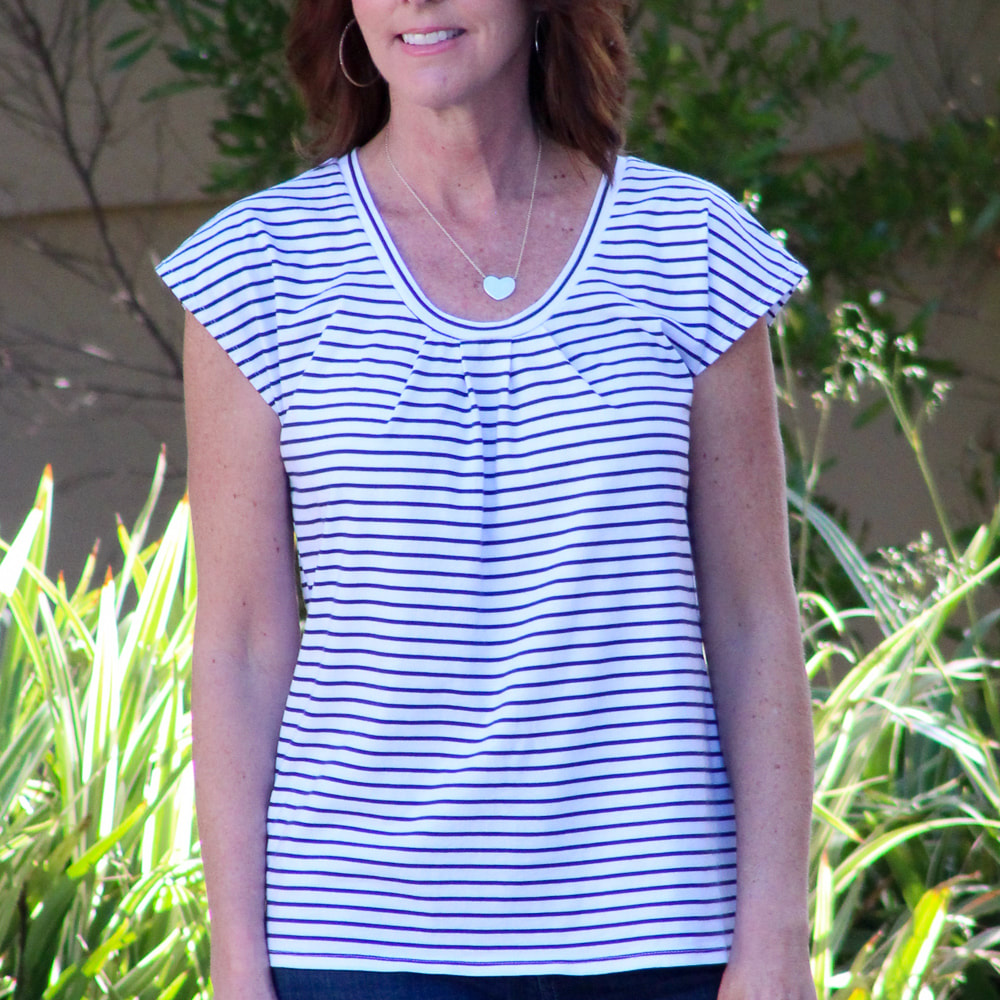
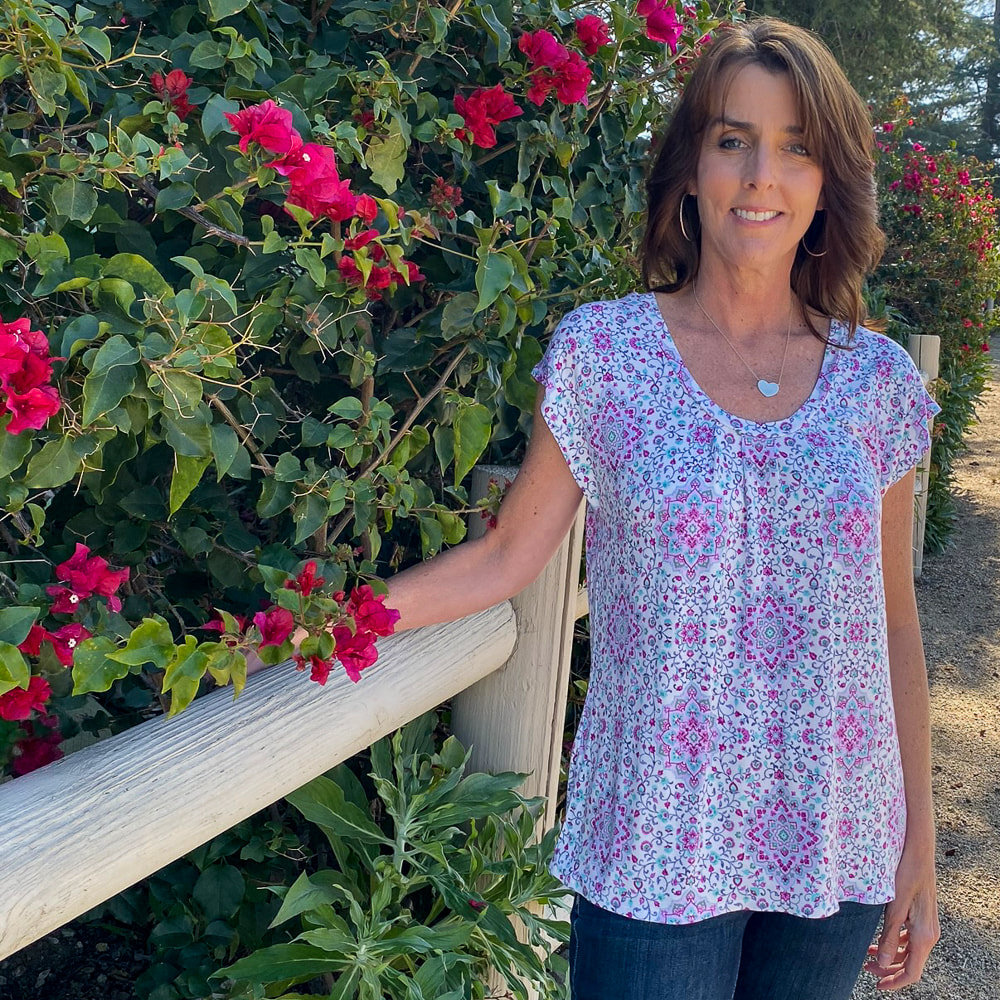
Happy Sewing, Friends! Diane 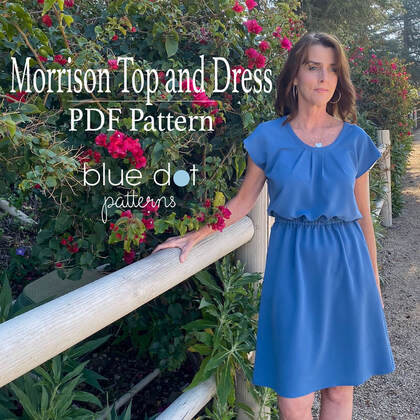 Yes! I have a new pattern to share with all of you! It's the Morrison Top and Dress PDF Pattern! This easy to sew sleeveless top or dress pattern has a scoop neck and pleated bodice. The dress has an elastic waist and side pockets (of course pockets!). And both can be made in either knit or woven fabric. The pattern package comes with full color, illustrated instructions, tiled pattern and copy shop file. It comes in sizes 4-18 and sells for $10! 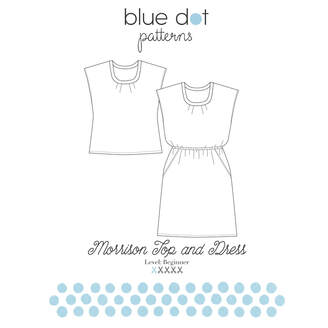 This pattern came out of a gap I had in my own closet. I was in desperate need of tops that were as easy to wear as a t-shirt but a little more elevated. As I was designing this I realized I could add the option of making it in a woven and then would also have a versatile and comfortable shell. Then I just kept going and added the dress. I can tell you I live in these dresses especially because I work at home and want something that's comfortable but isn't sweatpants! Uh-hem! I just pull it over my head, add a necklace and I'm good to go!
If you're new to sewing this is a great pattern for you because it's easy to sew and easy to fit. Start with the top as your first project because it only has three pattern pieces then move on to the dress as your second project. And if you're a seasoned sewist you can use this pattern as a quick wardrobe builder and as a great basic to be creative with. You can add piping to the pockets (one tester did this and it's adorable!), change the bodice pleats to gathers, add a drawstring with eyelets and a tie...the options are endless. One of my goals as a designer is to create affordable AND versatile patterns that can be used over and over again!  I had some wonderful testers that helped me with the Morrison Pattern and I'll be sharing their makes soon along with some tutorials on making this your own.
I really hope you enjoy it!  I wanna be your Valentine this year so I'm offering all PDF patterns in the store at 2 for $14 with coupon code BEMINE. It's only one day!!!! Offer ends 2/14/18 at midnight PST! Enjoy!
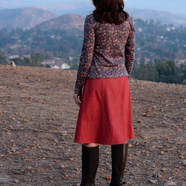
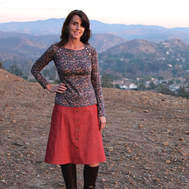
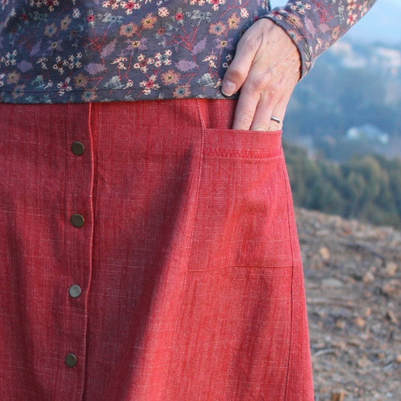
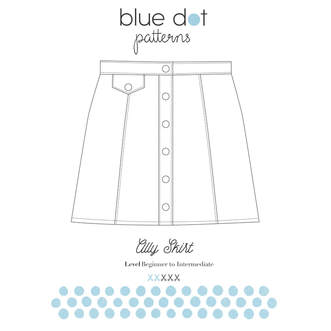
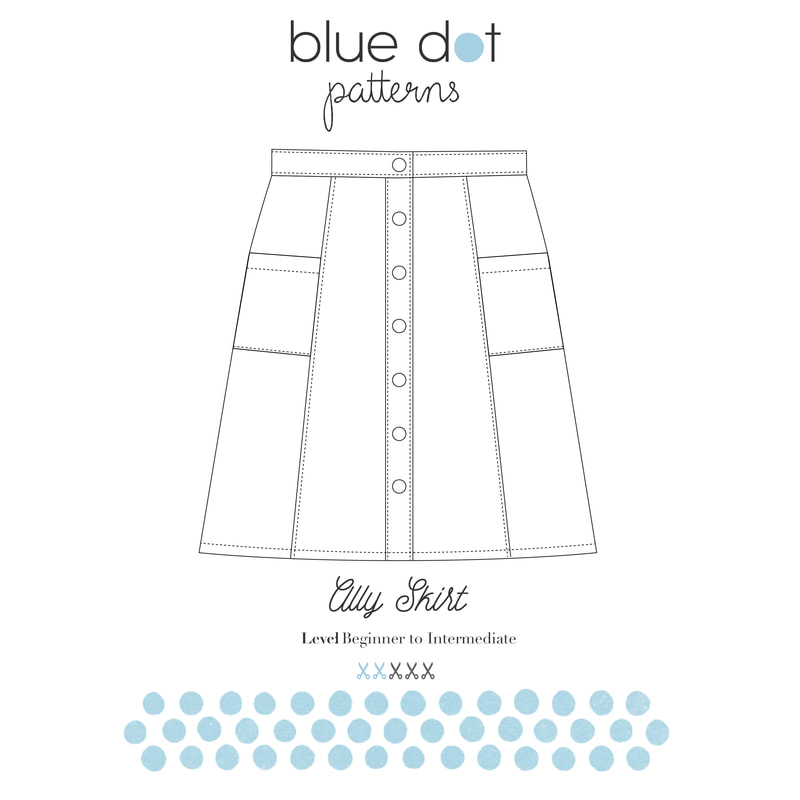
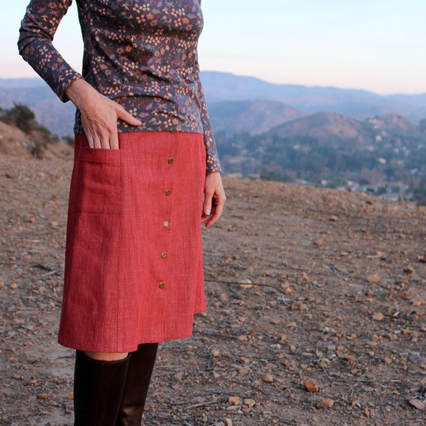 I'm still riding the "it's the new year and I have so many things I want to make" inspiration train so I thought I'd share not only my new Ally Skirt but also some inspiration. This skirt is made from a brick red denim from Fabric.com by Art Gallery Fabrics (did I know they made colored denim?) and brass snaps. 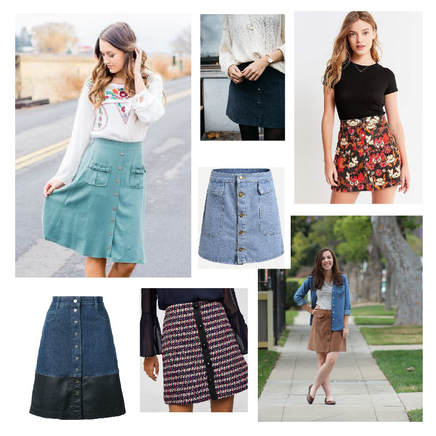 The Ally Skirt pattern is an easy and quick pattern to play with. It comes with 2 pocket options (flap and side seam) but it'd be really easy to add a patch pocket with ruffles (like the aqua cord skirt above) or an oversized pocket with flaps. I love the idea of adding contrast either by a solid placket on a print skirt or adding a leather border to denim (bottom left) like the $698 Stella McCartney version. Seriously, why not copy the good stuff and save yourself a few hundred dollars!
Here, I added a decorative machine stitch to the pocket. And in this version you can see the decorative stitches I added along the seams.
Be sure to check out my "Sassy Skirts" board on Pinterest for more. So much inspiration....not enough time, right?
What are you making? 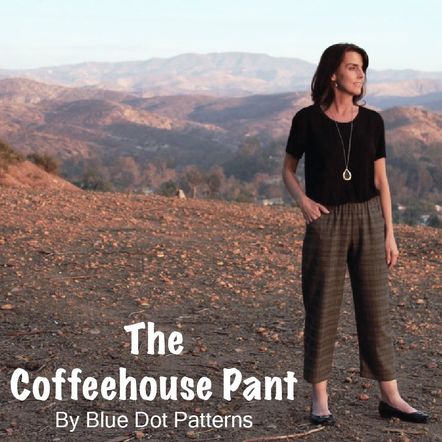 I’m very excited to start the new year with a new pattern! Say "Hello" to the Coffeehouse Pant! It’s an easy to wear and even easier to sew ankle length pant with front notch pockets and an elastic waist. It's available today and is on a NEW RELEASE SALE for 20% off here on the website and at Upcraft Club until January 14th! 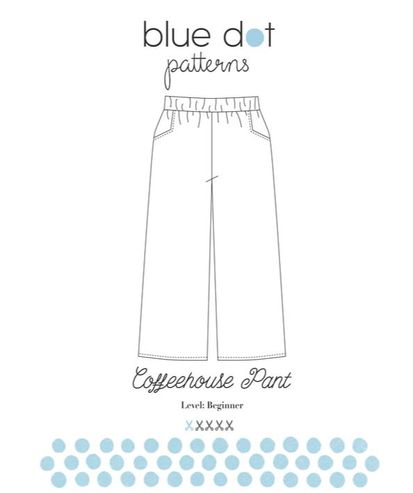 Let me introduce you...
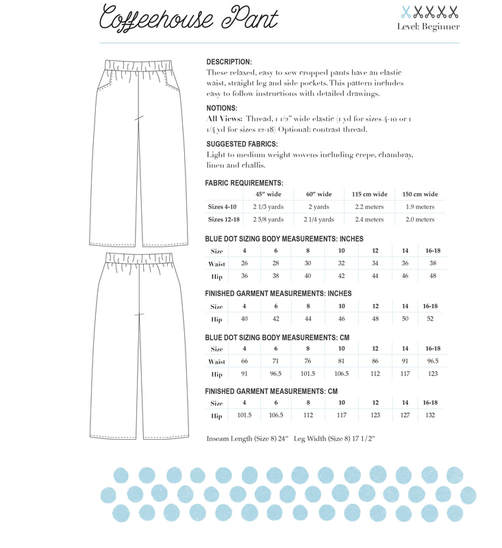 The Coffeehouse Pant sews up nicely in light to medium weight fabrics ideally with some drape. Linen, challis, crepe and chambray would all be good choices. Look at the darling pants Kyla from LifebyKy made out of a soft suiting. 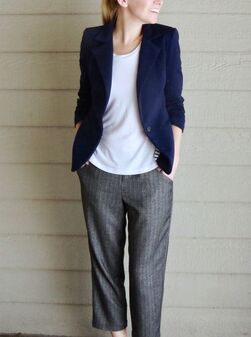 Grab a copy at 20% off at Upcraft Club and on the BDP website through January 11th! Don't forget to tag all your makes #Coffeehousepant and #Bluedotpatterns. Enjoy!
 Usually I like to keep my "fabric hauls" to 2 or 3 pieces of fabric because I get overwhelmed and ultimately something gets added to the stash cabinet and doesn't see the light of day. Well, I'm proud to say this didn't happen with my last haul from The Fabric Store in LA. I sewed everything up! Here's a beloved top made from a delightful rosebud silk crepe de chine. I eyed it when I first walked in and although they only had 1 1/4 yards left (apparently others liked it too) I brought it home anyway. 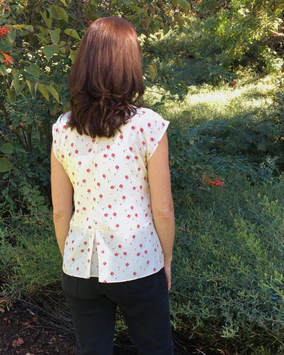 StyleArc's Rosie Top was already on my sewing list and what are the chances it would not only fit on 1 1/4 yards of rosebud fabric but also be called "Rosie"? It was meant to be. It's a simple peplum top that skims the body and has a darling pleat in the back. It sewed up in under 2 hours and honestly the teeny tiny hem (I'm quite proud of it) was the longest step. I've worn it with jeans, black pants and a straight skirt. It's versatile and comfortable and a peplum style without looking too fussy. 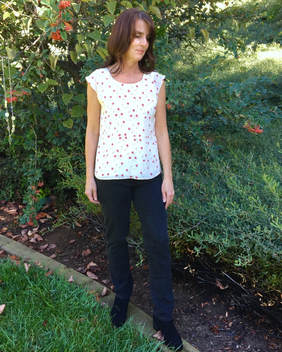 I've stitched up everything in this stack but haven't photographed it all. Unfortunately the light pink Liberty fleece on the bottom never made it back from our trip to New York. I'm not sure if it was left in the hotel room by accident or someone decided they needed it more than I did. Either way, hopefully it found a good home. An exciting note....there's a new pattern on the way! It'll be ready for your New Year sewing list. More details coming soon! 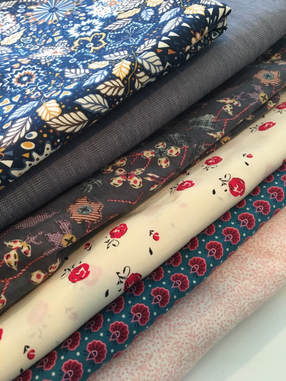 |

About MeHi! I'm Diane, a wife, mom, sewing teacher and pattern designer from sunny Southern California. I share my sewing adventures here on the Blue Dot Blog formerly Gatorbunnysews. For more info click here. 
Categories
All
Archives
October 2022
|


 RSS Feed
Proudly powered by Weebly