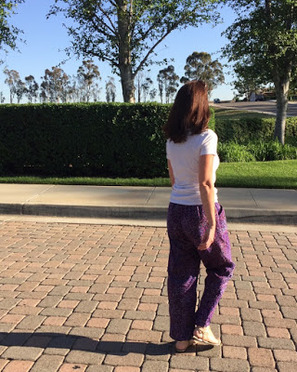
 A while back I saw an Instagram post of a pair of loose joggers that the sewist referred to as her "secret pajamas" (for the life of me I can't remember who made the post...if you know please tell me). That made me giggle and also made me realize I need a pair of secret pajamas too....but I'm calling mine "summer sweatpants" 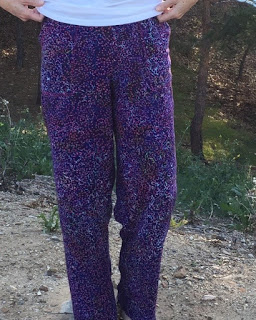 My biggest wardrobe deficit by far is solid or almost solid basics. Clearly, with all the prints I use I'm miserable at closing this gap but the other pieces I'm missing are everyday comfortable pants to wear when I'm running around. Sweatpants really, but something light and pretty for those days when temperatures hit the 90's. These rayon batiks were just delivered to Fabricland and I couldn't pass this one up. It's perfect for pants because it's light, washable and comfortable to wear. I always prewash my fabrics and for this fabric I washed it in warm water and dried it on a medium heat to take out any shrinkage. 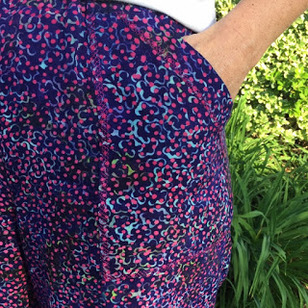 I used Butterick 6137 with pockets. There are several leg opening options for these pants but I added 2" to the length and left the legs open. To be honest I'm a little leary of the "jogger" trend because of my body shape but I may add elastic to the ankles for my next pair 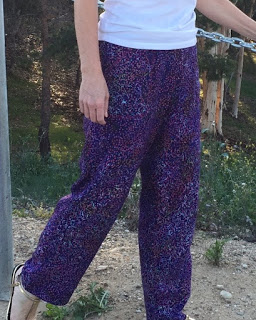 Word of warning here, these pants are high waisted...I mean really high waisted...like they could easily be granny pants. I shortened the crotch depth 2" and they still landed near my waist. I'll shorten them even more next time and bring the side seam in to give them a slimmer leg. 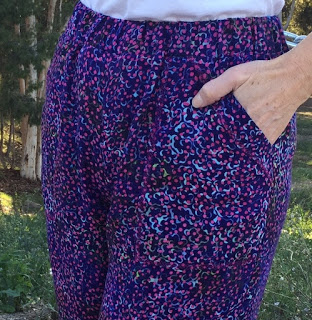 My favorite part of the these pants are the pockets. I attached them using a decorative stitch in contrasting thread. Rayon can get a little "squidgy" so to keep everything even and in place I used spray starch when I placed and pinned my pocket before sewing. It worked great! 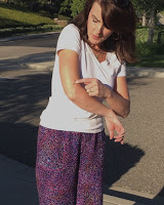 I had a ladybug land on my arm. Lucky day!
What are you sewing?
1 Comment
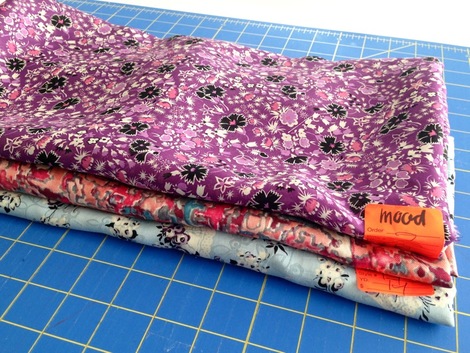
 A while back I had a Cynthia Rowley shell pattern that I really loved. It was a tank with small gathers and bias trim around the neckline. I made it up in a silk twill I bought in New York and I LOVED that blouse! I wore it and wore it and finally I had to accept that it had to come out of rotation. It needed some time off. 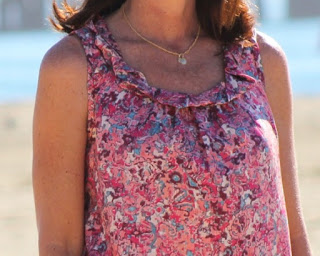 A couple of weeks ago my dear childhood friend from Nebraska came out for a visit. She was able to stay for two days and since she's a fabric lover we went to LA for fabric. We went to Mood and The Fabric Store and I picked up a few prints, a couple of bottom weights (I really needed some basics but you know how it is...) and this silk twill. When I saw it at The Fabric Store I knew I would make up my beloved shell again. This time I used New Look 6035. It's a great basic pattern and I'm sure I'll use it over and over since I wear sleeveless tops so often. I made two changes to the pattern: 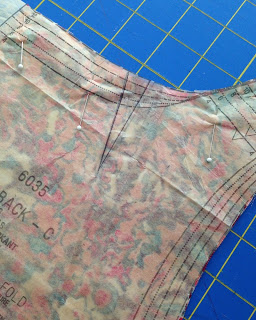 Shoulder darts were added to the back neck. I think the pattern makers in the sixties really had it right when they put shoulder darts on everything. It eliminates the icky gap I get at the back neck and honestly it's the easiest adjustment you can hope to make. 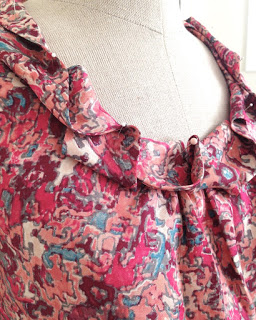 Twisted bias trim was added to the neckline. I cut strips of bias fabric 5" wide, pieced them together and sewed them into one long tube. I probably used about 90" of bias....maybe more...I wish I would've measured. Ugh.  Beginning at the center back, I gently twisted, pinned and folded the bias into soft folds. There was no rhyme or reason to my twisting I just kept working until I like how it looked. I'll be honest here, this took quite a while and when I was happy with the pinned result I hand sewed it to the shell. I do like hand sewing so this was enjoyable but all total this process probably took me 2 hours (primarily in the car or during my lunch break, I typically save my hand sewing for these times). 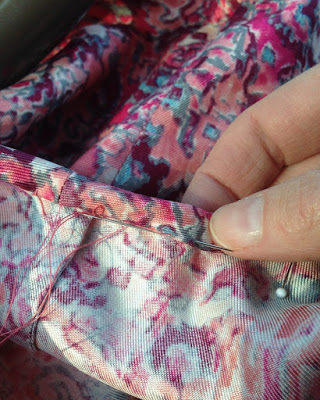 The shell itself went together in under two hours not including time spent stitching down the neck and sleeve bindings (again, I saved those for my "down times"). I will certainly use this shell pattern again. It's a great "basic but not too basic" pattern that I can keep simple or embellish 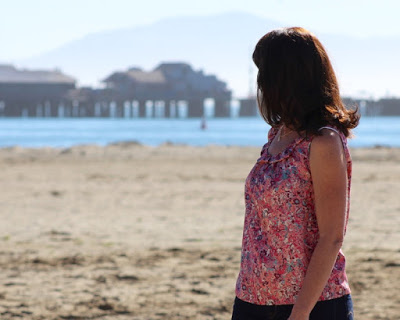 I went to Santa Barbara, California for a quick getaway with my daughter. The weather was perfect for hiking (and eating) and it was wonderful to have some time with her while she's back from school. She took these photos for me... I turned the camera on her....hee hee.  Thanks for reading. Happy Sewing!
 I love when people post photos of their stash no matter how big or small. I may admire the fabric, like the shelving but most often I wonder if they would share it with me if we were friends. Heehee. That said, I thought I'd post a photo of my stash and share how I fold it and how I make my fabric notebook of finished projects. 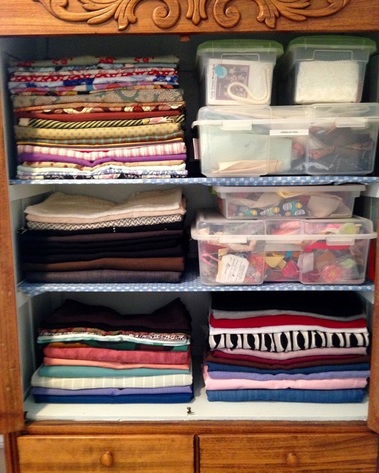 I store my fabric in a cabinet from my childhood. I like that I can close the doors and keep everything clean and out of sight but it also makes me feel at home. I keep saying I'm going to paint it (White maybe? What do you think?) but I never seem to get around to it. Top left is cottons, wool and silk are on the middle shelf, blouse weights are bottom left and bottom weights are on the right. The organizers hold trims and hardware for specific projects. This doesn't include notions I use everyday, interfacings, linings or patterns (that's a whole other story). Here's how I fold my stash:  I use an old shirt box top to keep all pieces the same size.  Fold both sides of the fabric in against the box.  Fold the bottom up against the box.  Pull out the box. 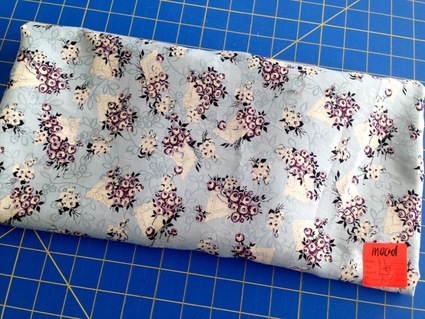 Fold again and voila! It's so pretty and tidy. I attach a sticker with width and length of the fabric. In this case, I used the Mood sticker that was already on the fabric. Lots of online fabric stores put a sticker on the fabric with all of this info too. 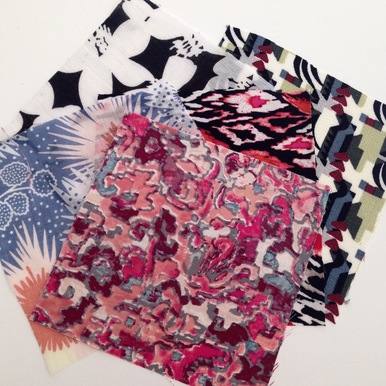 When I finish any project I cut a 5" square from the scraps and put it in a glass jar. I do this because I like to have a little piece of fabric from each thing I make because it makes is easier to part with the scraps. When the squares are piling up in the jar I add them to a notebook. I know there are prettier ways to make a fabric notebook but this works for me and doesn't take too much time. Sew Weekly has a free PDF that's really pretty if you want an option. Although it's designed for storing stash, I'm sure it would work for finished projects.  I use a simple sketchbook with a spiral binding (because is gets pretty fat after you add fabric swatches) 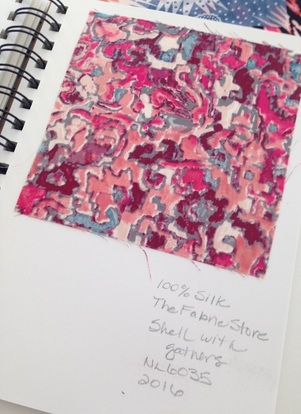 Using a glue stick, I stick the fabric on the page, write where I bought the fabric, the date and what I made out of it. It's fun to see the book grow and enjoy my hard work. And I get to see all the stash busting I actually do! Did you hear me just pat myself on the back?
What do you do with your fabric? Diane |

About MeHi! I'm Diane, a wife, mom, sewing teacher and pattern designer from sunny Southern California. I share my sewing adventures here on the Blue Dot Blog formerly Gatorbunnysews. For more info click here. 

Categories
All
Archives
October 2022
|
 RSS Feed
Proudly powered by Weebly